
VR User Interface
Tutorial
Beginner
+10XP
45 mins
(181)
Unity Technologies
You will learn how to:
- Create Crisp Text using Text Mesh Pro
- Import custom fonts from Google Fonts to use with Text Mesh Pro
- Precision Grab Interactable Objects that avoids "jumping" to your hand
Languages available:
1. New Canvas in World Space
- GameOBject > UI > Canvas
- In Inspector, see "Render Mode" to World Space
- Set Width to 3, Height to 4. Set the X position to -4.23, and Y position to 2.06
- Rotate the Canvas -90 on the Y axis
- Add text (right click > UI > TextMeshPro) If you don't have TMP, go to Window > Package Manager and install it.
- In the Inspector, set text Width to 3 and Height to 4.
- Set font size to 0.7, and Center the text
2. Custom Google Fonts
- Visit fonts.google.com, pick a font, click the "+" button.
- Click the resulting box "1 Family Selected" and click the download button
- Extract the font, and drag the TTF (TrueType Font) into Unity to import it.
- To make the font usable by TextMeshPro (TMP), go to Window > TextMeshPro > Font Asset Creator
- In the Font Asset Creator window, drag the font you imported into the "Source Font File" field.
- Click "Generate Font Atlas" button.
- Click "Save As". I saved it into the Assets > TextMeshPro > Resources > Fonts & Materials folder. Close the Font Asset Creator window.
- With the TextMeshPro Text selected from the Hierarchy, Drag the newly created TMP Font Asset (F icon) into the Inspector window's "Font Asset" field.
3. Formatting Text
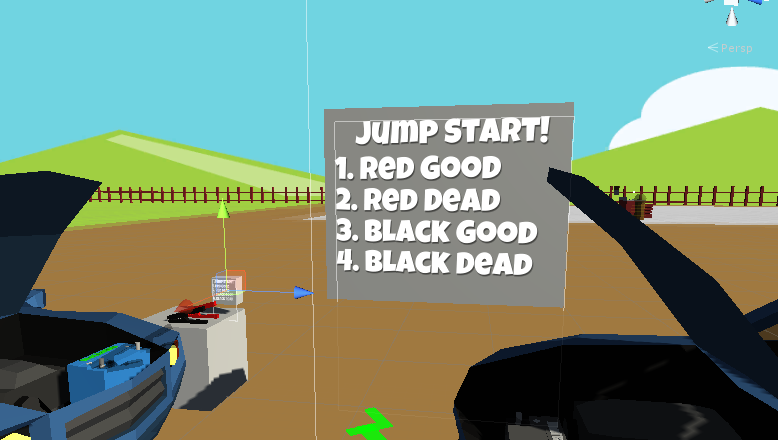
- Adjust the font size so "Jump Start!" is on one line (I used .41)
- Add an "Underlay" (a drop shadow) in the Inspector window. I used settings: Offset X: .46, Offset Y: -.82, Softness: .137
- In the Hierarchy, duplicate the TMP text (Control + D), naming the title "JumpStartText", and the new copy, "Directions"
- In the Inspector's Text field, add the directions (the order clamps should be connected). I used the text:
- Red Good
- Red Dead
- Black Good
- Black Dead
- Left align the text (click the left alignment button)
- Select the Canvas in the Hierarchy and move it down the Y position. I used .42 so it's not so high in the air.
4. Billboard Background for Text
- Drop in an Interactable prefab cube (the same one we used earlier, so I can later shrink this down into a small "clipboard" sized instructions) from Assets > VRTK > Prefabs > Interactions > Interactables
- Set the cube scale to X:1, Y:2.59, Z:3.2 and the position to X:-4.85, Y:1.31, and Z:-0.8
- In the Hierarchy, rename the Interactable prefab to "Billboard".
- Drop the Canvas onto the Billboard, making it a child object (allowing you to move the billboard and canvas & text together)
5. Clipboard-sized Instructions
- In the Hierarchy, duplicate (control + D) the Billboard, naming it "Clipboard".
- Set the scale of the Clipboard to X: 0.1, Y:0.2, Z:0.2
- Move the Clipboard using vertex snapping (Control + Drag) to the clamp table.
- Optional: Hide the "Test SZ" and Cylinder, it's just in the way, by selecting them in the Hierarchy and unchecking the box at the top of the Inspector Window.
6. Adjustments and Precision Grabbing Objects
- In the Hierarchy, select the Canvas inside the Clipboard. Adjust it's X position so it's closer to the cube. I used X: 0.51
- In play mode, currently, when I pick up the Clipboard, it "snaps" to an unexpected orientation on my hand. Let's change to to be more precise.
- In the Hierarchy, expand the Clipboard > Interaction Logic > Interactable.GrabLogic > Actions > PrimaryAction > select the Interactable.GrabAction.FollowAction
- In the Inspector, set the Grab Offset dropdown menu to "Precision Point".
Test out the difference between grabbing a clamp (it jumps to your hand's orientation) and the Clipboard (doesn't jump).