3.4 Creating and configuring Blend Trees
Tutorial
Beginner
+10XP
60 mins
255
Unity Technologies
In this tutorial, you’ll:
- Review the three different types of Blend Tree
- Explore how to create and configure 1D, 2D and Direct Blend Trees
Languages available:
1. Overview
Blend Trees are a way of playing multiple Animation Clips at the same time, so that each Animation Clip contributes some amount to the resulting animation.
In this tutorial, you’ll explore the way that Blend Trees work and how their settings affect the way they blend animations together.
2. Before you begin
This tutorial uses the Introduction to 3D Animation Systems Unity project. If you haven't already done so, download this before continuing.
When you’ve downloaded the project:
1. Open the project in Unity Editor.
2. In the Project window, go to Assets > 3.4 - Creating and configuring Blend Trees > Scenes.
3. Blend Tree basics
Let’s start by reviewing the basic functionality of Blend Trees.
Blend Trees and Motions
Each Animator State plays a Motion. Motion is a term that refers to either an Animation Clip or a Blend Tree.
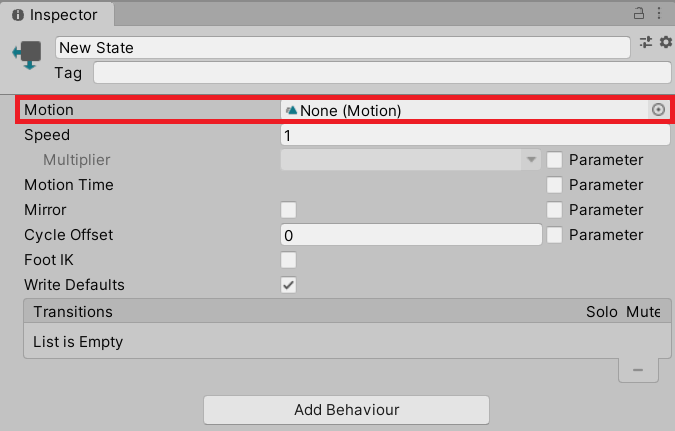
Blend Trees play a collection of Motions. Because of this, Blend Trees can play a mixture of Animation Clips and further nested Blend Trees.
Blend Trees and Normalized Time
Blend Trees use the Normalized Time of Animation Clips to allow multiple Animation Clips to play at the same rate.
Normalized Time is a measure of an Animation Clip’s current time based on how far through the Animation Clip is.
A Normalized time of:
- 0 is the start of the Animation Clip
- 0.5 is half way through
- 1 is the end of the Animation Clip
By playing all the Animation Clips based on their Normalized Time, you can sync up similar Animation Clips.
In practice, this might mean blending walking and running Animation Clips for a character animation. The Animation Clips might have different durations, but as long as roughly the same movement is happening at the same Normalized Time (for example, legs passing each other and feet hitting the floor), the resulting Motion will mean the animations happen at the same time.
When Animation Clips are blended in this way, the final duration is calculated based on the weights of the Animation Clips.
4. Blend Tree types
Blend Trees come in five different types:
- 1D
- 2D Simple Directional
- 2D Freeform Directional
- 2D Freeform Cartesian
- Direct
The only difference between these types is how the weights are calculated for the Animation Clips within the Blend Tree.
Motion Thresholds
Each Blend Tree has an array of Motions (either other Blend Trees or Animation Clips), each of which has a Threshold. This Threshold is the point at which the Motion is at maximum weight. The further away from the Threshold the Motion is, the less its relative weight.
1D Blend Trees have a single Threshold float value. 2D Blend Trees Thresholds are represented by two float values, Pos X and Pos Y.
Direct Blend Trees don’t have Thresholds. They directly set the weight of the Motion with a specific parameter.
Animator Parameters and dimensions
Each Blend Tree also takes one or more Animator Parameters. The proximity of these parameters’ values to the Motion Thresholds determines the weight of each Animation Clip as it’s added to the result.
The dimensions of a Blend Tree indicate how many Animator Parameters it uses:
- 1D Blend Trees use one float parameter, the value of which is called the blend value.
- 2D Blend Trees use two float parameters. Together, these values define the blend position.
- The Direct Blend Tree type is special, as it uses an arbitrary number of float parameters.
5. 1D Blend Trees
The most simple type of Blend Tree is 1D. It calculates the resulting animation by only attributing Weight to Motions where the Thresholds neighbour the blend value.
If the blend value is the same as a Threshold, the Motion receives a weight of 1 and all the others receive a weight of 0.
If the blend value is beyond either of the Thresholds at the extremes, the Motion at the extreme it is beyond receives a weight of 1, and all the others receive a weight of 0.
If the parameter is between the Threshold of two Motions, the Motion’s weight is based on the normalized distance of the blend value between the Thresholds.
Example
If there are two Motions with Thresholds of 1 and 2 and the blend value is 1.7:
- The Motion with a Threshold of 1 will have a weight of 0.3
- The Motion with a Threshold of 2 will have a weight of 0.7
6. Create a 1D Blend Tree
To create 1D Blend Tree:
1. In the Project window, go to Assets > 3.4 - Creating and configuring Blend Trees > Scenes and double-click 1DBlendTrees to open the Scene.
2. In the Hierarchy, select the MazeLowMan GameObject.
3. In the Inspector, find the Animator component.
4. In the Controller property, double-click the WalkRunBlending Animator Controller to open the Animator window.
5. In the Animator window, right-click the grid background and select Create State > From New Blend Tree.
6. Double-click the newly created Animator State to examine it.
7. Select the new Blend Tree to review its settings in the Inspector.
7. Review and configure the Blend Tree settings
Before you add Motions to your new 1D Blend Tree, let’s review the Blend Tree settings.
Name
All Motions have names, whether it’s an Animation Clip or Blend Tree. Since Animation Clips have their own names, you have to set a Blend Tree’s name separately. The name you provide in this field must be different to the name of the Animator State that contains the Blend Tree.
To add a name to your Blend Tree:
- At the top of the Inspector window, add a name in the Name field.
Blend Type
Below the Name field is the Blend Type setting.

- Check that the Blend Type is set to 1D Blend Tree.
Blend Value parameter
Once you’ve set the Blend Type to 1D Blend Tree, the next setting you’ll see is the parameter used for the Blend Value.
If you were creating:
- A 2D Blend Tree, the next settings would be the parameters used for the blend position: horizontal followed by vertical.
- A Direct Blend Tree, the parameters would be listed with the Motions instead of above them because they use just one parameter per Motion.
If there are no float parameters to be used, one called Blend will be automatically created when you create the Blend Tree.
8. Review the blend graph
There’s an additional useful tool here which you can use to view the weight distribution and preview the animation based on a preview value of the blend parameter(s).
1D Blend Trees
For a 1D Blend Tree, the graph is a criss-cross pattern that shows the weights for each of the Motions.
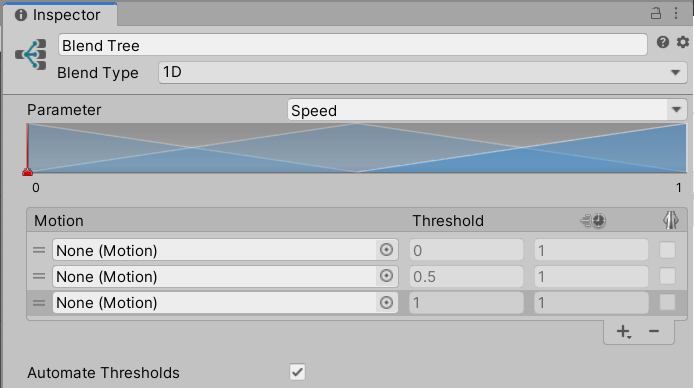
You can drag the lines representing the Motions around to change their Thresholds, though this is not recommended if you want precise Thresholds for your Motions. The level of precision you need will be guided by the particular project you’re working on.
2D Blend Trees
For 2D Blend Trees, the graph shows each Motion as a dot, with the weight of each Motion shown as a spread of blue.
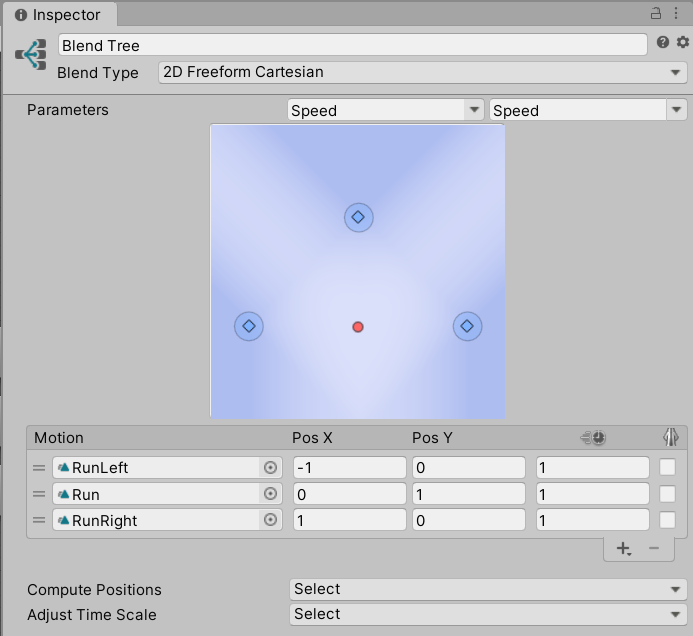
You can view the weighting for any particular Motion by clicking on it. You can also change the Thresholds for a Motion by dragging it around the graph (though again, this is not recommended if you want precise Thresholds for your Motions).
Direct Blend Trees
Direct Blend Trees do not have a graph as they have fully independent weights per Motion.
Previewing the animation
1D and 2D Blend Trees
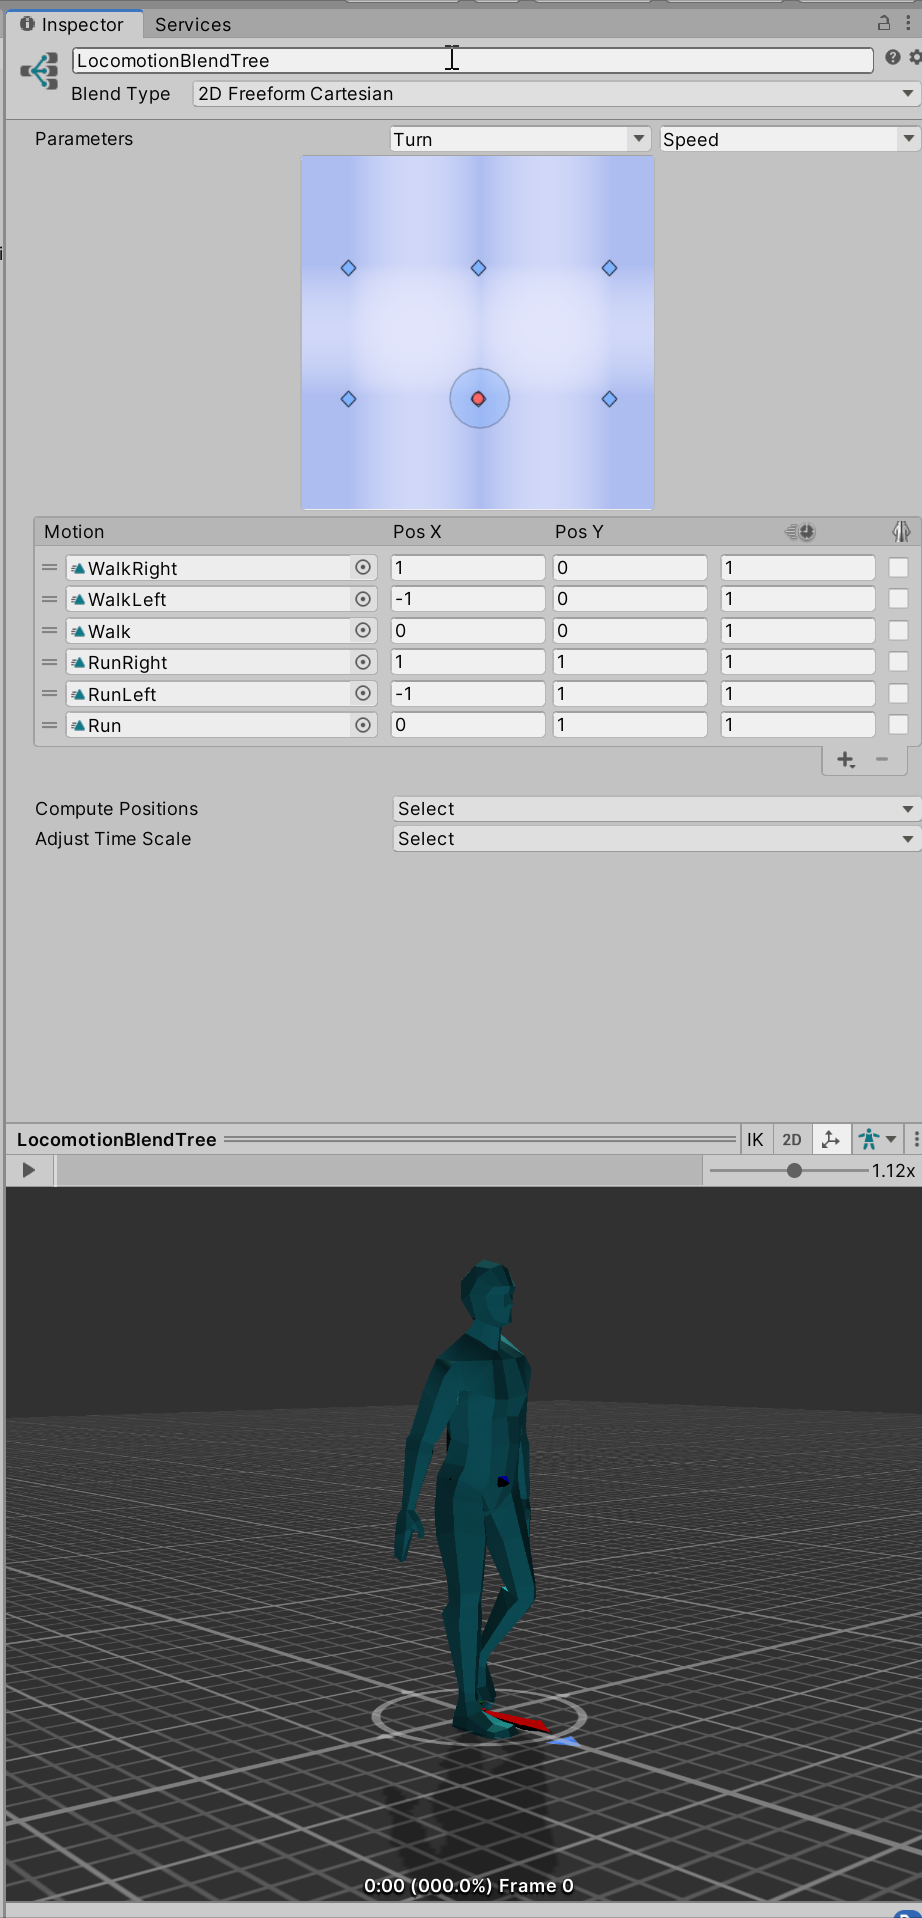
Whether you’ve created a 1D or 2D Blend Tree, you can drag the red handle along the graph to preview the animation based on a preview value of the blend parameter(s).
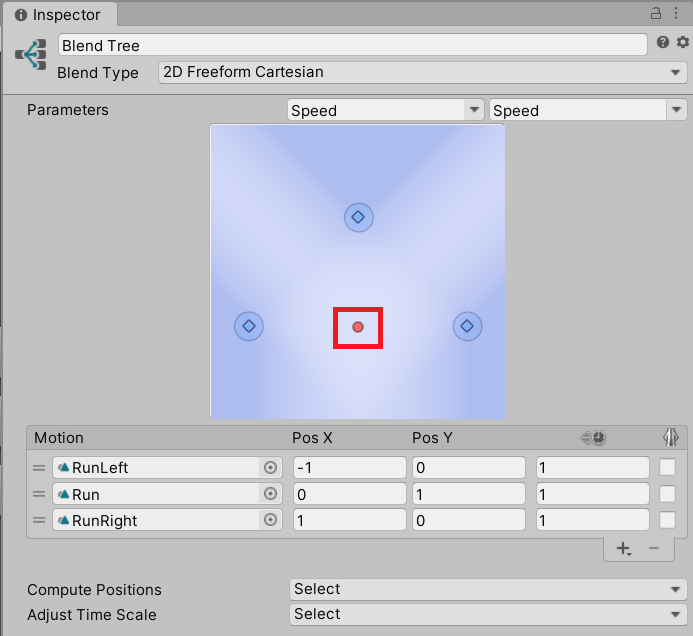
This is shown in the preview box at the bottom of the Inspector.
Direct Blend Trees
For Direct Blend Trees, sliders will be available for each of the parameters being used so that you can preview different values for their weights.
9. Add Motions to your 1D Blend Tree
Below the graphs is a Motion list. To add a Motion to your Blend Tree:
1. In the Inspector, click Add (+) and select Add Motion Field.

2. Repeat the above step so you have two Motion fields.
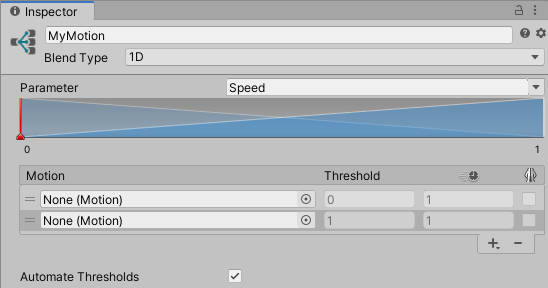
Because you selected a 1D Blend Tree, you’ll first see a field for the Motion itself, a float for the Threshold of the Motion, and then a second float for the Speed.
3. In the Project window, go to Assets > 3.4 - Creating and configuring Blend Trees > AnimationClips.
4. Expand both the HumanoidWalk and HumanoidRun models.
5. Drag the Walk and Run Animation Clip sub-assets from the Project window onto the Motion fields in the Inspector. Make sure that:
- Walk has a Threshold of 0
- Run has a Threshold of 1
If you need to change the order, you can drag the Motions to change their position. By default, all the Thresholds for Motions will be automated. To turn this off, disable Automate Thresholds checkbox when more than one Motion is in the list.
For each Motion on the list, there are a number of per-Motion settings. These settings depend on the type of Blend Tree being used.
Time Scale setting
One setting that all Motions will have regardless of Blend Tree type is Time Scale. This is represented by a clock icon.

The Time Scale works the same as the speed of an Animator State, except for the fact that it applies to just that particular Motion. A Speed of 0.5 means the Motion plays half as fast, and therefore will take twice as long.
If the Motion is a humanoid Animation Clip, you can also mirror the animation of the Motion.

Nesting Blend Trees
You can select Add (+) > New Blend Tree if you want to nest another Blend Tree within this one.
It’s technically possible to have many Blend Trees within Blend Trees. However, this can affect the animation performance as weight calculations will be compounded.
10. Test your Blend Tree
To test your 1D Blend Tree:
1. In the Hierarchy, select the MazeLowMan GameObject.
2. Press the Play button to enter Play Mode.
3. In the Inspector, find the Speed Control component. Use the Speed slider to adjust the blend of walking and running.
4. Press the Play button again to exit Play Mode.
11. 2D Blend Trees: Simple Directional
The exact calculation of the weights for the other Blend Tree types is beyond the scope of this beginner tutorial. For now, you just need to know when to use each type.
You should use a 2D Simple Directional Blend Tree when there are only two animations per blend position axis: one at each extreme. You can also only use a Simple Directional if there is only one animation per direction.
For example, you could use a 2D Simple Direction Blend Tree if you have four different walking animations for each of the four cardinal directions.
For 2D Blend Trees, the Thresholds are labelled Pos X and Pos Y. They refer to the blend position which is defined by the two parameters being used.
When you use this type of Blend Tree, you can also include a single Motion at the center blend position (0, 0) to represent no or neutral direction. This is optional, but recommended.
If you do include a center Motion, the output weights are based on a combination of two linear interpolations:
- An interpolation between the two directions on either side of the sampled point, based on the angle from the center point to the sampled point.
- An interpolation between that result and the center motion, based on the distance from the center. The closer the sampled point is to the centre, the higher the allocated weight.
If you don’t include a center Motion, the blended result will use an average of all the Motions whenever the center Motion would have otherwise been used. This can make it harder to predict the resulting animation, because more animations are sampled at once.
12. 2D Blend Trees: Freeform Directional
The 2D Freeform Directional Blend Tree is similar to the Simple Directional, but allows for multiple animations per direction.
The interpolation algorithm used is called Polar Gradient Band Interpolation. It’s very complex and all you need to know for the purposes of this course is that the calculation of output weights works in a similar way to Simple Directionals. The difference is that it’s possible to use Motions placed more freely in the blend space.
13. 2D Blend Trees: Freeform Cartesian
You should use the 2D Freeform Cartesian type when your Motions do not represent different directions. This is because with Freeform Cartesian, your X and Y parameters can represent different concepts. The calculation of the output weights is not based on angles, and there is no special treatment for the center position (0, 0).
2D Freeform Cartesian can be used in similar situations to when you would use a 1D Blend Tree, where each Motion is also a 1D Blend Tree. The difference is that Freeform Cartesian uses a more complex interpolation algorithm called Cartesian Gradient Band Interpolation. This means you can use Motions placed more freely in the parameter space.
You might use a Freeform Cartesian Blend Tree for a character whose speed and angular speed both vary.
14. Test a 2D Freeform Cartesian Blend Tree
Setting up a 2D Freeform Cartesian Blend Tree involves the same general process you followed to create a 1D Blend Tree, but with additional required Thresholds.
Let’s explore a pre-made example:
1. In the Project window, go to Assets > 3.4 - Creating and configuring Blend Trees > Scenes and double-click the 2DFreefromCartesianBlendTrees Scene to open it.
2. In the Hierarchy, select the MazeLowMan GameObject.
3. Press the Play button to enter Play Mode.
4. In the Inspector, find the Speed Turn Control script component.
5. Adjust both the Speed and Turn fields, to explore how it affects the character.
6. Press the Play button again to exit Play Mode.
15. Review the 2D Freeform Cartesian Blend Tree configuration
To review how this Blend Tree was set up:
1. In the Inspector, find the Animator component.
2. In the Controller property, double-click the WalkRunTurnBlending Animator Controller to open it.
3. In the Animator window, double-click on the Locomotion state to open it.
4. Select the LocomotionBlendTree to review its setting configuration.
16. Direct Blend Trees
Direct Blend Trees are perhaps the simplest but least frequently used type of Blend Tree. They allow for an arbitrary number of Motions where each weight is controlled directly by an Animator Parameter. Instead of a Threshold setting, there is a parameter selection instead. This means that you can have multiple Motions with a weight of 1.
You should use Direct Blend Trees for things like blend shape animation where each blend shape is independent. Blend shapes are commonly used for things like facial animation. For example, you might have one blend shape for a smile and another for a furrowed brow. Having these as separate Motions would allow you to control the smile and brow independently.
17. Automatic setup options for Blend Trees
For 1D and 2D Blend Trees that contain Motions which have Root Motion, there are automation options below the Motion list. These are Compute Thresholds for 1D Blend Trees and Compute Positions for 2D Blend Trees.
These settings are ways of setting the Thresholds for the Motions to specific values based on the Root Motion. Once you’ve set the Thresholds, you can change them at any time.
The aspects of Root Motion that can be used to set the Thresholds are:
- Speed: The average meters per second the animation moves.
- Velocity X: The average meters per second the animation moves in its local X axis.
- Velocity Y: The average meters per second the animation moves in its local Y axis.
- Velocity Z: The average meters per second the animation moves in its local Z axis.
- Angular Velocity: The animation’s average rotation per second around its local Y axis. This can be calculated in either radians or degrees.
Choosing an option
The best option for you depends on the animations that you’re blending.
For example:
- If you want to blend a variety of sidestep/strafe animations with forward walking and running, then using Velocity X and Z might be good options. This is because those animations will differ in those properties.
- If you want to blend a variety of turning animations, then Angular Velocity might be the correct choice.
Having these options is useful, because they allow the parameters used to set the blend value or blend position based on the physical characteristics of the animation.
If you have a Speed parameter and a Blend Tree with Motions based on their Speed, simply setting the value of the Speed parameter to the speed you want the Character move will give you the desired result (assuming the Blend Tree has animations to accommodate the Speed).
Adjusting the Timescale
If none of the Motions in the Blend Tree are child Blend Trees, then the option to adjust the Timescale will appear.
Like with Compute Thresholds/Positions, these settings allow you to set the value of the Timescale (which you can adjust at any time). Unlike Compute Thresholds/Positions, however, adjusting the Timescale will change the Speed of the Motions instead of their Thresholds.
For setting the Speed of your animation through the Timescale settings, you have two options:
- Homogeneous Speed: Sets all the Speeds, so that animations with a non-zero Root Motion speed have the same Speed. This takes animations like idle into account and will not change their Speeds.
- Reset Time Scale: Sets all the Speeds back to 1.
18. Summary
In this tutorial, you’ve explored the 3 different types of Blend Tree. You’ve learned how to create and configure 1D, 2D and Direct Blend Trees as well as understanding when to use each type.
In the next tutorial, you’ll explore Transitions in more detail and learn how to create and configure them.