3.7 Creating and configuring Animator Layers
Tutorial
Beginner
+10XP
40 mins
226
Unity Technologies

In this tutorial, you’ll:
- Explore the role of Animator Layers
- Review Animator Layer settings
- Consider how you could use Animator Layers to control animations you want to blend together.
This tutorial won’t guide you step by step through setting up Animator Layers, but you will identify how to do this.
Languages available:
1. Overview
Animator Layers are part of the structure of an Animator Controller and are another way of playing and blending multiple animations together.
In this tutorial, you will explore the role of Animator Layers, review their settings and consider how to use Animator Layers to control the animations you want to blend together. The tutorial won’t guide you step by step through setting up Animator Layers, but you will identify how to do this.
2. Before you begin
This tutorial uses the Introduction to 3D Animation Systems Unity project. If you haven't already done so, download this before continuing.
When you’ve downloaded the project:
1. Open the project in Unity Editor.
2. In the Project window, go to Assets > 3.7 - Creating and configuring Animator Layers > Scenes.
3. Double-click the AdditiveAnimationExample Scene to open it.
4. If the Animator window is not open, go to Windows > Animation > Animator.
5. In the Hierarchy, select the Ellen GameObject.
3. Animator Layer basics
Animator Layers are a way of playing multiple animations at the same time and blending the result. This can be done in one of two different ways:
- The blending overrides what’s happening on other Animator Layers.
- The blending adds to what is happening on other Animator Layers.
Each Animator Layer contains a State Machine that contains all the States for the Layer.
Animator Layer indices
Animator Layers have indices. The base Layer has an index of 0 and all subsequent Layers have indices incrementing from there.
Animator Layers are evaluated in ascending index order, starting with 0. This means that the base Layer is evaluated first, followed by the Layer with index 1, then 2, and so on.
Animator Layer weights
Each Animator Layer has a weight that determines its contribution to the final result. However, blending between Animator Layers happens slightly differently to Transitions or Blend Trees.
To understand exactly how this works, there are two important concepts you need to explore first: masking and Blending Type.
4. Masking
When you’re working on a transform animation or humanoid animation, it can often be useful to only animate part of a skeleton at once. This way, independent animations can play on different parts of the body.
For example, on a humanoid you might want a waving animation on the upper body whilst the lower body plays a walking animation.
You can achieve this by adding a reference to an Avatar Mask asset on the Animator Layer on which you want to play only part of the animation.
5. The Animator Layer blending process
Blending Animator Layers differs from normal blending. Let’s explore that in more detail.
Animator Layers have their resultant animation evaluated as the indices increase. This means that:
- First Layer 0 is evaluated.
- Then Layer 1 is evaluated, and then blended with Layer 0.
- Then Layer 2 is evaluated, and then blended with the result of the blend of Layers 0 and 1.
- Then Layer 3 is evaluated, and then blended with the result of the previous blending.
- And so on...
There are two different ways you can blend animation using Animator Layers:
- Override blending
- Additive blending
6. Override blending
Override blending is similar to the blending used by Transitions and 1D Blend Trees. As the contribution from the next Animator Layer increases, the contribution from the previous Animator Layers decreases.
This is how the weighting is calculated:
The weight of the previous Animator Layers is equal to the inverse of the overriding (next) Animator Layer. So, for example, if the next Animator Layer has a weight of 0.7, the combination of the previous Animator Layers have an effective weight of 0.3.
7. Additive blending
The other option for Animator Layer blending is Additive blending.
This is used to support additive animation. Additive animation is when the animation itself is stored as a delta (or change) from a reference pose. A common example of additive animation is the heavy breathing animation you might see when a character in a game runs. If you want to set up additive animation, review Model-Specific Animation Import Settings.
You can use Additive blending for non-additive animation, but this will result in a very strange animation which will probably not meet your needs.
How does Additive blending work?
When you use Additive blending, the already evaluated Animator Layers always have an effective weight of 1. Any animation from the Additive Animator Layer is added to the contribution from those Layers. The animation data is taken as a delta (or change) between a default value and its current value to calculate the weighted contribution.
Let’s think about the heavy breathing example.Here, a reference pose of the character not breathing would be used. Then, as the chest expands, only the difference would be recorded. When this animation is added to whatever other animation is on the current Animator Layers, the Weight can be increased to increase the amount the chest expands.
8. Explore an additive animation
Let’s explore an additive animation created for this learning project:
1. In the Hierarchy, check that the Ellen GameObject is still selected.
2. Press the Play button to enter Play Mode.
3. In the Inspector, find the Layer Weight Setter component.
4. Adjust the Weight field and observe the effect on Ellen in the Game view.
5. Press the Play button to exit Play Mode.
9. Review the Animator Layer configuration
Whenever you create an Animator Controller, it automatically has a Base Animator Layer. Let’s review at how Ellen’s Animator Layers are set up:
1. In the Hierarchy, select the Ellen GameObject.
2. In the top menu, go to Window > Animation > Animator to open the Animator window.
3. Select the Layers tab at the top left of the window.
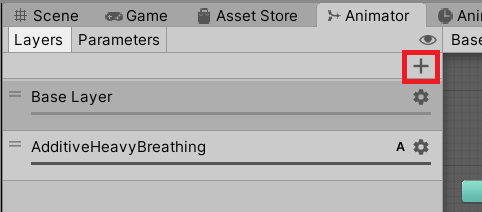
Note that there are two layers:
- Base Layer: this has an index of 0.
- AdditiveHeavyBreathing: this has an index of 1.
If you want to create another Layer, select the Add (+) button above the Layers.

You can click and drag the Animator Layers if you need to change the order in which they are evaluated.
AdditiveHeavyBreathing Layer
For now though, let’s look at how the AdditiveHeavyBreathing Layer is set up:
1. Select the AdditiveHeavyBreathing Layer.
Note: There is only one State called HeavyBreathing, which is played on loop.
2. Open the contextual settings pop-out by selecting the cog icon on the far right of the AdditiveHeavyBreathing entry in the Layers list.

These are all the Layer settings.
10. Review the Weight, Avatar Mask and Blending settings
First, let’s review the settings you will have already encountered in this course.
Weight
The first setting is the Weight. Increase an Animator Layer’s Weight to increase the contribution of the Layer to the final animation.
Avatar Mask
The second setting is the Avatar Mask. This is used to prevent the Animator Layer from writing to specific areas of the body for humanoids or specific transforms for generic animation. For more details on Avatar Masks, review the Rigs tutorials.
Blending
The third setting is Blending. You can set this to either:
- Override: Useful for most cases and blends in the same way as transitions or 1D Blend Trees.
- Additive: Useful for additive animation.
11. Review the Sync and IK Pass
There are also additional settings here you may not have encountered before.
Sync
The next setting you’ll see is Sync. When this is enabled, you’ll be asked for the Animator Layer you want to sync this Animator Layer with. This will create an identical State Machine to the one on the source Animator Layer.
By default, the State Machine will match the timing of the source State Machine. This means that when Transitions happen in the source Animator Layer, they will also happen in the synced Animator Layer.
However, if Timing is enabled, State durations will be an interpolation of the source Animator Layer’s Animation Clip length and the synced Animator Layer’s Animation Clip length. They will be based on the weight of the synced Animator Layer.
Review an example of Sync with Timing enabled
For example, imagine that you have a base Animator Layer with Walk and Run States. You then create another Layer you call “Injured”, which is synced to the base Layer.
The Injured Layer will have Walk and Run States with the same Transitions set up, however you replace the Animation Clips with “InjuredWalk” and “InjuredRun”. Because the Layers are synced, they will transition together. However, they have different durations.
If Timing is enabled, the States on the Injured Layer will have their durations interpolated towards the durations of the States on the base Layer. A Weight of 1 for the Injured layer will mean the States will have the same duration as those on the base Layer.
IK Pass
The last setting you’ll see is IK Pass. This setting is just for humanoid animation.
If it’s enabled, it will cause methods for evaluating IK to be called on MonoBehaviours on the same GameObject as the Animator component, as well in State Machine behaviours for this Animator Layer.
You can learn more about this in 4.2 Introduction to humanoid-specific animation scripting.
12. Summary
In this tutorial, you have explored Animator Layers and how they work in Unity. You’ve explored:
- How Animator Layer indices and Weights determine the Layer’s impact on the final animation.
- The difference between Override and Additive blending and when to use each.
- Animator Layer configuration, and the different settings involved.
You’ve now completed this learning project on The Animator. In the final part of this course, you’ll begin to explore animation scripting in Unity.