4.1 Introduction to general animation scripting
Tutorial
·
Beginner
·
+10XP
·
50 mins
·
(205)
Unity Technologies

In this tutorial, you will explore basics of animation scripting. Specifically, you’ll learn how to get and set data on the Animator Controller.
This tutorial is an introduction to general animation scripting for learners who have some C# scripting experience. Step by step guidance on animation scripting is beyond the scope of this course.
Languages available:
1. Overview
In this tutorial, you will explore the basics of animation scripting. Specifically, you’ll learn how to get and set data on the Animator Controller.
Most of the scripting discussed here is for methods found on the Animator component. Finding a reference to the Animator component is an assumed step before using any of these methods.
This tutorial is an introduction to general animation scripting for learners who have some C# scripting experience. Step by step guidance on animation scripting is beyond the scope of this course.
2. Before you begin
This tutorial uses the Introduction to 3D Animation Systems Unity project. If you haven't already done so, download this before continuing.
When you’ve downloaded the project:
1. Open the project in Unity Editor.
2. In the Project window, go to Assets > 4.1 - Introduction to general animation scripting.
3. Controlling Animator Parameter values
The most fundamental scripting techniques that affect animation are probably those that get and set the values of Animator Parameters.
Animator Parameters are used for all sorts of things when controlling how Animators work such as:
- When to start Transitions
- Blend values and blend positions for Blend Trees
- Various settings for States
4. Setting Animator Parameter values
It’s very important that you’re able to control Animator Parameter values at runtime. This is done using four methods:
- animator.SetBool()
- animator.SetFloat()
- animator.SetInteger()
- animator.SetTrigger()
For them to work, each of these methods needs to know two things:
- Which parameter it is setting
- What value it is setting it to
The exception is trigger parameters. These have no value and only need to know the parameter to set.
Letting the method know which parameter is being set can be done in two ways:
- Using a string of the name
- Using an integer representation of the name called a hash
This means that calls to set the value of a float parameter, for example, might look like this:
animator.SetFloat(“Speed”, 5f);
Or like this:
animator.SetFloat(speedParameterHash, 5f);String hashes
In the second case, speedParameterHash is a hash of the speed parameter name that will need to be found before it can be used. It’s recommended that you use a name hash instead of a string whenever possible.
To generate a hash for any string in an Animator Controller, use the following static method:
Animator.StringToHash()This method takes a single string parameter: the name you want to convert.
This method is static and compile-time constant. This means you can use it to initialise member variables like this:
int speedParameterHash = Animator.StringToHash(“Speed”);Although it’s not necessary, this hash has been made static because parameters are likely to have the same name throughout all instances of a method.
The hash will always be the same and so can be made readonly to make sure it’s not changed by accident. These adjustments would result in code that looks like:
static readonly int speedParameterHash = Animator.StringToHash(“Speed”);Review an example
To see a full example:
1. In the Project window, go to Assets > 4.1 - Introduction to general animation scripting.
2. Double-click on the SetParametersExample asset to open the method in your code editor.
using UnityEngine;
public class SetParametersExample : MonoBehaviour
{
   public Animator animator;
   static readonly int speedParameterHash = Animator.StringToHash("Speed");
   void Update()
   {
       animator.SetFloat(speedParameterHash, 5f);
   }
}5. Getting Animator Parameter values
Returning to parameters, you’ve already learned how to set them. However, it can sometimes also be useful to get their values. You can do this using the following methods:
- animator.GetBool()
- animator.GetFloat()
- animator.GetInteger()
Since trigger parameters don’t have values, there is no method to get their value.
These methods work in a very similar way to the ones setting their values. The difference is that they only require one bit of information: the name of the parameter whose value is being retrieved.
Examples
Each method returns the value of that parameter. This means that calls to get the value of a bool parameter, for example, might look like this:
bool isCharacterGrounded = animator.GetBool(“IsGrounded”);
Or like this:
bool isCharacterGrounded = animator.GetBool(isGroundedParameterHash);
One of the most common reasons you might need to get the value of an Animator parameter is if it’s not being set by script but instead by an imported animation.
Imported animations have the option to use additional Animation Curves, and each of these additional Animation Curves must have a name. If this name is the same as a float Animator Parameter, then while the animation is being evaluated the parameter will have its value set to that of the Animation Curve.
These Animation Curves are subject to weighting, so if two animations are being blended, the value of the Animator Parameter will be a blend between its values for each animation.
6. Controlling Animator Layer weights
You can also get and set the weight of an Animator Layer using a similar technique to getting and setting Animator Parameters.
You can do this using the following methods:
- animator.SetLayerWeight()
- animator.GetLayerWeight()
These methods need similar information to their Animator Parameter equivalents. They need to know what they are getting or setting, and what value to set the weight to.
Examples
The final code using these methods might look something like this:
animator.SetLayerWeight (1, 0.5f);
Or like this:
float shootingLayerWeight = animator.GetLayerWeight (2);
These operations are important for any Animator Controller using more than one Animator Layer. For more information about this, review Creating and configuring Animator Layers.
7. Introduction to flow control
Although one of the main jobs of Animator Parameters is to control Transitions, sometimes you might prefer to take control of the flow of animations that play more individually. You can do this using the following methods:
- Play()
- PlayInFixedTime()
- CrossFade()
- CrossFadeInFixedTime()
8. Using Play and PlayInFixedTime
Both Play() and PlayInFixedTime() do the same thing: play a State of a given name. They just do it slightly differently.
Both methods can have up to three parameters:
- The name of the State to be played (as either a string or a hash of the State’s name)
- The index of the Layer that the State to be played is on
- The time that the State should start playing at
The difference between them is that the time parameter for Play() is in Normalized Time from 0 to 1. The time parameter for PlayInFixedTime() is in seconds.
For Play(), this means that a value of 0.5f for the last parameter will start playing the Transition halfway through the State. For PlayInFixedTime(), it will start playing half a second into the State.
Examples
Calls to these methods might look something like this:
animator.Play(“Run”, 0, 0.1f);
Or like this:
animator.PlayInFixedTime(shootStateHash, 1, 0f);
In the second case, shootStateHash is a hash of the name of the State to be played.
9. Using CrossFade and CrossFadeInFixedTime
The CrossFade() and CrossFadeInFixedTime() methods are very similar to Play() and PlayInFixedTime(), but work more like Transitions. As such, they require more information than the Play() and PlayInFixedTime() methods.
Both the CrossFade() and CrossFadeInFixedTime()methods can have up to 5 parameters:
- The name of the State to be cross faded to (as either a string or a hash of the State’s name)
- How long the fade should take
- The index of the Layer of the State being cross-faded to
- The offset through the State being transitioned to
- The time through the fade to start at
As with Play() and PlayInFixedTime(), the difference between the two methods is that CrossFade() uses Normalized Times for its parameters and CrossFadeInFixedTime() uses time in seconds.
The one exception to this is that the final parameter (how far through the fade to start) must be in Normalized Time for both methods.
10. Review flow control examples
Let’s look at some examples of these being used:
animator.CrossFade(walkStateHash, 1f, 0, 0.1f, 0f);
The above example is cross-fading to a State with a name represented by the walkStateHash. This crossfade will take the same length of time as the State it is fading from. This is because there is a Normalized Transition duration parameter of 1.
The States it is fading between are on the Base Animator Layer as shown by the 0 for the Animator Layer index. When the cross-fade starts, three things will happen:
- The State it is fading towards will start playing just as with regular Transitions.
- The State it is transitioning towards will start playing a tenth of the way through because of the 0.1f parameter for the time offset.
- It will play the entire Transition because it’s starting with a Normalized Time of 0f.
Review an example
To review an example script in Unity Editor:
1. In the Project window, go to Assets > 4.1 - Introduction to general animation scripting.
2. Double-click on the FlowControlExample asset to open the method in your code editor.
using UnityEngine;
public class FlowControlExample : MonoBehaviour

{
   public Animator animator;
   static readonly int shootStateHash = Animator.StringToHash("Shoot");
   static readonly int walkStateHash = Animator.StringToHash("Walk");
   void Start()
   {
       animator.Play("Run", 0, 0.1f);
   }
   void Update()
   {
       if(Input.GetKeyDown(KeyCode.Space))
           animator.PlayInFixedTime(shootStateHash, 1, 0f);
       if(Input.GetKeyDown(KeyCode.LeftShift))
           animator.CrossFade(walkStateHash, 1f, 0, 0.1f, 0f);
   }
}11. MonoBehaviour messages
Most animation scripting, such as getting and setting parameters or playing or cross-fading to different States, can be done in a MonoBehaviour’s Update or FixedUpdate calls. However, there are some actions that you should do elsewhere, specifically in two other message methods that are part of MonoBehaviours: OnAnimatorMove and OnAnimatorIK.
OnAnimatorIK
The OnAnimatorIK method is exclusively called when the Animator component has a humanoid Avatar. It should be used for any IK. You can find out more about this Method in 4.2 Introduction to Humanoid-specific animation scripting.
OnAnimatorMove
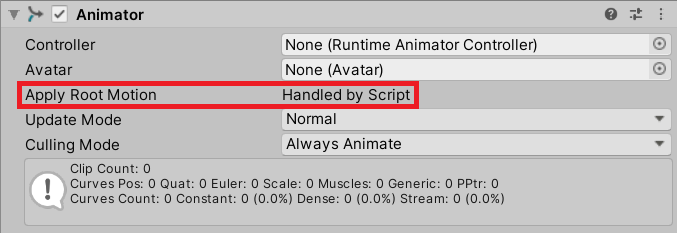
The OnAnimatorMove method is called for both humanoid and generic animation. Normally, Root Motion is either enabled or disabled on the Animator component. However, if a MonoBehaviour calls the OnAnimatorMove method, then it controls the Root Motion. This can be seen as a change to the Animator component.

An empty OnAnimatorMove method will make an Animator behave as though it has no Root Motion. However, you can change this by using the animator.deltaPosition and animator.deltaRotation properties.
Applying these changes to the Root Transform in the OnAnimatorMove method will cause the Animator Controller to behave as though it’s applying Root Motion normally. You can make changes to this based on the requirements specific to your Animator Controller.
Call Order
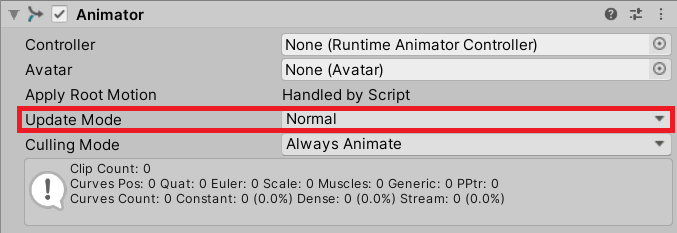
Something important to note about these messages is that they’re called in time with the Animator Controller’s internal update process. This changes based on the Update Mode set on the Animator component.

If the Update Mode is set to Normal, the Update method will be called first, followed by OnAnimatorMove, followed by OnAnimatorIK and then LateUpdate.
If the Update Mode is set to Animate Physics, FixedUpdate will be called first, followed by OnAnimatorMove, then the physics system will run its internal update to check for collisions and resolve them before finally calling on OnAnimatorIK.
12. State and Animation Clip Information
Sometimes, it can be useful to know more information about what’s currently going on in the Animator Controller beyond the values of parameters. To help with this, there are some methods you can use to find the situation of the Animator Controller.
Is it transitioning?
To find out if a particular Animator Layer of an Animator Controller is transitioning between States, you can use:
animator.IsInTransition()This takes in an integer parameter for the index of the Animator Layer you want to check and returns true if the Animator Layer is currently in a transition and false otherwise.
What States are playing?
You may also want to check which State the Animator Controller is currently in, and, if the Animator Controller is transitioning on that Animator Layer, what the next State will be. You can do this using these two methods:
- animator.GetCurrentAnimatorStateInfo()
- animator.GetNextAnimatorStateInfo()
These both take in an integer for the index of the Animator Layer to be queried and return a struct called an AnimatorStateInfo. This contains concise information about the State such as:
- Length
- Hashes for the name and tag
- Speed
If you attempt to get information about the next State while the Animator Layer is not transitioning (in which case there is no next State), you will receive an AnimatorStateInfo with default values throughout.
Getting information about Animation Clips
If you want information about the Animation Clips being played, you can use these two methods:
- animator.GetCurrentAnimatorClipInfo()
- animator.GetNextAnimatorClipInfo()
These work similarly to the methods used to get AnimatorStateInfo. They both have an index parameter for the Animator Layer, but instead return an array of AnimatorClipInfos.
These are structs with a reference to the Animation Clip being played and its Weight. This Weight is the blending weight, meaning it takes both Blend Trees and Transitions into account. It does not take the weights of Animator Layers into account.
13. Summary
In this tutorial, you explored scripting for generic animations in Unity. You’ve reviewed how to do the following using scripting:
- Control and set Animator Parameter values
- Control Animator Layer weights
- Use Play and PlayInFixedTime
- Use CrossFade and CrossFadeInFixedTime
- Review flow control
- Control Monobehaviour messages
- Find State and Animation Clip information
Next, you’ll explore scripting used only when working with Humanoid animations.