Add Global Lighting
Tutorial
·
intermediate
·
+0XP
·
35 mins
·
(28)
Unity Technologies

In this tutorial, you’ll learn about the Global Light 2D GameObject, the default lighting source used in Universal 2D projects.
Languages available:
1. Explore Global Light 2D
We’ll begin with the simplest and most general approach to adding light: the Global Light 2D GameObject, which is the foundation of 2D lighting in Unity. This light works like a sun, casting lighting evenly across the entire scene. To add it, follow these steps:
1. In the Project window, go to Assets > 2D_Pixel_Light > Scenes, then double-click the Basic scene to open it.
2. In the Hierarchy window, right-click and select Light > Global Light 2D. Rename it to “Global Light 2D”.
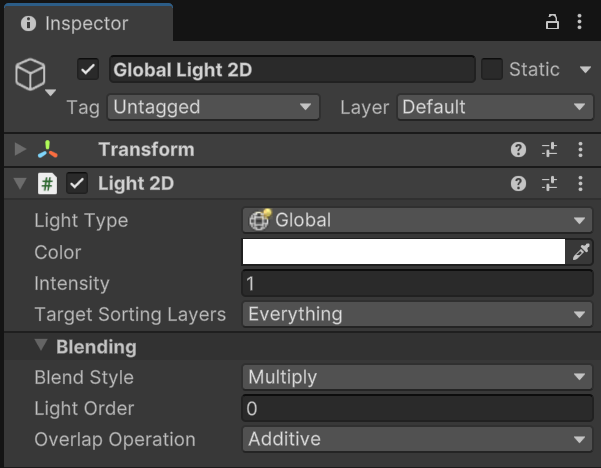
In the Inspector window, you’ll see that the Global Light 2D GameObject has a Light 2D component attached to it. Light 2D components allow you to apply 2D optimized lighting to sprites.
The Light Type property of a Light 2D component can be set to one of four options that determine the shape of the light the component produces:
- Freedom: Lets you freely edit vertices to shape the light area.
- Sprite: Creates a light area based on a selected sprite.
- Spot: Creates a light area that spreads in a circular shape and gives you control over its angle and direction.
- Global: Applies light across the entire scene and its GameObjects.
In this case, the Light Type property is set to Global. This means that the Global Light 2D GameObject applies an equal light area to the entire scene.
The next important properties of the Light component to note are Color and Intensity; these allow you to completely change the mood of an entire scene:
- Color: The color that is applied to light.
- Intensity: The brightness level applied to the light.
Even though there is light present in the scene, it’s not affecting the ambience. Let’s adjust the light to better match the atmosphere we want to create: a dark and mysterious dungeon.
3. Adjust the Color and Intensity values. Experiment with different values to find the look that fits your style!
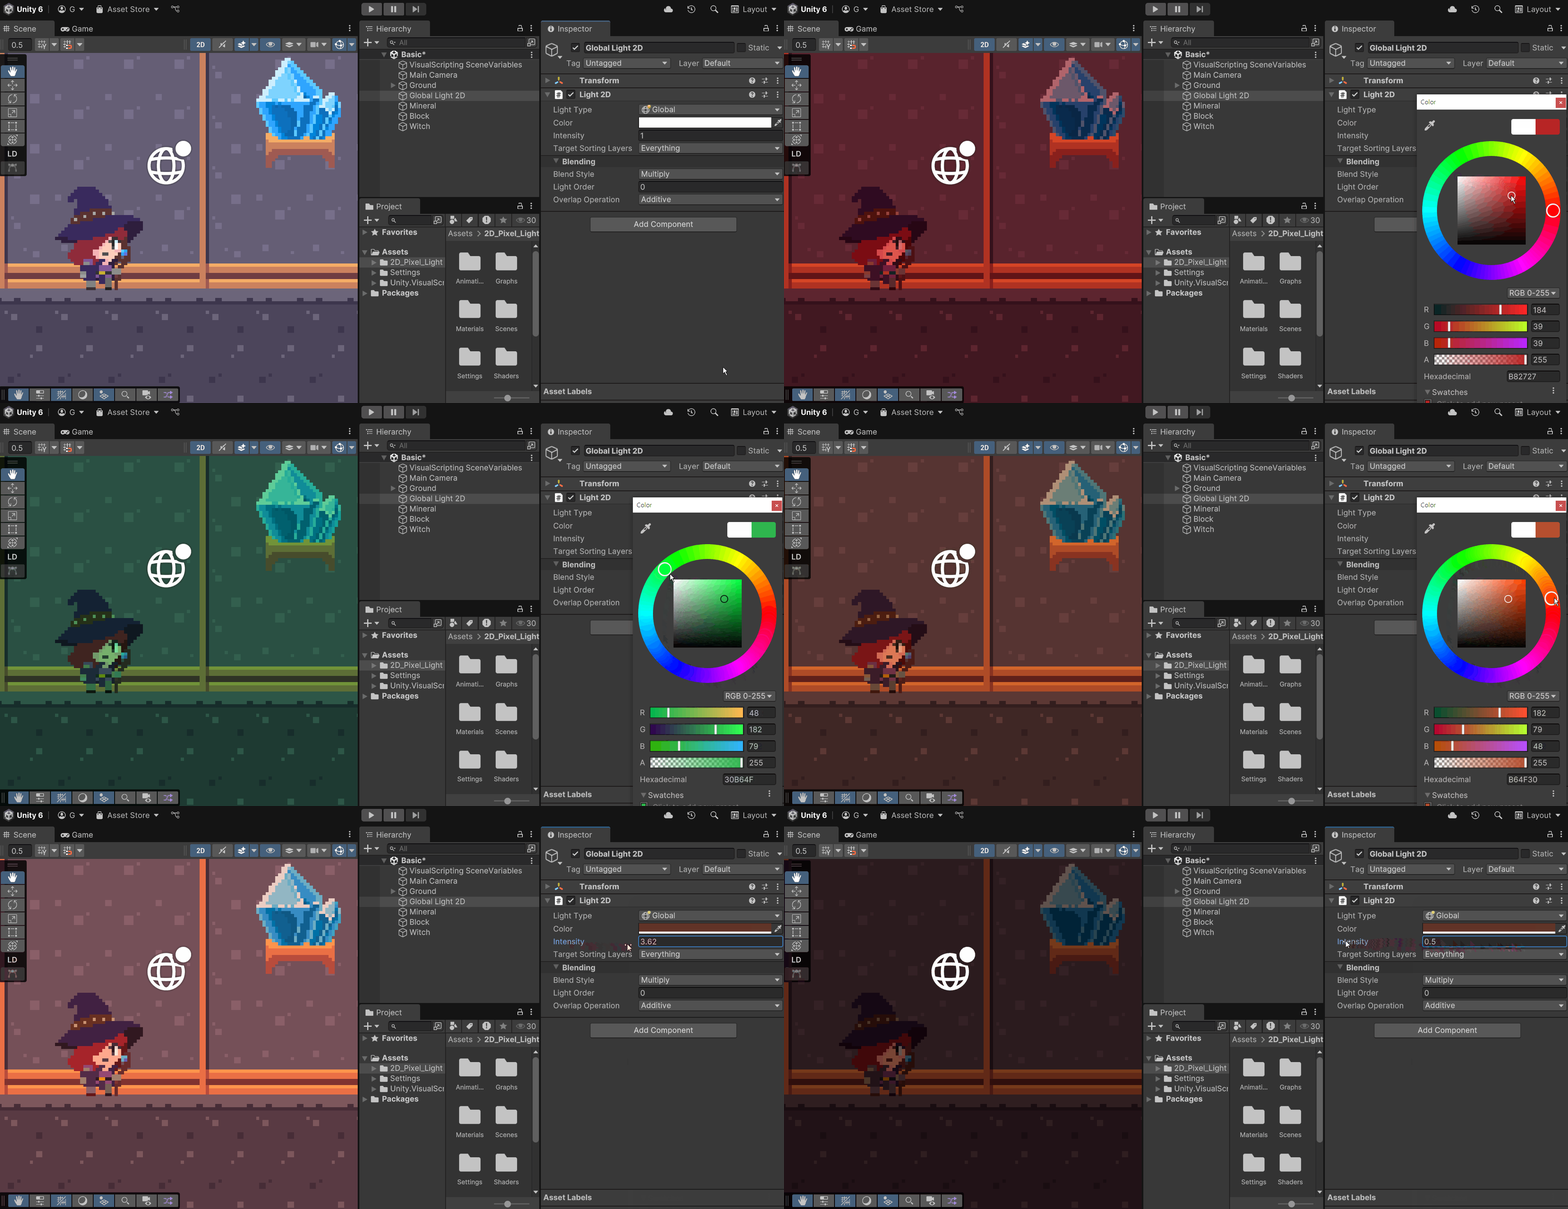
As you can see, the Global Light 2D GameObject affects all 2D GameObjects in the scene that have a Renderer component attached. In 2D, a Renderer component defines the visual representation of an object, just like meshes do in 3D. Examples of 2D Renderer components include the Sprite Renderer, the Tilemap Renderer, and the Sprite Shape Renderer components.
Since this is the only light source and it affects the entire scene, everything looks much darker—but it still lacks atmosphere. You’ll refine this in the next steps.
2. What are Sorting Layers?
Now it’s time to learn an important concept that you’ll need for the next step. In any 2D project, the order in which the sprites are rendered is crucial—sprites drawn earlier in the order can be covered by those drawn later. In Unity, the rendering order of 2D sprites is determined by three properties:
- Transform Z-position: The closer a GameObject’s Z-position is to the camera’s direction, the later it gets rendered.
- Renderer Sorting Layer: Unlike regular Layers, which define physics or other interactions, Sorting Layers are used exclusively to control the rendering order of 2D objects. Layers higher in the list are rendered later.
- Renderer Order in Layer: When two GameObjects are on the same Sorting Layer, the GameObject with a higher value in this property will be rendered later.
To illustrate this, we have intentionally misconfigured the properties of the Witch and Mineral GameObjects. Try moving the Witch GameObject over the Mineral GameObject. You’ll find that the Witch GameObject gets covered by the Mineral GameObject. This happens because although the Sprite Renderer components attached to both the Witch and Mineral GameObjects have the same Sorting Layer, the Order in Layer of the Witch GameObject is lower.
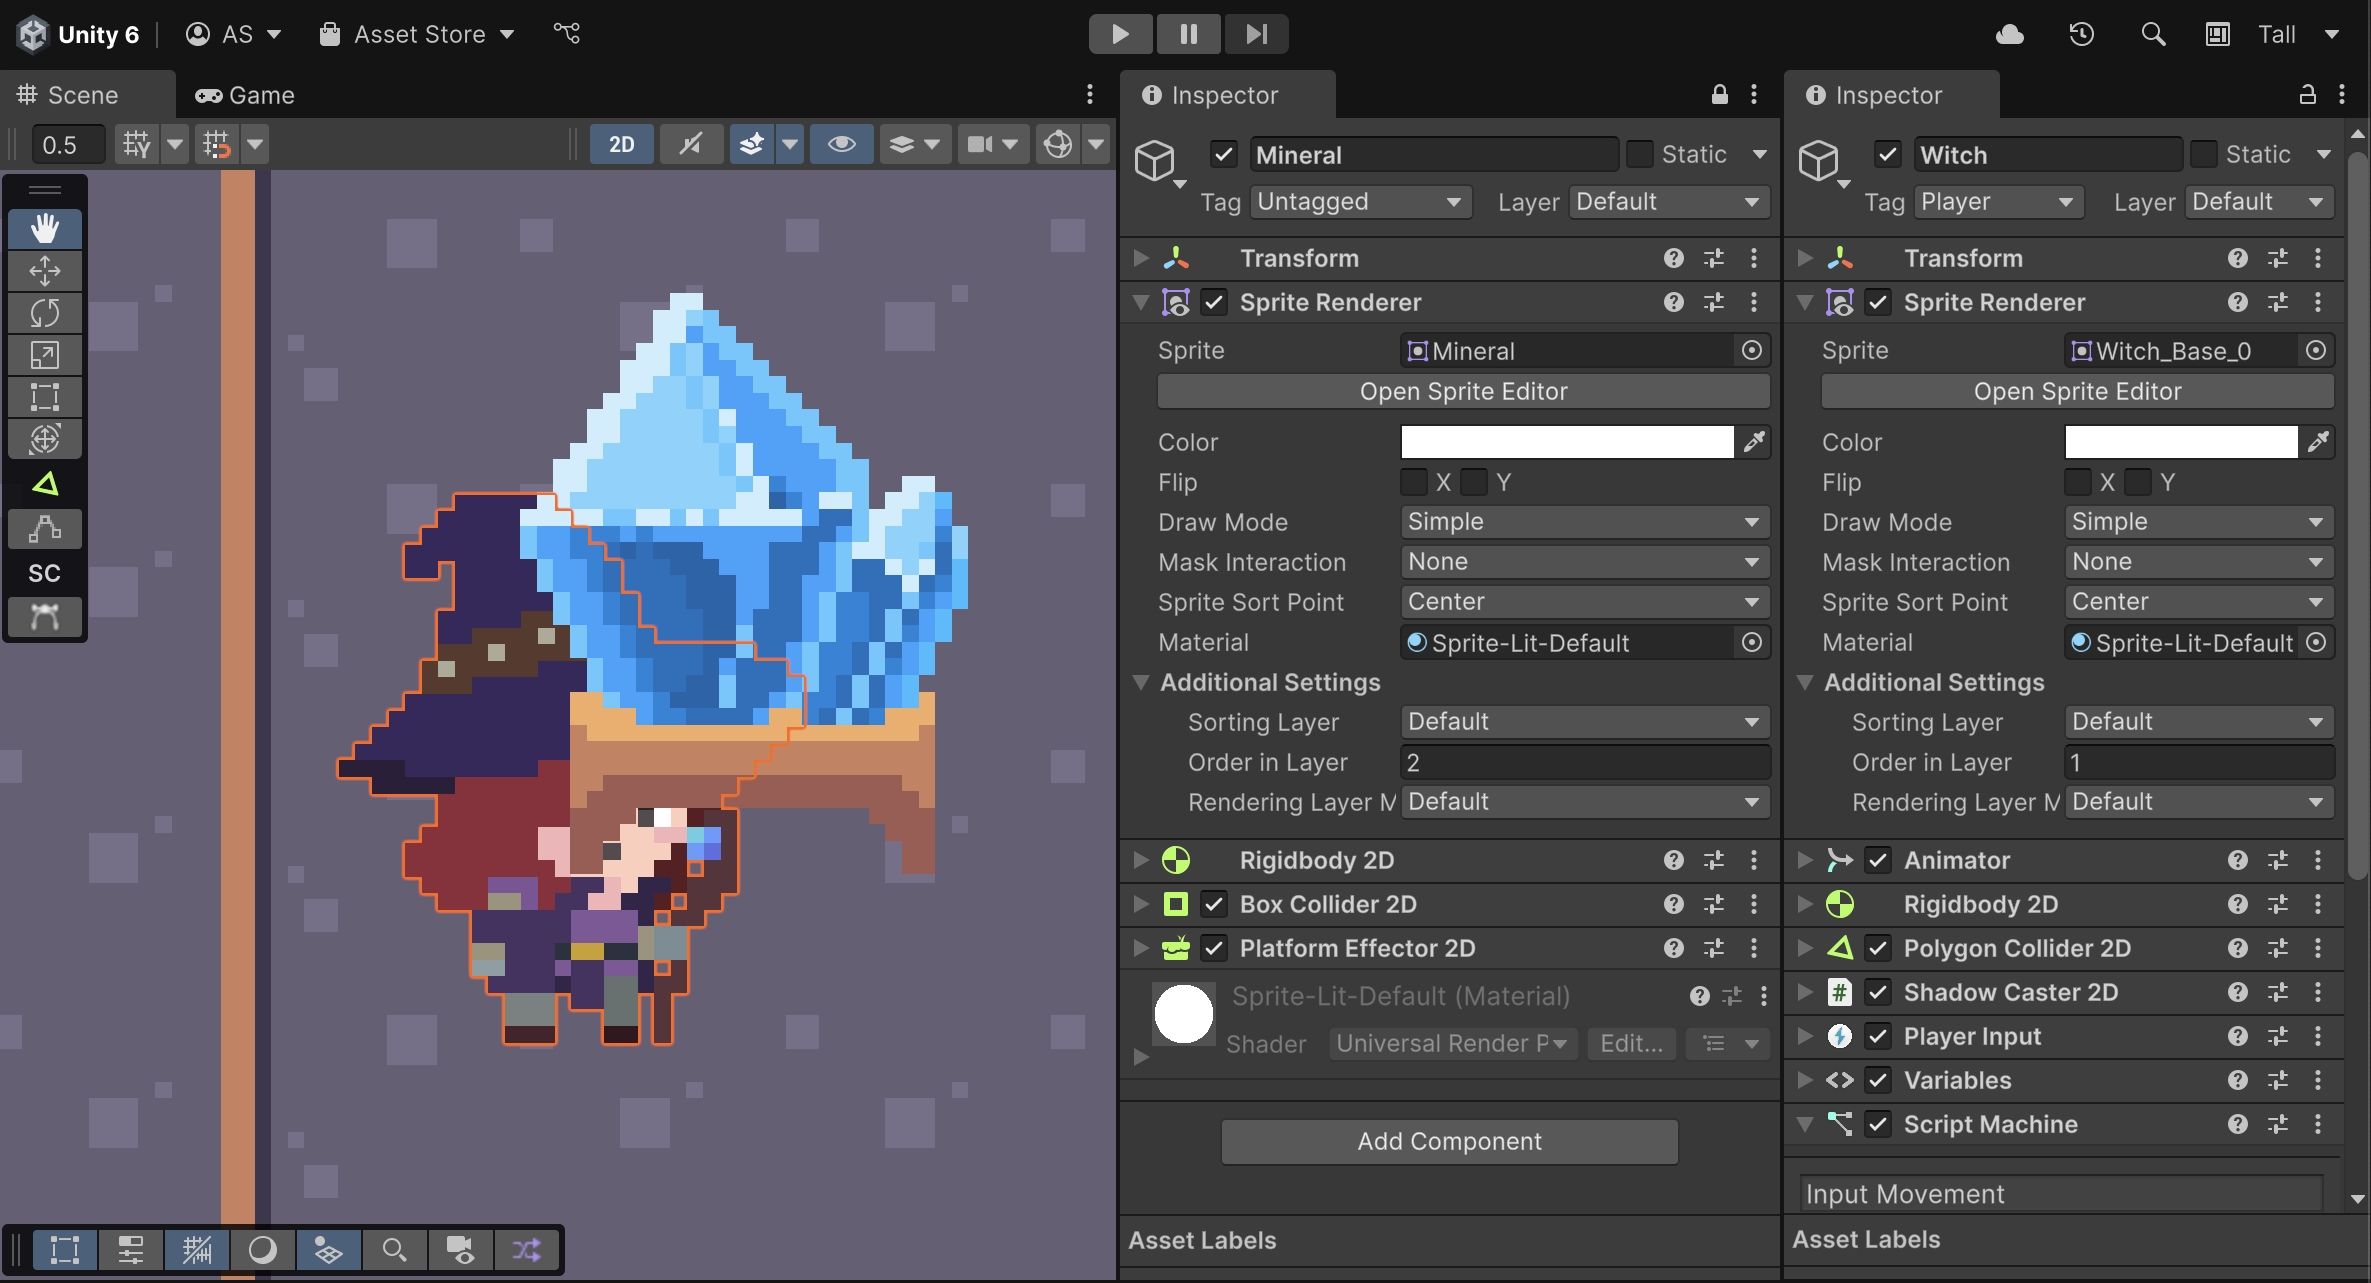
There are two easy ways to fix this. The first is to change the Witch GameObject’s Order in Layer property to 3, making it higher than the Mineral’s value. The second option is to assign a lower Sorting Layer to the Mineral. Since we want to demonstrate how Sorting Layers work, we’ll use the second method.
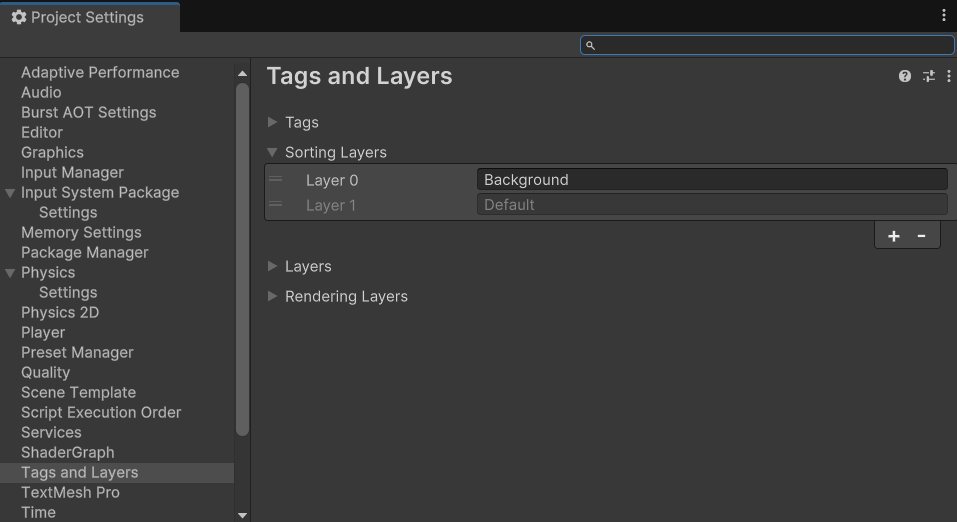
We’ve preconfigured this project so the Background layer is rendered before the Default layer. You can find this setting under Edit > Project Settings > Tags and Layers > Sorting Layers.
1. Set the Sorting Layer property of the Mineral GameObject to Background.
Now when you move the Witch GameObject over the Mineral GameObject, the Witch will be rendered on top of the Mineral GameObject, confirming that the sorting is working correctly.
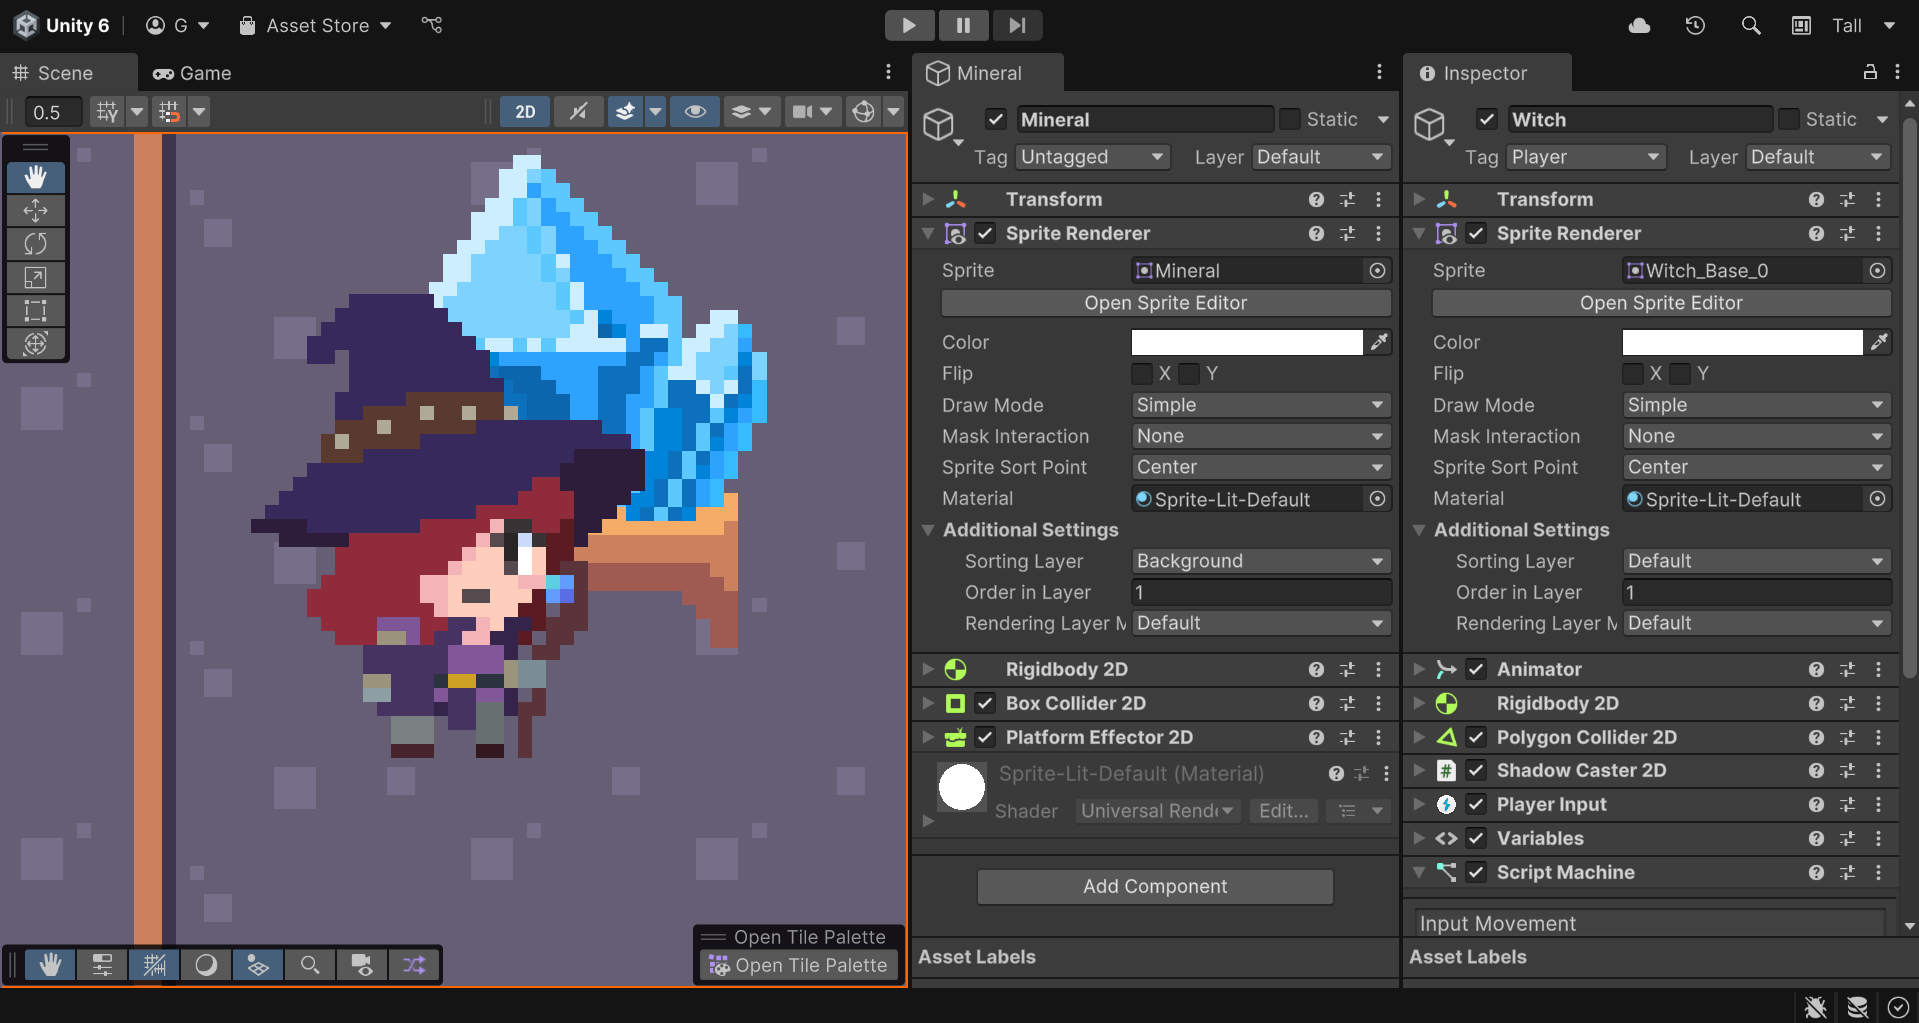
The Background layer is rendered first because its order precedes that of the Default layer in the Sorting Layers list. You can add a new Sorting Layer with the Add (+) button and rearrange the order by dragging the Layer handle. Sorting Layers are especially helpful when creating detailed scenes where the foreground and background are composed of multiple layers.
Tip: After adding a new Sorting Layer, be sure to save your project using File > Save or Ctrl+S (macOS: Cmd+S).
3. Partial lighting using Sorting Layers
Now that you have a solid understanding of Sorting Layers, it’s time to apply them in 2D Lighting by introducing the Target Sorting Layer, a property of the Light 2D component we haven’t explored yet. As the name suggests, this property defines which Sorting Layer the 2D Renderer component applies the lighting to. By default, the Target Sorting Layer is set to Everything. To see this property in action, follow these steps:
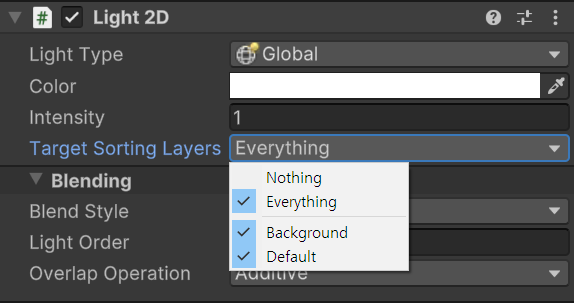
1. In the Hierarchy window, select the Global Light 2D GameObject.
2. In the Inspector window, locate the Light 2D component, open the Target Sorting Layers dropdown, and select Nothing.
The entire scene will now be completely black, just like a space without any light.
3. Open the Target Sorting Layers dropdown again, but this time, select Default.
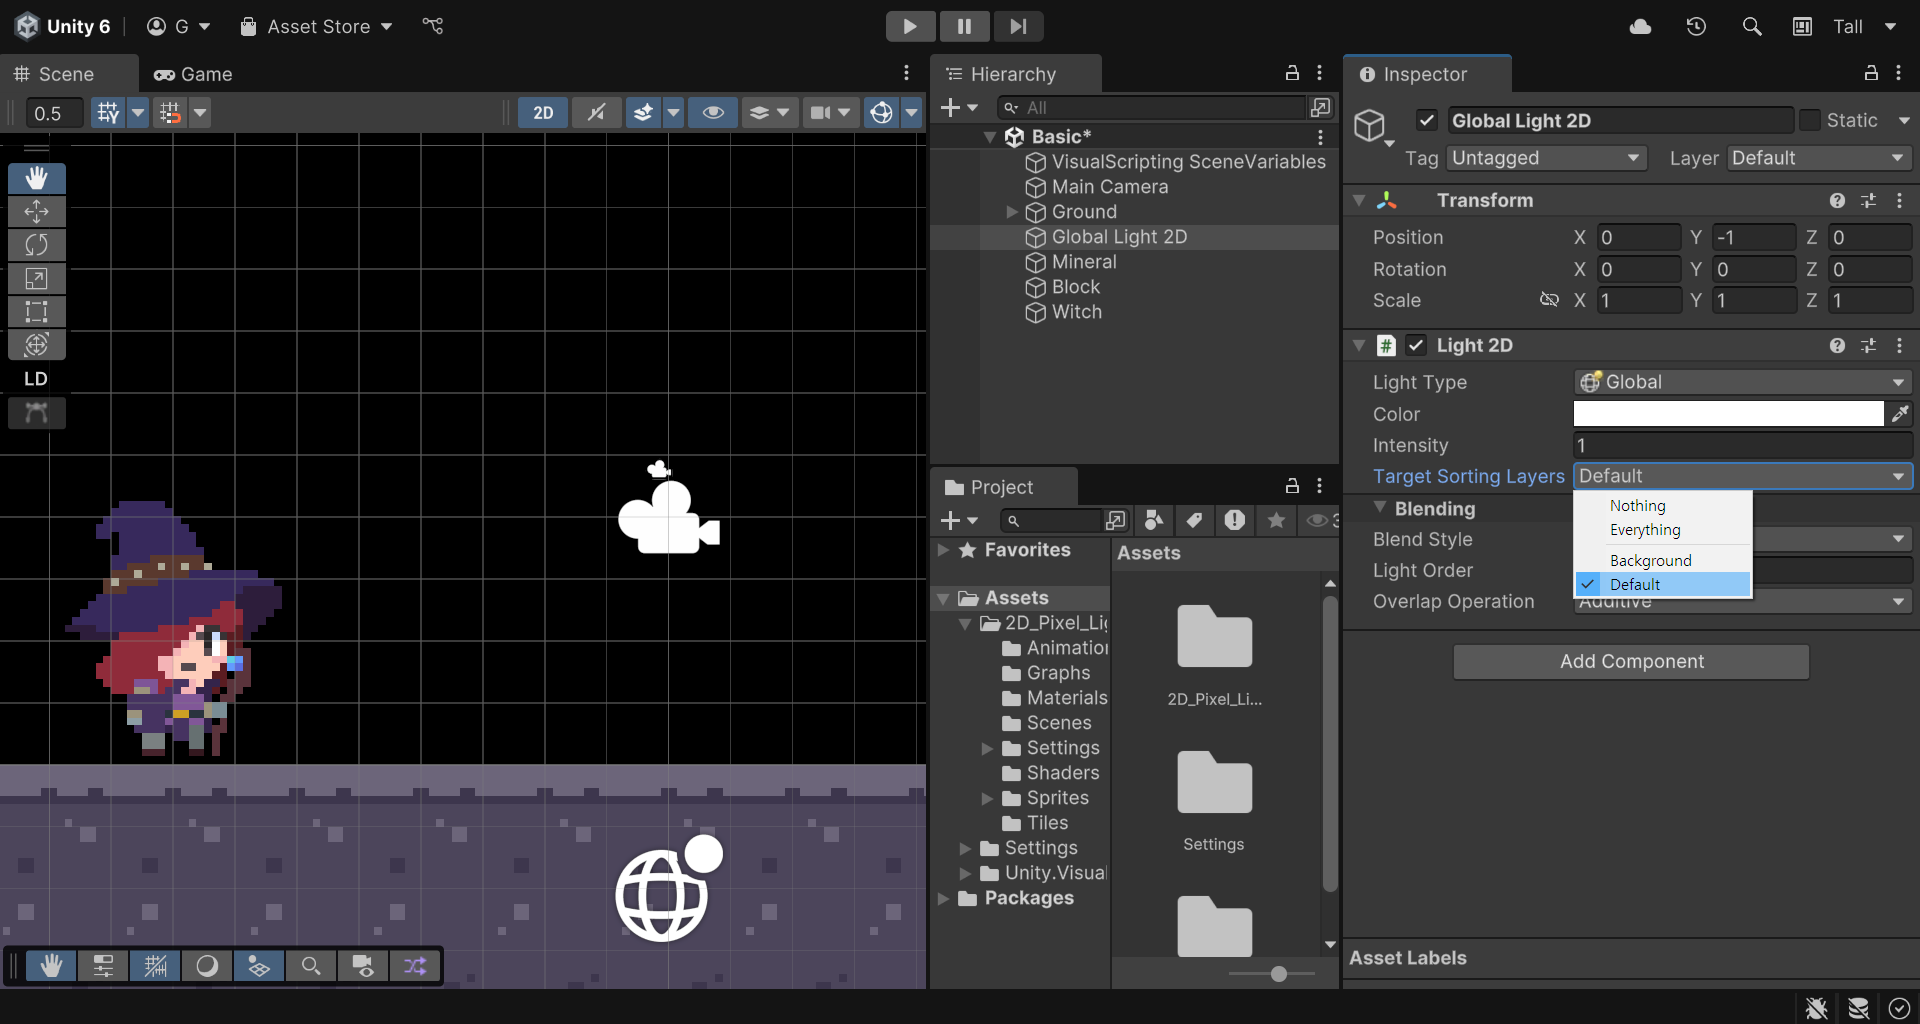
You’ll see that only the GameObjects that have their Renderer component’s Sorting Layer property set to Default will now be visible.
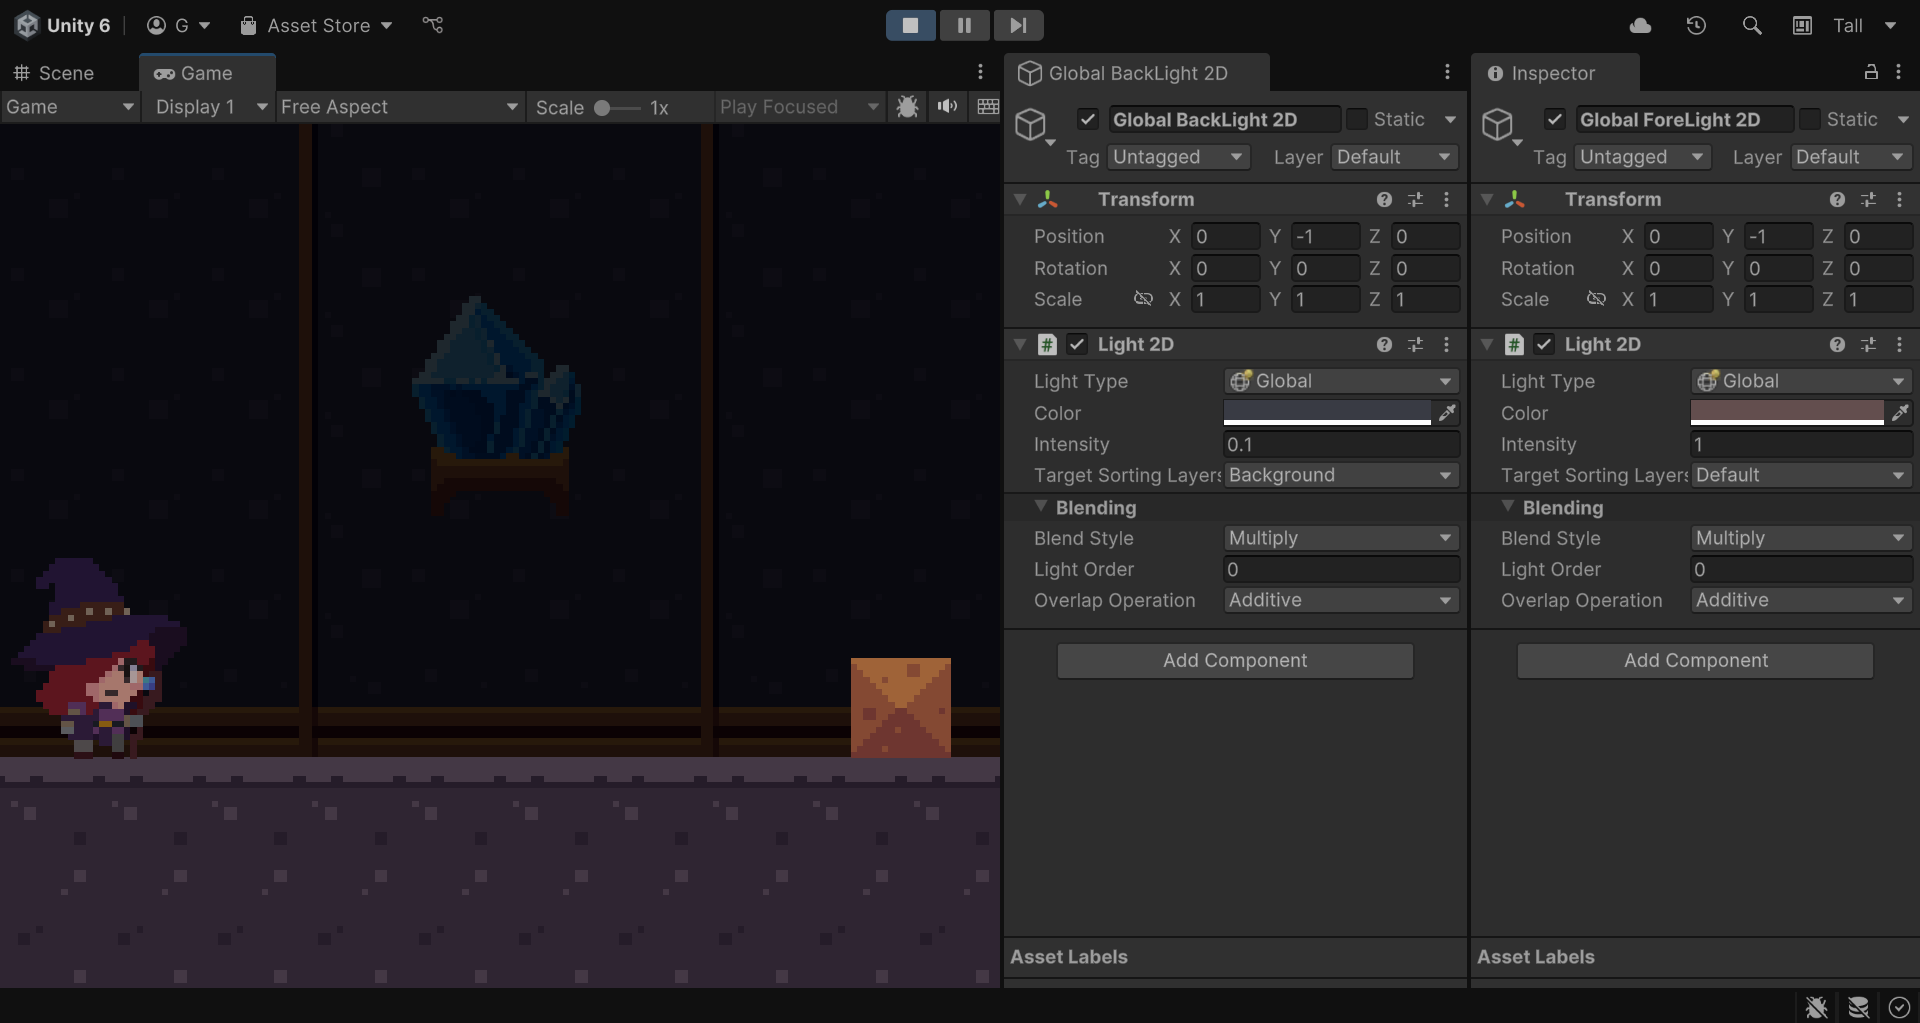
You can use the Target Sorting Layers to apply lighting selectively. For example, by adding another Global Light 2D GameObject and assigning it to a different Target Sorting Layer, you can create more complex scenes with distinct lighting for each layer.
This is what is done in the Complete scene, to replicate the setup follow these steps:
1. Rename the existing Global Light to “Global ForeLight 2D”.
- Set its Intensity to 1, and change its Color to a light brown (e.g. HEX #604940).
2. Duplicate it and rename the duplicate to “Global BackLight 2D”.
- Set the new light’s Intensity to 0.1 and change its Color to gray (e.g. HEX #333232).
- Assign its Target Sorting Layer to Background.
This configuration allows you to differentiate the lighting between the foreground and background, creating a richer and more atmospheric look for your scene.
4. Next steps
Congratulations!
You’ve added a Global Light 2D GameObject to your scene, providing the first source of general illumination to your scene. In the next tutorial, you’ll learn about another type of lighting that only affects certain areas: the Spot Light 2D.