Adding AI Navigation
Tutorial
Beginner
+10XP
40 mins
3135
Unity Technologies
In this tutorial, you will:
- Implement a NavMesh for AI-based enemy navigation.
- Add static and dynamic obstacles to challenge the player.
- Code win and lose conditions using Unity scripting.
Materials
Languages available:
1. Overview
In this tutorial, you will:
- Set up a basic Unity 3D environment with player and enemy GameObjects.
- Implement NavMesh for AI-based enemy navigation.
- Add static and dynamic obstacles to challenge the player.
- Code win and lose conditions using Unity scripting.
By the end of this tutorial, your game will look something like this if the player loses:
And your game will look something like this if the player wins:
2. Create an enemy
Follow the video or text instructions below to create an empty enemy GameObject, add a cube for the enemy’s body, and create a material for the enemy:
1. Create an empty Enemy GameObject.
- Create an empty GameObject and rename it to "Enemy".
- Reset the Transform component of the Enemy GameObject to position it at the origin.
2. Add a cube for the enemy’s body.
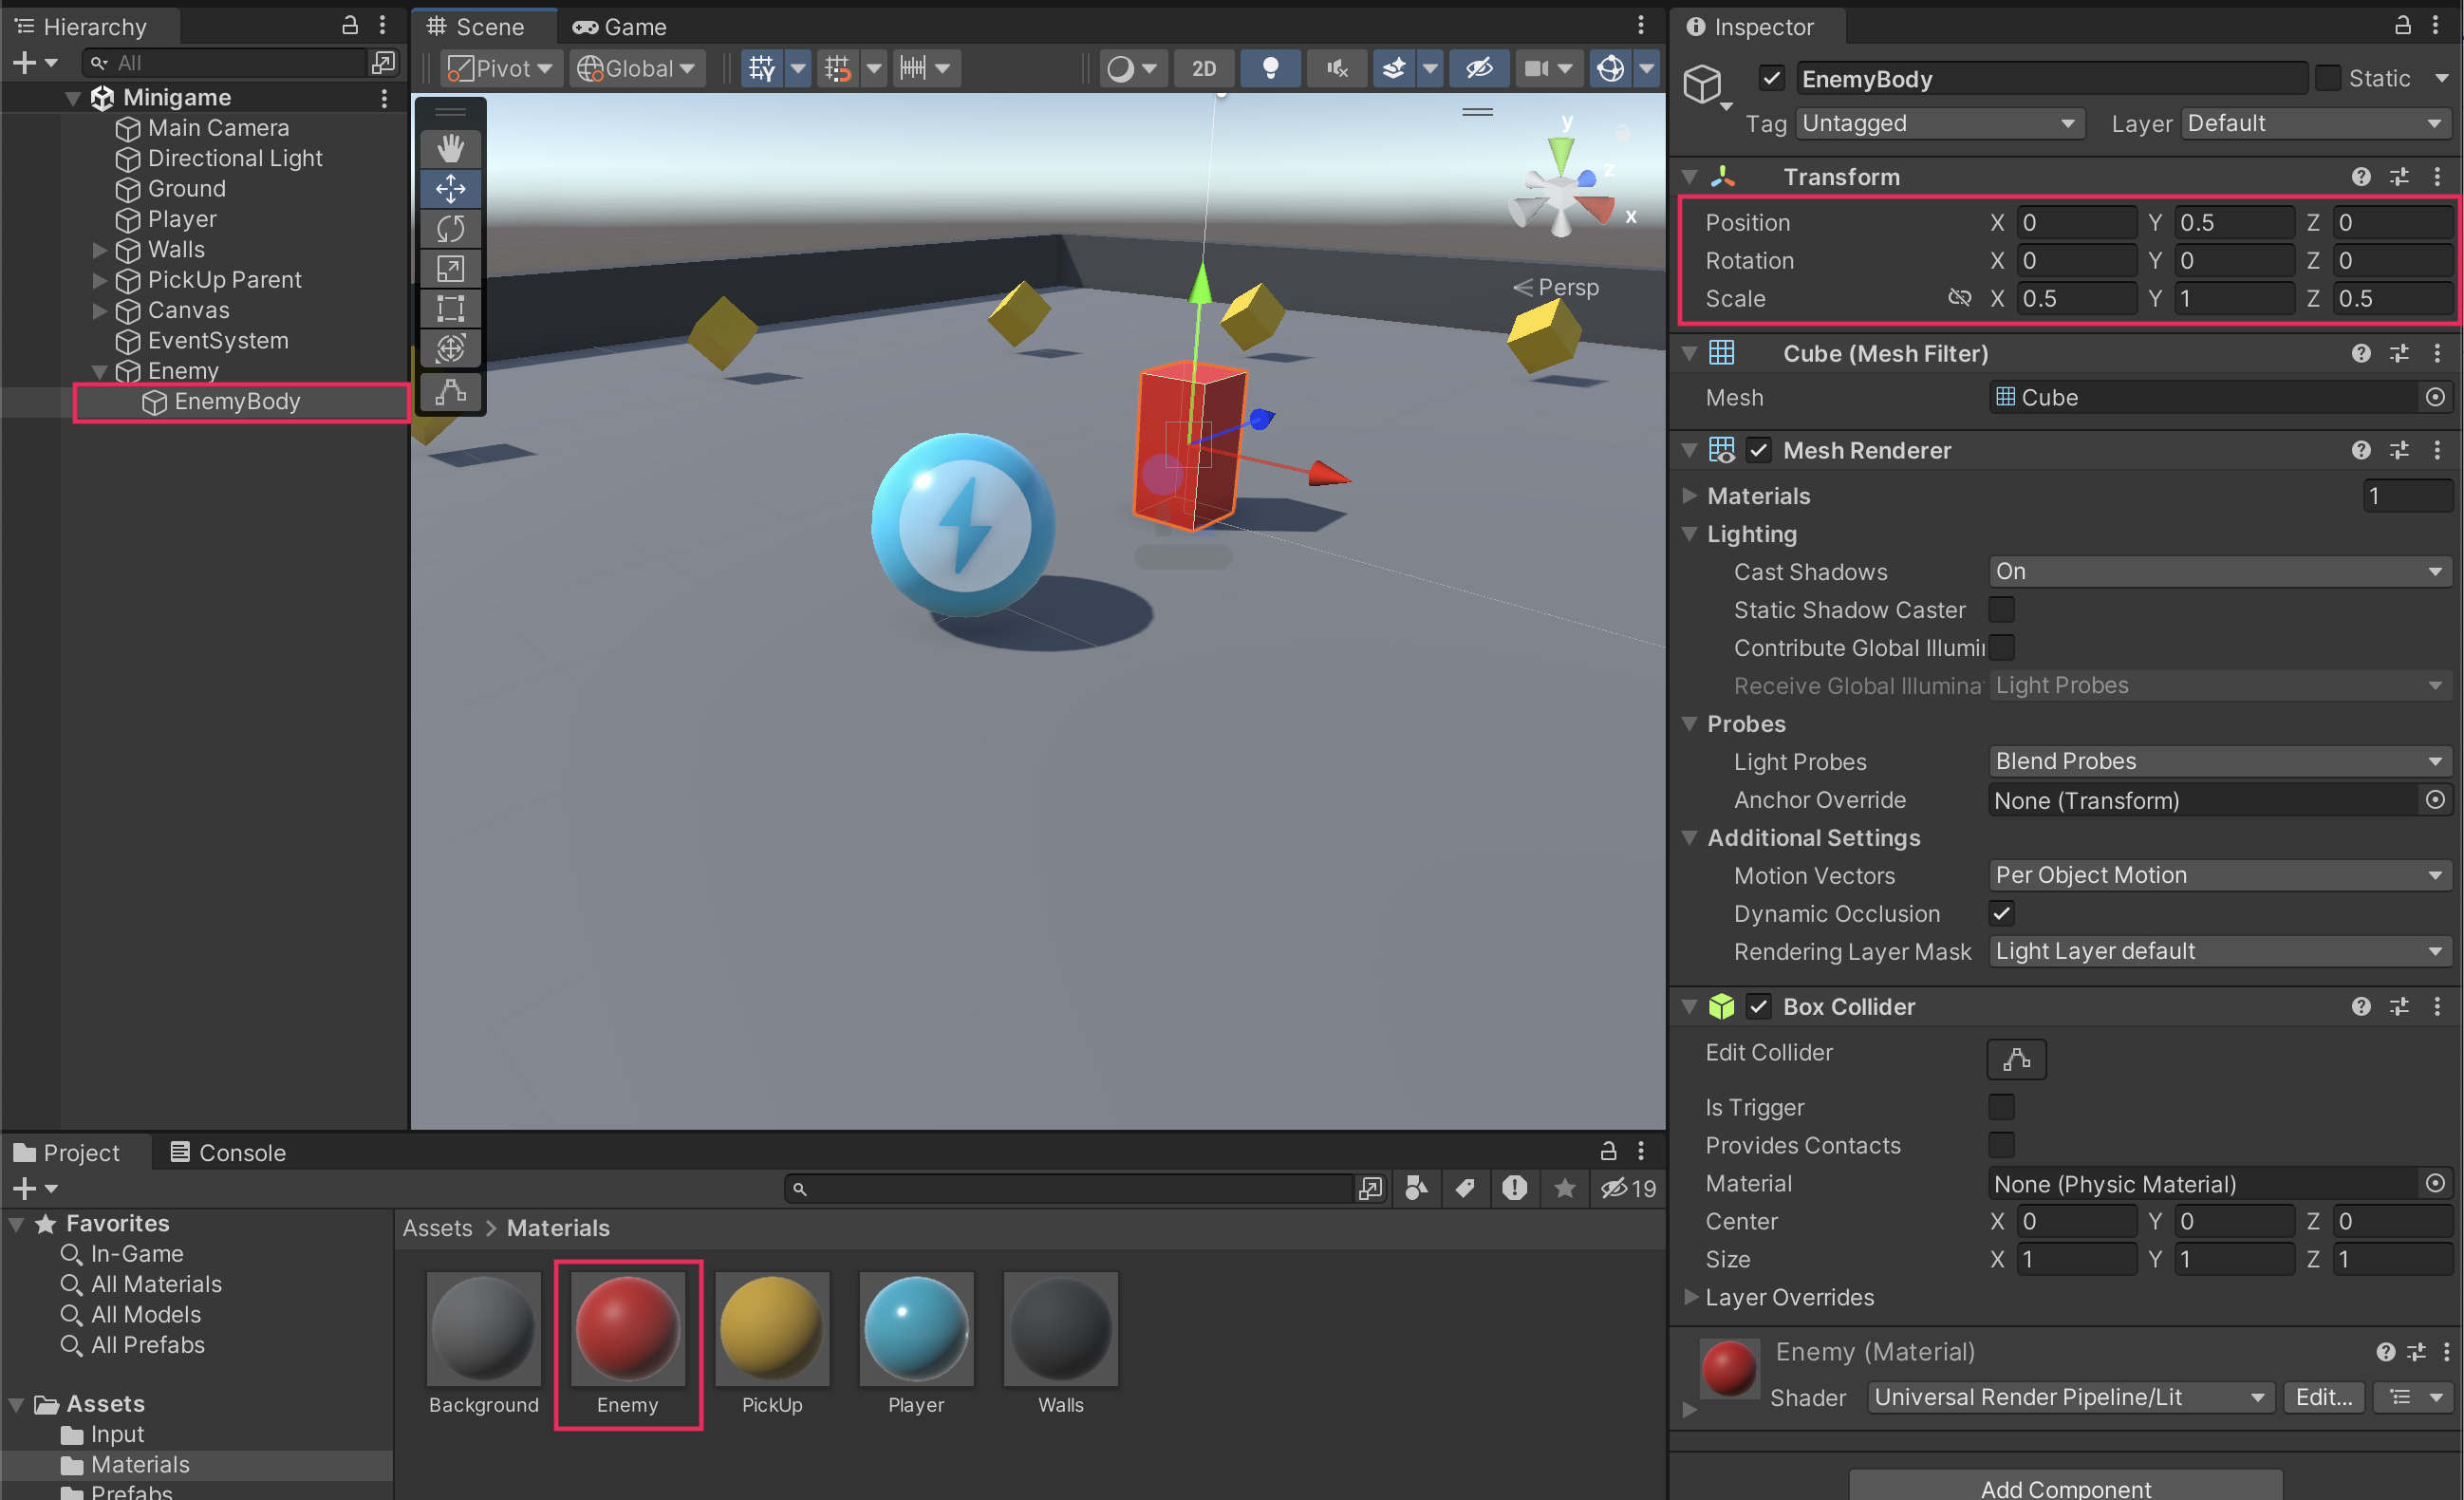
- In the Hierarchy window, right-click on the Enemy GameObject and select 3D Object > Cube, then rename it to "EnemyBody".
- Set the Scale values to 0.5, 1, 0.5 so that it is a taller rectangular shape.
- Set the Position of the EnemyBody to 0, 0.5, 0 to position it above the Ground GameObject.
3. Create a material for the enemy.
- Right-click inside the Materials folder and select Create > Material, then rename the material to "Enemy".
- Set the material’s Base Map color to whatever color you want for your Enemy GameoBject.
- Drag and drop the Enemy material onto the EnemyBody GameObject in the Scene view or Hierarchy window.
Note: For easier editing, you might want to move the Enemy GameObject out of the way a bit. Remember to move the Enemy parent GameObject and not just the EnemyBody child GameObject.
3. Bake a NavMesh
Follow the video or text instructions below to bake a NavMesh on the Ground GameObject, and configure what to include in the NavMesh surface:
1. Bake a NavMesh on the Ground GameObject.
- Select the Ground GameObject.
- In the Inspector window, select Add Component > NavMeshSurface.
- Select Bake in the NavMeshSurface component.
2. Configure what to include in the NavMesh surface.
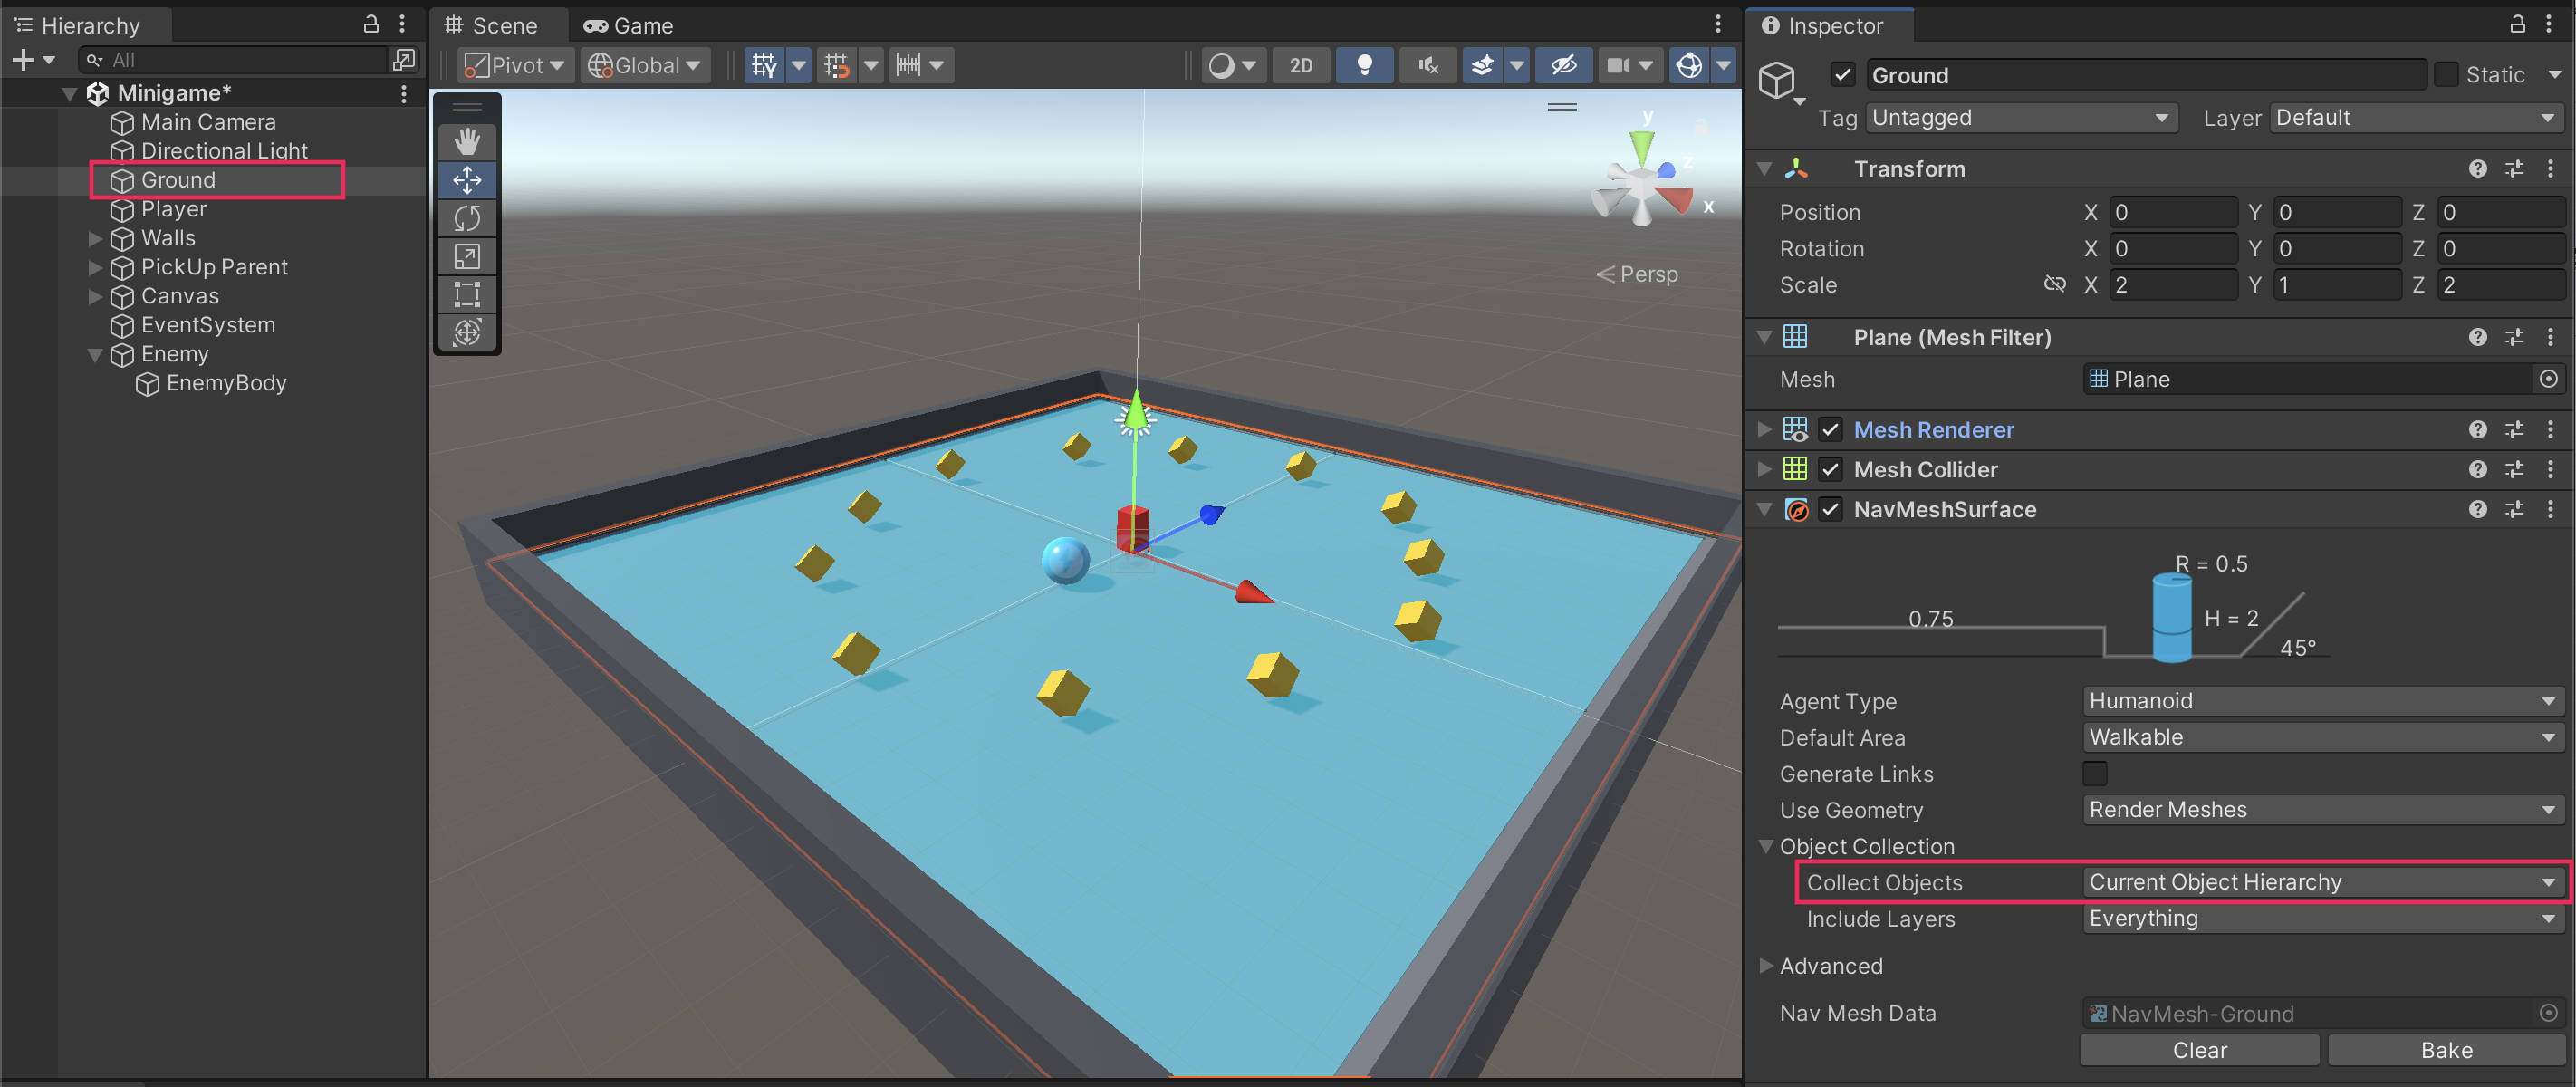
- In the Inspector window, in the NavMeshSurface component settings,use the foldout (triangle) to expand the Object Collection module.
- Open the Collect Objects property dropdown menu and select Current Object Hierarchy.
- Select the Bake button again.
- The PickUp GameObject collectibles should now be ignored in the NavMesh.
4. Make the enemy chase the player
Follow the video or text instructions below to make the enemy, add a new script, and program the NavMesh Agent to chase the player:
1. Make the Enemy a NavMesh Agent.
- Select the Enemy GameObject in the Hierarchy window.
- In the Inspector window, select Add Component > Nav Mesh Agent.
- Set the Speed property to a value around 2.5.
2. Add a new EnemyMovement script.
- With the Enemy GameObject selected in the Hierarchy window, select Add Component > New script in the Inspector window.
- Name your new script “EnemyMovement”.
- In the Project window, move the script from the root Assets folder into the Scripts folder.
- Open the new script for editing.
3. Add a variable to reference the Nav Mesh Agent component.
- Add the following “using” statement to the top of the script, right under the using UnityEngine line:
using UnityEngine.AI;- Above the Start function, add the following two new variables:
public Transform player;
private NavMeshAgent navMeshAgent;- In the Start function, add the following line of code to assign the NavMeshAgent variable:
navMeshAgent = GetComponent<NavMeshAgent>();4. Set the Enemy GameObject’s destination as the Player GameObject’s position.
- In the Update function, add the following code to update the Enemy GameObject’s destination to the Player GameObject:
       if (player != null)
       {
           navMeshAgent.SetDestination(player.position);
       }
5. Assign the player variable.
- Save the script and return to the Unity Editor.
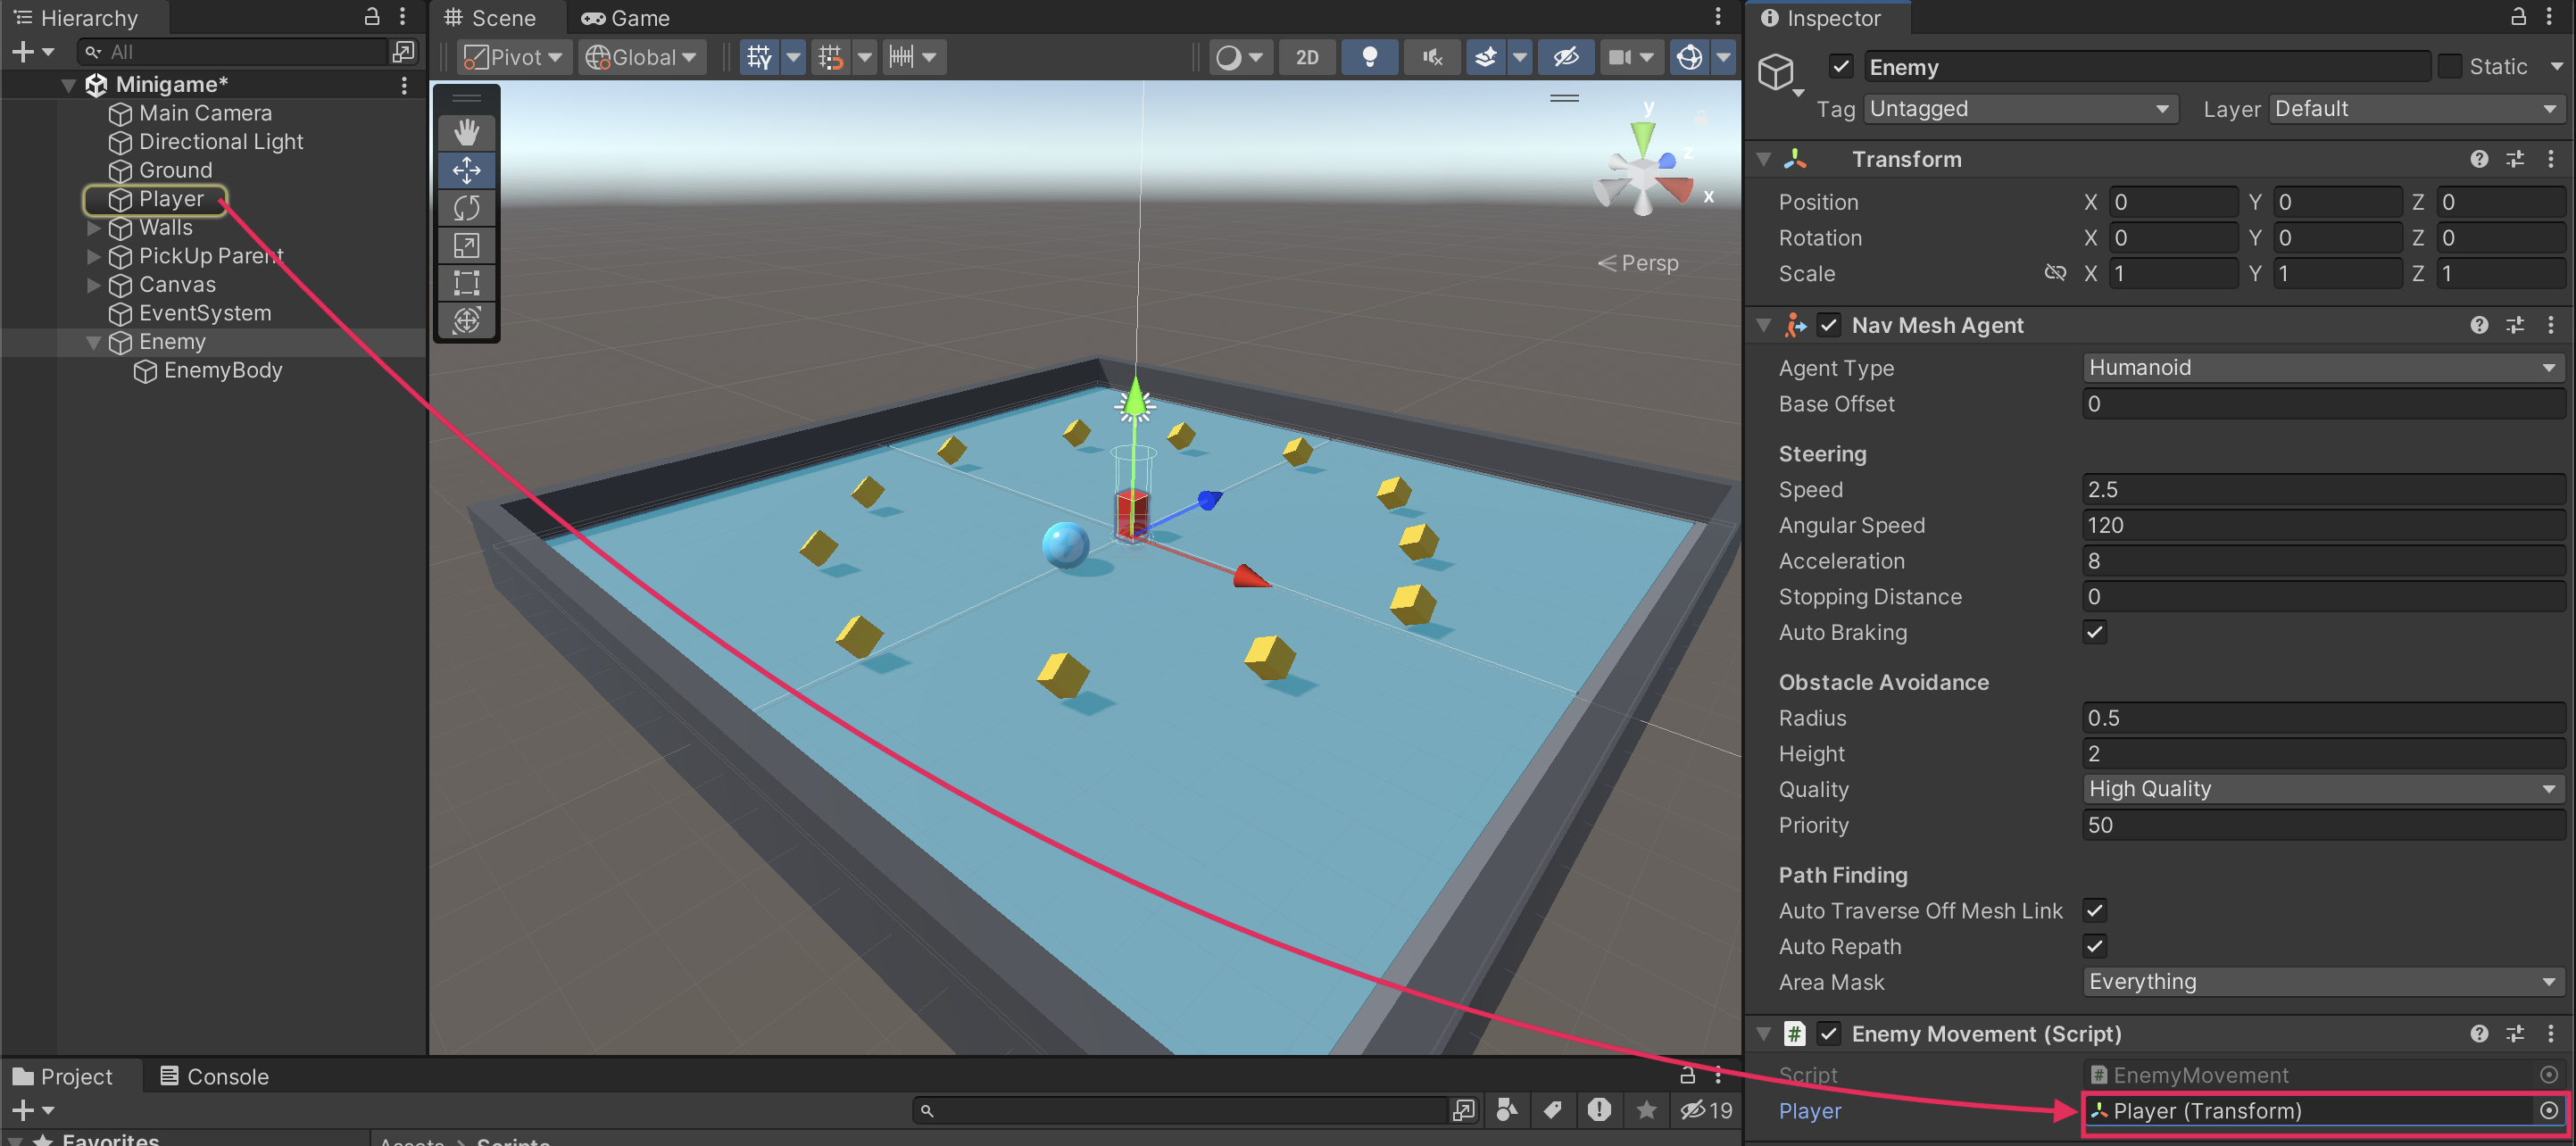
- Select the Enemy GameObject in the Hierarchy Window, then drag the Player GameObject into the Player slot of the EnemyMovement script component in the Inspector window.
Important: This step is very important and easy to miss. If you do not do this step, you will see a NullReferenceException error in the Console window and your game will not work.
6. Test the game.
- Save the scene and run the game.
- The Enemy GameObject should now chase the Player GameObject around.
- If it’s not working, you can check out the full script samples at the end of this tutorial.
5. Create static obstacles
Follow the video or text instructions below to create a variety of obstacles, include the obstacles in the NavMesh surface, and customize the agent settings:
1. Create a variety of obstacles.
- Create a new cube GameObject, then use the move, rotate, and scale tools to turn it into an interesting obstacle.
- Repeat this process to create additional obstacles of different shapes and sizes.
- Make sure to turn at least one object into a ramp to test your Enemy GameObject’s slope-climbing abilities.
2. Include the obstacles in the NavMesh Surface component.
- In the Hierarchy window, drag each obstacle GameObject onto the Ground GameObject to make them child GameObjects.
- Select the Ground GameObject and select Bake again in the NavMesh Surface component to regenerate the NavMesh with the updated obstacle configuration.
- You should now see the area around the obstacles carved out of the blue NavMesh Surface overlay in the scene.
3. Customize the agent settings.
- In the NavMesh Surface component, from the Agent Type dropdown, select Open Agent Settings. Alternatively, you can select Window > AI > Navigation.
- Increasing the step height will allow the agent to hop up onto higher surfaces.
- Increasing the max slope will allow the agent to climb up steeper hills.
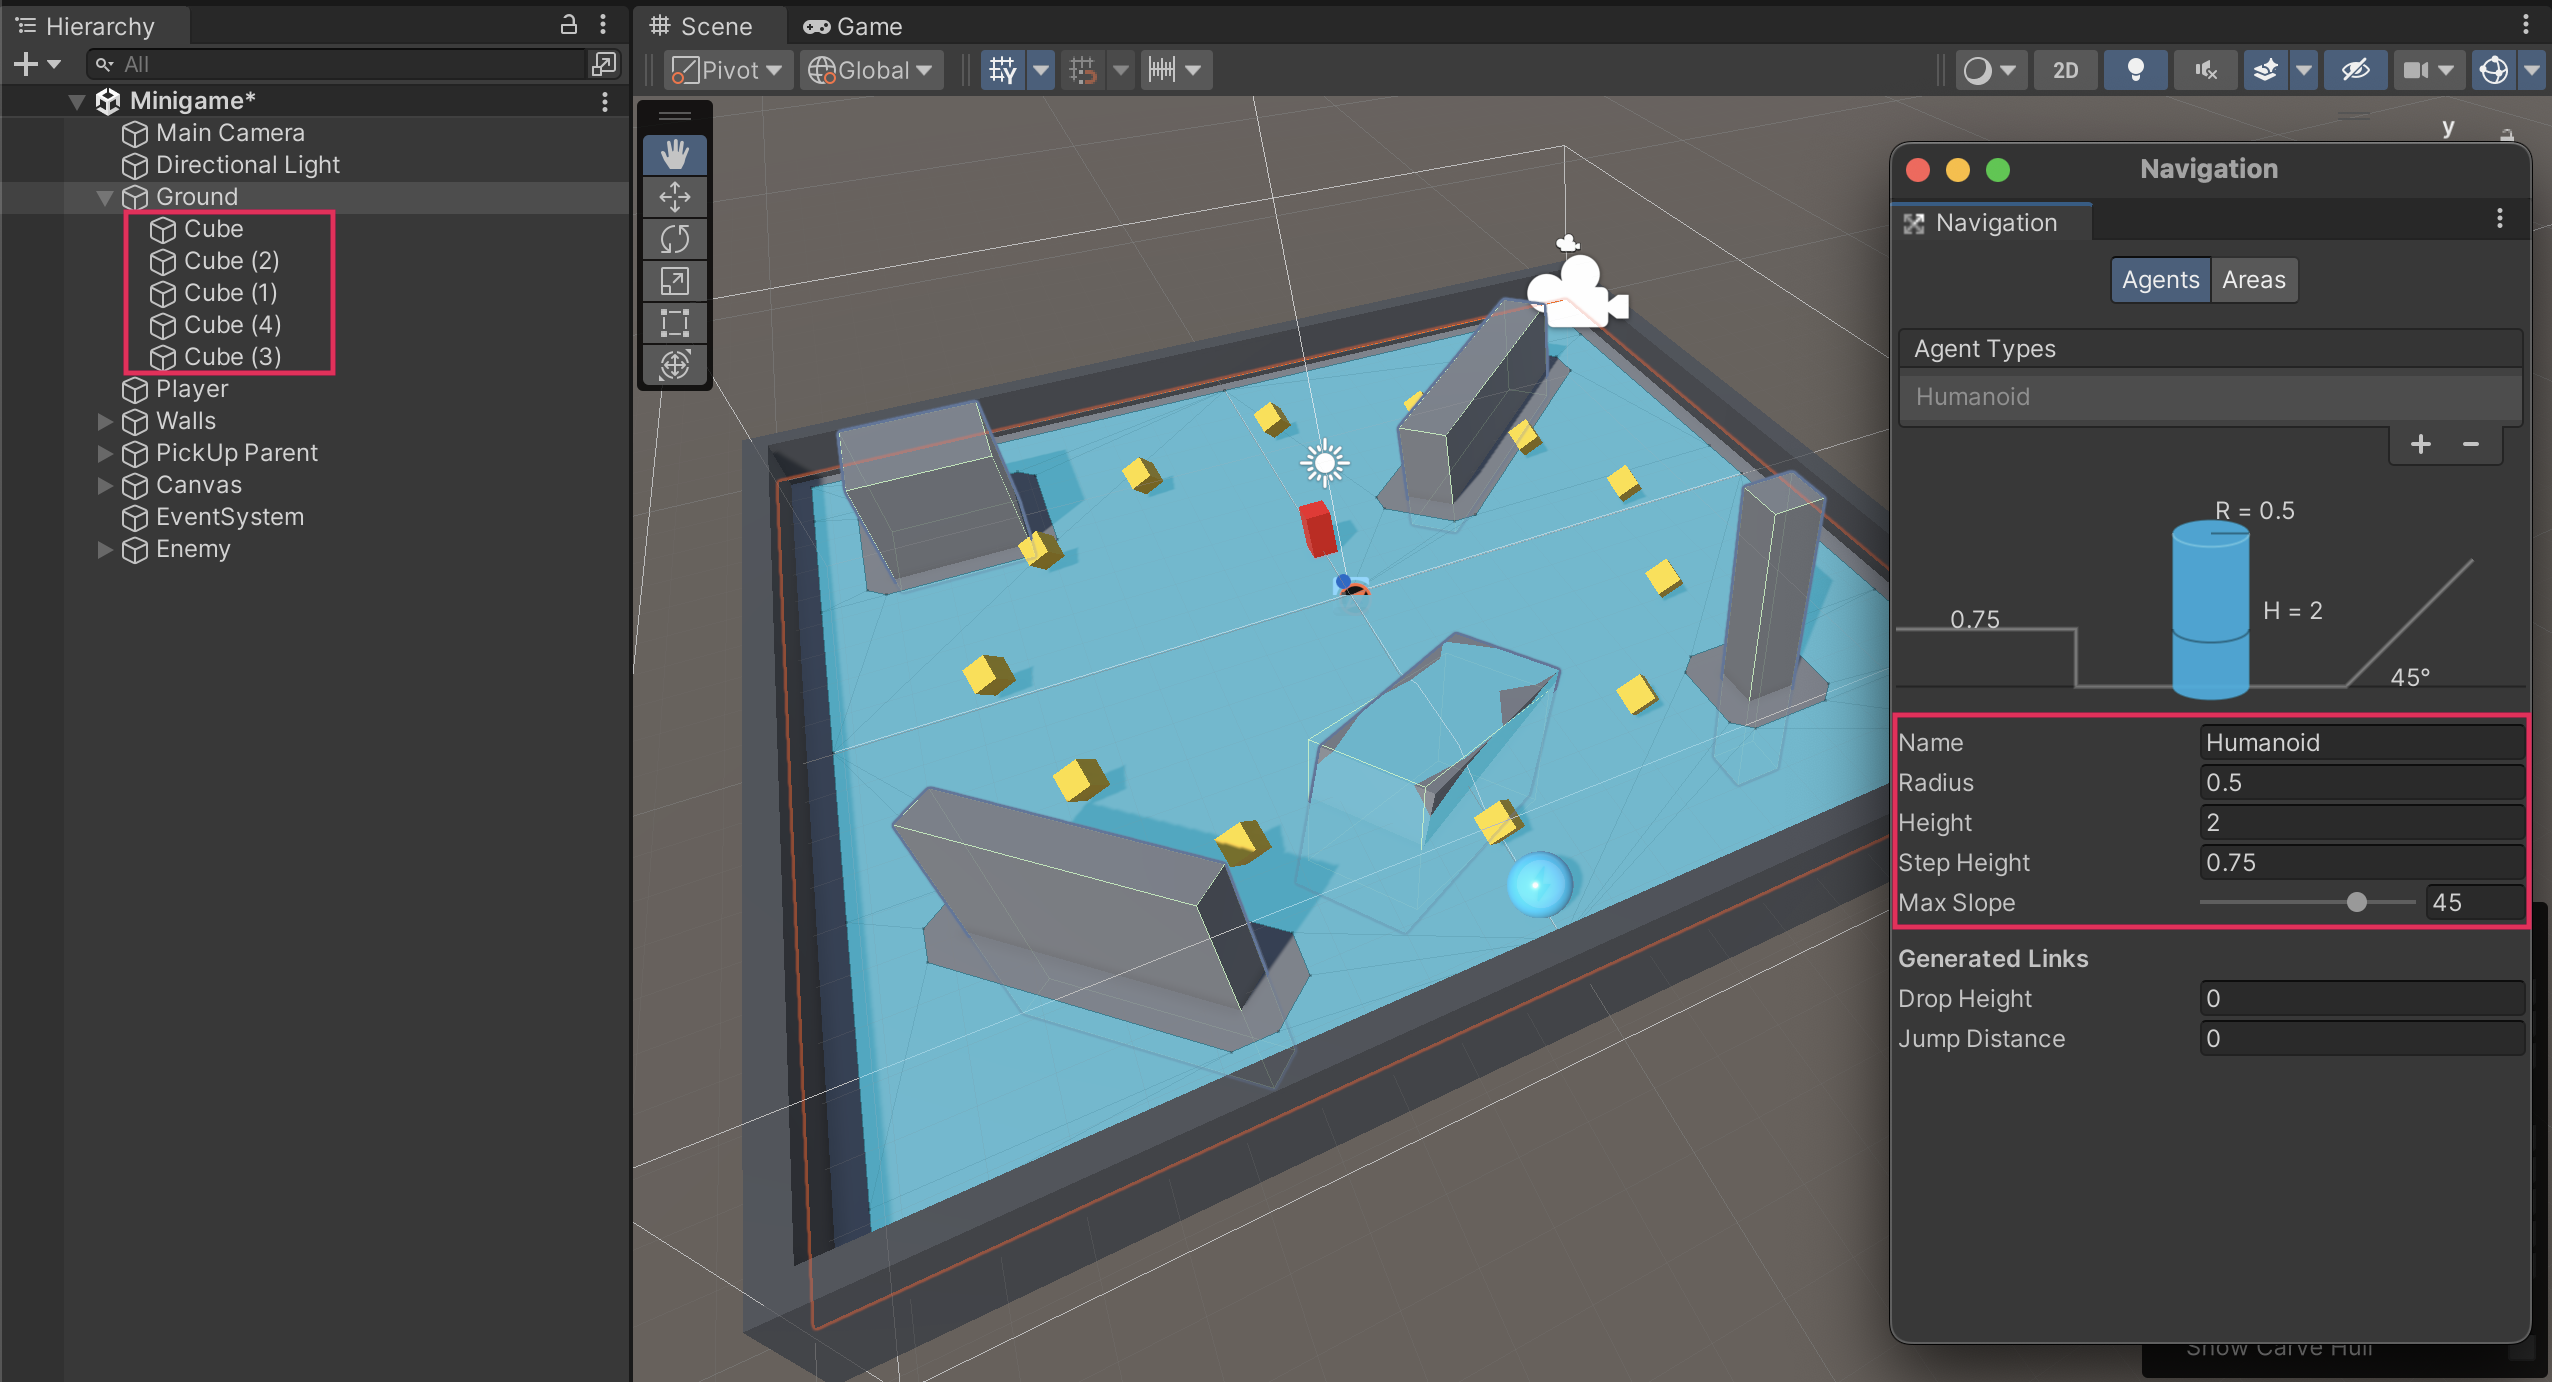
4. Test your game
- Test your game and experiment with different agent settings.
6. Create dynamic obstacles
Follow the video or text instructions below to create a light, movable cube, make the cube a NavMesh Obstacle, and turn it into a prefab:
1. Create a light, movable cube.
- Create a new cube GameObject and rename it to "DynamicBox".
- Scale and position the box to your liking in the scene.
- Create a new material named "Dynamic Obstacle", give it a color, and assign it to the new cube.
- In the Inspector window, add a new Rigidbody component, then reduce the Mass to around 0.1 so that it can be more easily pushed around.
- Test the scene and notice that the Enemy GameObject goes straight through the dynamic obstacle.
2. Make the cube a NavMesh Obstacle.
- Select the DynamicBox GameObject, then search for and add the NavMesh Obstacle component.
- Enable the Carve option in the NavMesh Obstacle component.
3. Turn it into a prefab.
- Drag the DynamicBox GameObject from the Hierarchy window into the Prefabs folder in the Project window. This will create a prefab of the DynamicBox GameObject.
- Duplicate and scatter the DynamicBox prefab instances around the play area as desired.
Note: You may want to create an empty parent object to hold all of these DynamicBox GameObjects to keep your Hierarchy window neat and organized.
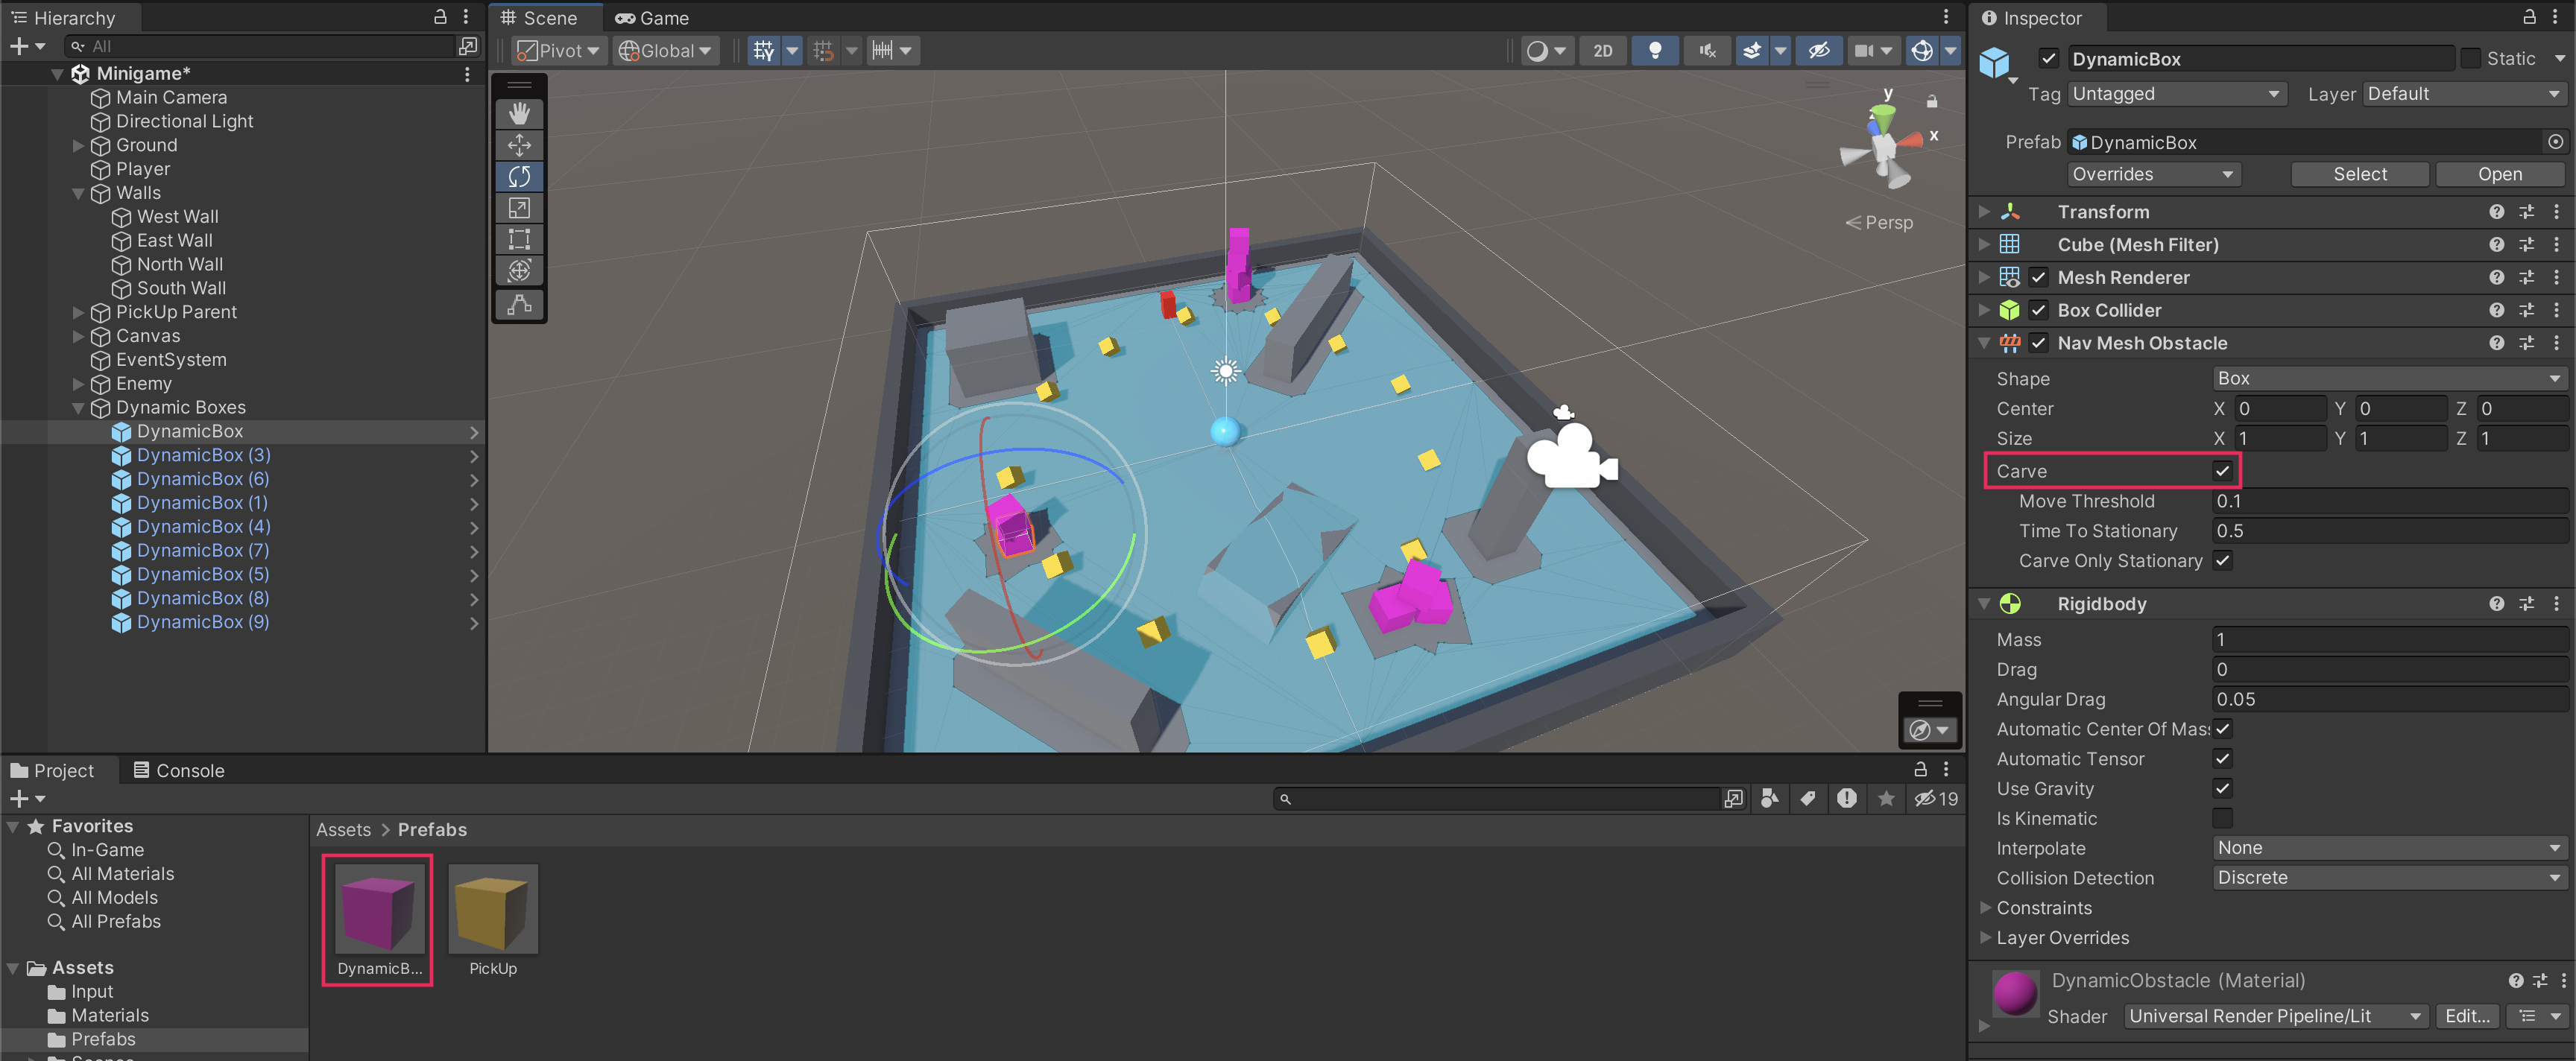
4. Test your game.
- Experiment with different stacks of dynamic obstacles to make the most fun play area.
7. Set the win and lose conditions
Follow the video or text instructions below to add a lose condition that destroys the player and says “You lose!”, add an “Enemy” tag to the EnemyBody GameObject, and destroy the Enemy GameObject when the player wins:
1. Add a lose condition that destroys the player and says “You lose!”
- Open the PlayerController script.
- Add the following new OnCollisionEnter function before the final curly bracket in the script:
private void OnCollisionEnter(Collision collision)
{
   if (collision.gameObject.CompareTag("Enemy"))
   {
       // Destroy the current object
       Destroy(gameObject);
       // Update the winText to display "You Lose!"
       winTextObject.gameObject.SetActive(true);
       winTextObject.GetComponent<TextMeshProUGUI>().text = "You Lose!";
   }
}
2. Add an “Enemy” tag to the EnemyBody GameObject.
- Save the script and return to the Unity Editor.
- Select the EnemyBody GameObject in the Hierarchy window.
- In the Inspector window, locate the Tag dropdown menu and select Add Tag.
- Select the Add (+) button to create a new tag and name it "Enemy." Make sure the capitalization matches what you wrote in your code.
- Save the new tag.
- In the Inspector window, select the EnemyBody GameObject again and set its tag to the newly created Enemy tag. Make sure you apply the tag to the EnemyBody child GameObject and not the Enemy parent GameObject.
- Run the game to test — now, when the Enemy GameObject collides with the player, the Player GameObject is destroyed and the updated text displays “You lose!”
3. Destroy the Enemy GameObject when the player wins.
- Open the PlayerController script again.
- Inside the SetCountText function, within the if (count >= 12) condition, add the following line to destroy the Enemy GameObject:
Destroy(GameObject.FindGameObjectWithTag("Enemy"));4. Test your completed game.
- Save the script and return to the Editor.
- Run the game to test the win condition. When you collect all the PickUp GameObjects, the Enemy GameObject is destroyed.
8. Final script samples
If your scripts are not working as expected, below are examples of what your code should look like at this point. The comments have been added to make the code more readable.
PlayerController.cs
using UnityEngine;
using UnityEngine.InputSystem;
using TMPro;

public class PlayerController : MonoBehaviour
{
 // Rigidbody of the player.
 private Rigidbody rb;

 // Variable to keep track of collected "PickUp" objects.
 private int count;

 // Movement along X and Y axes.
 private float movementX;
 private float movementY;

 // Speed at which the player moves.
 public float speed = 0;

 // UI text component to display count of "PickUp" objects collected.
 public TextMeshProUGUI countText;

 // UI object to display winning text.
 public GameObject winTextObject;

 // Start is called before the first frame update.
 void Start()
    {
 // Get and store the Rigidbody component attached to the player.
        rb = GetComponent<Rigidbody>();

 // Initialize count to zero.
        count = 0;

 // Update the count display.
        SetCountText();

 // Initially set the win text to be inactive.
        winTextObject.SetActive(false);
    }

 // This function is called when a move input is detected.
 void OnMove(InputValue movementValue)
    {
 // Convert the input value into a Vector2 for movement.
        Vector2 movementVector = movementValue.Get<Vector2>();

 // Store the X and Y components of the movement.
        movementX = movementVector.x;
        movementY = movementVector.y;
    }

 // FixedUpdate is called once per fixed frame-rate frame.
 private void FixedUpdate()
    {
 // Create a 3D movement vector using the X and Y inputs.
        Vector3 movement = new Vector3 (movementX, 0.0f, movementY);

 // Apply force to the Rigidbody to move the player.
        rb.AddForce(movement * speed);
    }


 void OnTriggerEnter(Collider other)
    {
 // Check if the object the player collided with has the "PickUp" tag.
 if (other.gameObject.CompareTag("PickUp"))
        {
 // Deactivate the collided object (making it disappear).
            other.gameObject.SetActive(false);

 // Increment the count of "PickUp" objects collected.
            count = count + 1;

 // Update the count display.
            SetCountText();
        }
    }

 // Function to update the displayed count of "PickUp" objects collected.
 void SetCountText()
    {
 // Update the count text with the current count.
        countText.text = "Count: " + count.ToString();

 // Check if the count has reached or exceeded the win condition.
 if (count >= 12)
        {
 // Display the win text.
            winTextObject.SetActive(true);

 // Destroy the enemy GameObject.
            Destroy(GameObject.FindGameObjectWithTag("Enemy"));
        }
    }

private void OnCollisionEnter(Collision collision)
{
 if (collision.gameObject.CompareTag("Enemy"))
    {
 // Destroy the current object
        Destroy(gameObject);

 // Update the winText to display "You Lose!"
        winTextObject.gameObject.SetActive(true);
        winTextObject.GetComponent<TextMeshProUGUI>().text = "You Lose!";

    }

}


}
EnemyMovement.cs
using UnityEngine;
using UnityEngine.AI;

public class EnemyMovement : MonoBehaviour
{
 // Reference to the player's transform.
 public Transform player;

 // Reference to the NavMeshAgent component for pathfinding.
 private NavMeshAgent navMeshAgent;

 // Start is called before the first frame update.
 void Start()
    {
 // Get and store the NavMeshAgent component attached to this object.
        navMeshAgent = GetComponent<NavMeshAgent>();
    }

 // Update is called once per frame.
 void Update()
    {
 // If there's a reference to the player...
 if (player != null)
        {
 // Set the enemy's destination to the player's current position.
            navMeshAgent.SetDestination(player.position);
        }
    }
}