
Adding Audio Effects to BIM Objects
Tutorial
intermediate
+10XP
20 mins
Unity Technologies
In this tutorial, we’ll use the BIM data associated with imported objects to identify elements to which you can add an Audio Source component.
Resources
Languages available:
1. Introduction
Spatial audio is an important part of creating immersive experiences. Since Reflect contains a virtual reality component, knowing how to add audio sources to specific objects at runtime will help you create more realistic and immersive Scenes. In this tutorial, we’ll use the BIM data associated with imported objects to identify elements to which you can add an Audio Source component.
For this tutorial, you will need:
- The Reflect Package installed via the Package Manager
- A Pro license for the Unity Editor
- The Unity custom package "AddingAudioEffectstoBIMObjects.unitypackage"
- The Revit sample project exported to Reflect using the Reflect plugin in Revit
2. Adding the AudioSource Component
Typically, when you want to add an Audio Source component, you would add it to a GameObject in your Scene and then set it up according to your needs. In this tutorial, however, you will be adding the component via script, allowing you to use the same process for the Reflect Viewer streamed model, as those GameObjects are not available until the project is running.
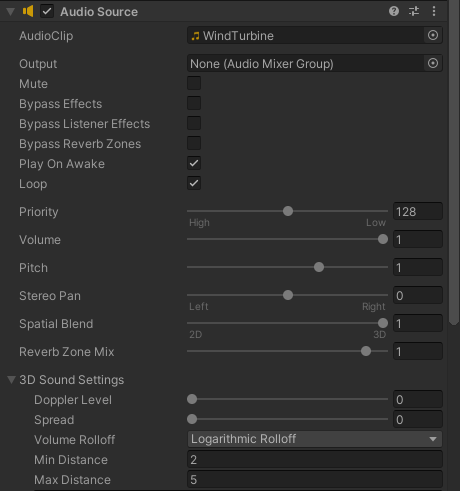
This script will add the component, look for the specified Audio Source, and then set the audio to your specifications. Let’s start by looking at the Audio Source component and the settings we want (Figure 01).
The Audio Source component gives you access to various settings that control the behavior of the sound source in your Scene:
- You will be setting the AudioClip (1). This is the sound file you wish to play.
- Next, you’re going to switch the sound on by checking Play On Awake (2) and then setting it to Loop (3).
- You want to make sure that the Spatial Blend (4) is set to 1. In this case, we are using our audio in a 3D setting. Setting the Spatial Blend to 1 tells Unity we want a 3D sound effect.
- The Doppler Level (5) controls how the sound behaves when you move past it, or the other way around. This is the change in pitch that you experience when a car drives past you with the horn blaring. In this Scene, the movement is not severe enough that we require a Doppler Effect, so we set it to 0.
- The Volume Rolloff (6) controls how severely the sound fades out as you move away. With a LinearRolloff, the sound fades out evenly as you move away. Logarithmic Rolloff, on the other hand, is how sound behaves in the real world and will cause the sound to fall off fast as you begin to move away and then very gradually as you move farther away. This is the default setting and you won't have to set it with the script.
- Min Distance (7) sets a radius around the source where the sound will be at full volume. Max Distance is the maximum distance where the sound stops attenuating. This means that the sound will be audible in the entire Scene, but past this point, it will not fade any further. Should you need the sound to stop completely at Max Distance, you can set the Volume Rolloff to Linear or Custom.
3. Setting up the Scene
In this tutorial we’ll use a model that was imported by Reflect instead of the streamed model. The reason for this is that the script should run only after the model has imported. Currently, Reflect doesn’t have a “Completed Importing” event, so we can’t test it before running the script. There are workarounds, but they’re beyond the scope of this script.
The script will work on the Reflect Viewer streamed model as well, but using the imported model makes testing and experimenting easier and faster.
1. Install the Reflect package from the Package Manager. Note that the Reflect package is a preview package. To enable preview packages within the Package Manager, click Advanced > Show preview packages.
2. Run the Reflect Importer from Window > Reflect (Figure 02).
3. For this tutorial, you need to open the standard Revit sample project and export it to Reflect, then import it using the Reflect Importer (Figure 03). Should you prefer to use your own project, you will have to adjust the script to use your specific values.
4. Drag the imported model Prefab, "rac_basic_sample_project_phases_{3D}" into the Scene (Figure 04). This is found at the following folder path: Assets > Reflect > Revit Sample Project.
5. Import the custom package "AddingAudioEffectstoBIMObjects.unitypackage"
6. Create a new empty GameObject and change the name to AudioSource (Figure 05).
7. Drag the AddAudio script on to the new empty GameObject. The script will be explored below (Figure 06).
8. Run the project. If you select one of the wind turbines, you will see that an Audio Source component has been added. Note the settings (Figure 07):
4. Understanding the Script
The script is well-documented to explain what each step does and you should open it and review it for this tutorial (Figure 08).
The script starts by looking for the wind turbine by using the metadata imported by Reflect. It uses the “Family” key to look for a family called WindTurbine (1). If you use your own model, you can change the script by changing the key and the value that it looks for.
Once it finds the family in the Scene, it will add an Audio Source component (2). Next, it will set the Audio Source to the sound file in the Assets > Resources (3) file and then set up the audio as per our needs (4). Finally, it sets the audio to “loop” and starts playing it (5).
5. Next Steps
In this tutorial you learned how to find a specific element in your model using the associated BIM data and then add components via script at runtime. This is a very powerful tool that will allow you to create boost functionality in your Scene.