
Alpha Channels and Normal Map Best Practices
Tutorial
intermediate
+0XP
15 mins
Unity Technologies
In this tutorial, we examine best practices when working with Texture alpha channels and normal maps.
Languages available:
1. Alpha Channel Best Practices
It’s important to be selective when adding an alpha channel to a Texture. Adding transparencies often makes a Texture’s file size larger, as this converts the Texture to a 32-bit format, increasing memory use.
Another way to store an alpha channel is by using the extra channel for roughness or metallic Textures. In Unity, these types of Textures sometimes use two channels out of three — roughness (G) and metallic (B) — leaving you with the (R) channel free to use.
By using the free channel to store the alpha mask, you can keep the diffuse Texture at 16-bit and effectively halve the file size. An ambient occlusion map usually can also be baked in the diffuse map.
The following image shows how you can store an opacity map in a Texture’s red channel instead of storing it in its own alpha channel, effectively using that spare red channel to save memory:
2. Normal Map Best Practices
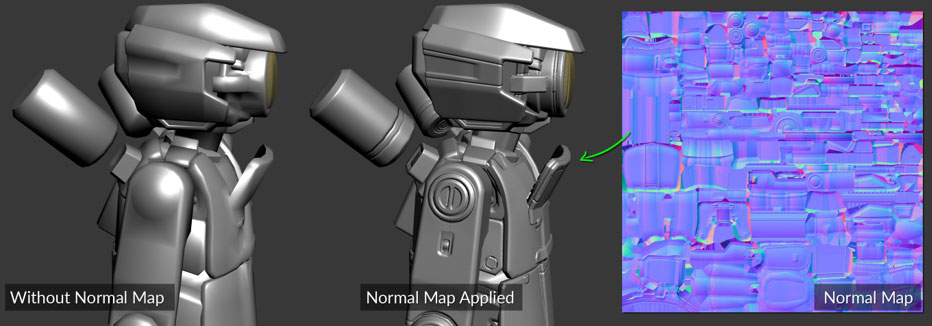
Using a normal map is a great way to make a 3D object appear to have more detail. Normal maps are best used to add smaller details, such as wrinkles or bolts, that would otherwise need lots of triangles to model. Whether you use normal mapping depends on the type of game and its art direction.
Using normal maps does come with a small cost. Remember:
- A normal map is an extra Texture, meaning more Texture fetches, which results in more memory being used.
- Normal maps should be used sparingly when targeting lower-end devices.
Despite these costs, performance can be improved if using normal maps allows you to greatly reduce the number of triangles in the Scene.The following image shows how you can use a normal map and Textures for smaller details:
3. Normal Map Baking Best Practices
Using a cage is a great way to get a high-quality normal map, regardless of the surface that you are baking.
A Mesh cage is basically a larger, pushed-out version of a low polygon count model. Cages are often used to limit the raycast distance that’s used during normal map baking. A cage can also solve problems with split-normal seams on the normal map, as demonstrated below:
Most normal mapping software can make your cage automatically. However, you can make one by copying your low polygon model and then increasing its scale slightly.
The cage allows the program to change the direction that’s used to calculate the normal when baking. This produces far better results on split-normal and hard edges, as you can see in the following image:
If your baking software supports it, match the Mesh names to mitigate the problem of creating a wrong normal map projection. When objects are too close to each other, such as the parts of the robot in the following image, they can unexpectedly project the normal map onto the wrong face. Matching the Mesh names ensures that baking is only done on the surface with a matching name.
This solution can sometimes require a separate bake for ambient occlusion. This means you should split UVs on hard edges because a continuous UV causes visible seams. The general rule is to keep the angle less than 90 degrees or set it as a different smoothing group. Coincide UV seams with different smoothing groups on the triangles.
The following image shows how a break in a UV looks on hard edges:
4. Conclusion
Normal maps and alpha channel Textures can be powerful tools for optimizing mobile applications when used thoughtfully. In the next tutorial, we’ll take a deep dive into Texture settings in Unity, exploring the best practices for different scenarios.