
Applying 2D Colliders for Physics Interactions
Tutorial
Beginner
+10XP
15m
(337)
Unity Technologies
For assets in a 2D project to have a physical presence in the Scene and be able to interact with each other, they must have a 2D Collider. A 2D Collider is a component that helps define an asset’s physical shape to determine how it will interact with other colliders in a Scene.
In this tutorial, you'll learn about the types of 2D Colliders you can use, and you'll apply a Collider to a GameObject.
Languages available:
1. Applying 2D Colliders for Physics Interactions
This tutorial has been verified using Unity 2019.4.12f1 LTS - https://learn.unity.com/tutorial/applying-2d-colliders-for-physics-interactions-2019-3
For assets in a 2D project to have a physical presence in the Scene and be able to interact with each other, they must have a Collider 2D. A Collider 2D is a component that helps define an asset’s physical shape to determine how it will interact with other Colliders in a Scene. It does this via a built-in physics engine. In this tutorial, we’ll cover types of Collider 2D’s and how to apply them.
2. Types of Colliders
There are seven types of Collider 2D’s you can choose from: the Box Collider, the Capsule Collider, the Circle Collider, the Composite Collider, the Polygon Collider, and the Edge Collider, and Tilemap Collider (Figure 01).
All of these Colliders share properties as they all derive from the same generic Collider 2D. Each Collider, however, is optimized for a particular shape. The Circle Collider works best with circular objects; the Box Collider works best with rectangular objects; the Polygon Collider works best with complex shapes; the Edge Collider works well for surfaces and the Tilemap Collider works best for tilemaps.
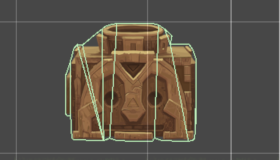
The Polygon Collider and the Edge Collider are both created by several points, or vertices, with edges connecting them. But the Polygon Collider must be a closed shape covering an area while the Edge Collider must be open, defining an edge of one or more segments (Figure 02).
A good use of the Edge Collider is to make a solid surface, such as a wall, rather than use a series of Box Colliders.
The Composite Collider doesn’t define an inherent shape like the other Colliders. Instead, it merges the shapes of any Box Collider or Polygon Collider that you set it up to use. The Composite Collider uses the vertices from these Colliders and merges them together into new geometry that’s controlled by the Composite Collider itself (Figure 03).
All of the Colliders share two properties in the Inspector: Is Trigger and Material. Other properties for the Colliders are unique settings for defining the size and shape of a particular Collider (Figure 04).
- Material: You can define how an object behaves when it hits a Collider, such as making it bounce off at a faster rate or come to a dead stop. This is different than a standard surface material as it will try to simulate the physical properties of the object rather than its visual properties.
- Is Trigger: A trigger executes a script when another Collider touches or passes through it. Disabling it causes prevents other Colliders from passing through
3. Applying a 2D Collider
To apply a Collider 2D to a GameObject:
1. Select the GameObject and click Add Component.
2. Type Collider in the search field to bring up a list of Colliders. Select the Collider you wish to use. For this example, select the Box Collider 2D.
Your GameObject will now have an attached Collider component that is automatically sized to the entire Sprite (Figure 05).
You can now adjust properties like size, tiling, and radius. Each Collider component has its own set of properties to determine its size and behavior.
To adjust the Collider’s size, change the Size X and Y properties and the Offset so the Collider fits to the actual size of the Sprite. It’s important to have a close-fitting Collider, as this will determine its physical size within the game (Figure 06).
4. Conclusion
Being able to add Collider 2Ds to your GameObjects allows for physical interactions, meaning you’re now able to create collisions, impassable walls, debris, obstacles, and more.