
Applying UVs in PiXYZ Studio
Tutorial
Beginner
+10XP
45m
(18)
Unity Technologies
PiXYZ Studio enables you to create and apply UV’s in two ways, projection and unwrapping. PiXYZ Studio makes it a simple task to generate UV’s and provides several tools to aid in the process of manipulating the UV’s, eliminating a need for another step or program to manage the UV’s of the model. You can take care of everything in readying your CAD model for real-time application use. In this tutorial, you will learn how to apply UV's to your models in PiXYZ Studio.
Languages available:
1. Applying UVs in PiXYZ Studio
PiXYZ Studio takes care of everything you need to ready your CAD model for real-time application use. It allows you to create and apply UVs in two ways, projection, and unwrapping, and it makes it easy to generate UVs. It also provides several tools that simplify the process of manipulating UVs and eliminates the need for another program.
2. The UV Tools
PiXYZ Studio provides several tools to help generate UVs for your model. (Figure 01)
- Generate UV By Projection: This generates UVs for selected parts of your model by projecting them from a Bounding Box. It handles the projection in different ways: Bounding Box, Cubic Bounding Box, Custom Bounding Box, Box, Sphere, Cylinder, Plane, and View.
- Generate UV By Unwrapping: This generates a UV by unwrapping its Mesh. It automatically makes necessary cuts and stitches and packs the UV.
- Repack UV: This will repack the UV depending on defined input, such as UV Channel, Resolution and Padding.
- Normalize UV: This will normalize your UV’s texture coordinates to the [0, 1] range.
- Swap UV Channel: This will move the selected UVs to a new UV Channel
- Remove UV: Removes the selected UV
- Copy UV: Copies the selected UV
- UV Viewer: Opens a window to preview the selected UVs
3. Types of UV Generation
Before you can manipulate nor adjust a UV, you have to first create it. There are two ways to do this: UV Projection and UV Unwrapping. UV Projection projects the texture onto selected parts from a Bounding Box, creating texture coordinates. UV Unwrapping takes the selected parts’ Meshes and unfolds them by creating seams in the texture.
Projection separates UVs by their normals. This creates UV shells: disjointed pieces tied together by the direction of the UV normals. Projection generally creates six UV shell groups and doesn’t attempt to flatten them to prevent stretching of the textures. (Figure 02)
Unwrapping will create more unified UV shells, as the UV is generated by the unfolding of the Mesh onto a flat plane. (Figure 03)
4. UV Projection
With PiXYZ, there are multiple ways to generate UVs by projection but we will focus on the primary three ways; Bounding Box, Cubic Bounding Box, and a Custom Bounding Box. For all three options, the user defines the size of the Bounding Box, which determines the size of the UVs. Finally, the user defines the Channel on which to generate the UVs, with the default being 0.
There are differences between these options. Bounding Box will not generate UVs at the same scale on each axis, while Cubic Bounding Box will generate UVs at the same scale on each axis. Custom Bounding Box allows the user to define the scale of the projection on each axis.
The Bounding Box and Cubic Bounding Box windows are similar in available options. At the top of the Property window is a link to open the documentation for that Properties window on the PiXYZ site. (Figure 04)
The following properties can be changed with the Projection mapping:
- New Preset Button: Clicking this will save a preset of the current values. Once a preset is saved, it can be selected later.
- Scene Paths: This shows the number of parts selected in the Scene.
- Select Button: Allows the selection of more parts in the Scene
- Use Local AABB: This option is only available for Bounding Box and uses the local axis for the scale of the UVs.
- UV 3D Size: Determines the size of the Bounding Box
- Channel: Allows the user to select which channel will generate the UVs.
- Override Existing Uvs: Toggle this to overwrite any existing UVs generated for a particular UV Channel.
The third option for UV Projection is the Custom Bounding Box. (Figure 05)
The Custom Bounding Box window has the same settings and properties as the Bounding Box projection except for the local axis; instead, it allows you to define the axis scale.
In order to generate the UVs: (Figure 06)
- Select the part(s) you wish to generate and apply UVs to.
- Click UV > Generate UV By Projection > Projection On Bounding Box.
- A new window will open. Under UV 3D Size, define the size of the Bounding Box. This will determine the scale of the UVs. The higher the value, the larger the projection. You want the box to be big enough to encapsulate the part(s) you’re generating the UVs so the shells will fit into the [0, 1] range of the UV.
- Select which UV Channel you wish to use. The default is 0.
- Click Execute.
PiXYZ will now generate the UVs. In the lower-right window, you’ll see a progress bar. The length of time required to generate the UVs depends on the complexity and number of parts selected.
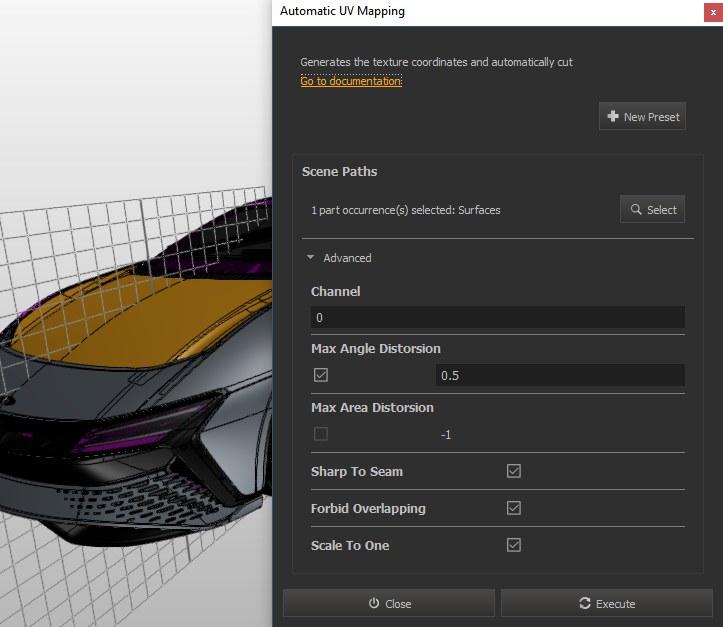
5. UV Unwrapping
The automatic UV Mapping window for generating the UVs by UV Unwrapping has a few settings you should be familiar with to help create an optimized UV shell. (Figure 07)
The following are the properties of the UV Unwrapping window:
- New Preset Button: Clicking this will save a preset of the current values. Once a preset is saved, it can be selected later.
- Scene Paths: This shows the current number of parts selected in the Scene.
- Select Button: Allows the selection of more parts in the Scene.
- Channel: Allows the selection of which UV Channel on which to generate the UVs.
- Max Angle Distortion: This sets the upper limit of the angle distortion that happens when unfolding UVs.
- Max Area Distortion: This sets the upper limit of the area distortion before the UVs are scaled to 1.
- Sharp to Seam: If enabled, this treats any sharp angles on the Mesh as seams.
- Forbid Overlapping: If enabled, it prevents UV shells from overlapping.
- Scale to One: When enabled, these scales generated UVs to the [0, 1] UV range.
6. Conclusion
PiXYZ Studio is a one-stop application for preparing your CAD models for real-time applications. It eliminates the need to use a third-party program to generate UVs and expedites the process via automation.