
Assets shouldn't be liabilities
Exercise
Beginner
+60XP
35m
Unity Technologies
In this session we will learn how to make a plan for assets – the sounds, images, models, animations and other resources that make up a game – to avoid nasty surprises later in development.
Languages available:
1. Planning for Assets
2. Using other people’s work
There’s plenty of great free assets (art, sounds, animations, and so on) for games on the Internet, and using them can save you an enormous amount of time. Even professional teams often find or purchase assets to speed up development. But before grabbing that “ka-ching!” sound or sprite sheet for your game, make sure you are legally allowed to use it. It’s the professional and polite thing to do. This course doesn’t cover copyright law and certainly can’t provide legal advice. But here are a few resources that can help you understand the rules in the United States. This guide from Stanford is a good place to get started. Here’s a highlight:
- With one important exception, you should assume that every work is protected by copyright unless you can establish that it is not... The exception is for materials put to work under the “fair use rule.”
- Here’s a pretty readable summation of fair use in video games. Start with “What’s Protectable in Video Games Under Copyright Law?”
- And this article from the US government calls itself Copyright Basics, but it’s actually pretty detailed.
But if all that seems difficult, don’t worry – there’s plenty of assets out there that the creators want you to use, as long as you follow their rules (such as giving them credit). Look for artwork that is explicitly labeled as “public domain” or “Creative Commons”, make sure you read and understand the rules, and go ahead.
3. What does a good asset inventory look like?
To make your feedback useful, or to assess your own work, briefly answer at least two of the following questions.
1. Do you notice any missing categories of assets, such as UI sound effects or parts of the environment? If you do notice anything you think should be on the list, describe it briefly. If it seems complete, say something nice.
2. Do you notice any specific missing assets, based on your imaginary playthrough? If you do notice anything you think should be on the list, describe it briefly. If it seems complete, say something nice.
3. If your classmate has chosen to make their own assets, were they able to finish one in each category?
4. If your classmate has chosen to use open-licensed art, have they found one in each category? Click on the links. Do the items they found look or sound consistent with one another? Note briefly if anything's missing or obviously under copyright.
5. Try searching for more art in each category – give each category a minute or two. Do you see other sites or asset collections where they might find more of what they need? Do you think they’ll be able to find/modify as many of each kind as they will need? If you couldn't find anything compatible, let them know.
6. Think about how you might help your classmate. Is there a resource you can send them, e.g. an arcade sound maker, that would be helpful? Is there a coding trick or an art technique that could save them some effort?
7. Imagine you’re a publisher. You're deciding whether to invest money in this game, so you need reassurance that this asset plan is realistic. How would you rate it? 1 is "unlikely to finish in time" and 10 is "confident they'll finish".
Like the last time, this isn't an assessment of your classmate – it's a data point for them to use as they decide how to proceed with their plans. Be honest with your number.
4. Assignment: Make an Asset Inventory
At the beginning of any game project, professionals plan their assets – they decide how to find or make them and they test bringing them into the game engine so they don’t get any nasty surprises later in development. In this assignment we’ll guide you through the process.
Making an asset inventory means that you will test:
- Your plans for acquiring or producing your assets (sound, sprites, textures, models, and so on)
- Your pipeline: actually getting the assets into your game engine and integrating them with your code.
Both of these things are often the source of nasty surprises in game development.
This assignment will probably take an hour or two, depending on your asset strategy. It’s nearly all work you’ll need to do anyway to make your game.
Make an Initial Inventory
1. Make a spreadsheet. We’ve provided a basic template in the Tutorial Materials. Give it columns for name, file location, description, category and sub-category. If you’re not making your assets, you’ll also need columns to keep the original URL and notes about your right to use it (for example if it’s public domain or the artist provided it under a Creative Commons license.)
2. Think about your game. Consider making rough sketches to help you visualize it. Mentally break it down into its individual screens and levels, and come up with some broad categories for art and sound. For example:
- Environment art, such as level backgrounds, platforms, or a frame around your match-three board.
- UI art, such as score, timers, health bars, buttons, or list background. Don’t forget your non-game screens like pause, main menu and settings!
- Character art, such as a sprites for different character states (walk, jump, hurt, etc.), avatars for visual-novel-style games, or enemy sprites that show damage. - In-game objects such as projectiles, power-ups, spell scrolls, or coins.
- Effects, such as particles, explosions, trail renderers, outline glow for an interactable object, or animations of puzzle elements.
- Sounds, such as background music, UI sounds like clicks, emotes, or puzzle pieces falling into place.
- Other categories appropriate to your game, such as card backs, puzzle tiles, list items, or level maps.
3. Work on your prototypes for a while, or just look at them if they’re already finished. Pay attention to every placeholder asset and everywhere you’re expecting to put a sound.
4. As you notice more assets you need, return and add them to your asset inventory. You’ll repeat steps 2 and 3 throughout development, because no one thinks of everything.
Test Your Strategy
If you are planning to make any assets yourself, go ahead and make a reasonably finished example for each category, including sounds. Put thumbnails of them in your spreadsheet. Record how long it takes you.
If you plan to find rather than make any of your assets, go find one asset in each category that you would use in your final game, including sounds. You’re not committing to use these specific assets, but the examples you find should work together reasonably well and should not be placeholders.
If you are planning to use something you found online, download the file and put the URL next to its entry in your asset list. You’ll need this later when you make your credits screen.
For each asset, were there more where that one came from? If not, could you modify the ones you have, e.g. with a palette swap? If the answer is no for both of these questions, you will want to reconsider the assets you chose – this problem will not just go away during development.
Test Your Pipeline
Now that you’ve made categories for your assets, choose a folder structure for storing your assets in your project. (You will be sad if you don’t do this near the beginning of your project.) If you’ve already started collecting assets, take this moment to clean up any strays that are in other folders.
Now import your assets, that is, move them into the appropriate places in your project folder. Choose one asset from each category and make an object from it in Unity. Does it look good? Is it the right size? Adjust the import settings if necessary.
If you are using any character animations, set up a quick test to show a few states (and transitions if appropriate). Are you able to see all the animations? Do they look good in your environment?
Import and play a couple of your sample audio files, particularly any compressed files like mp3s. If you are planning to stream your audio, stream your samples. Do they sound good in engine?
Finally, look back at your list and your samples. If there’s anything you didn’t find or make, either fix it or decide to cut it – it is not all right to think you’ll get them done later.
If you weren’t able to get everything done, it’s not a reflection of you or your worth as a game maker; it’s just a reality of your skills and availability versus this project at this time in your life. You found it early enough that you can make intelligent adjustments, like a professional, and still get across the finish line.
“I’ll catch up later” is what beginners think. Pros think “What can I simplify so that I still finish?”
Help Your Classmates
We highly recommend to comment on at least two other course member’s submissions. We've provided some questions below for you to think about. Read the questions first, then read your classmate’s concept document. Imagine you’re playing the game described – what’s on screen? What sounds do you hear? Try to think about less-obvious needs, such as fonts or a game-over sound effect. Then look at their asset inventory and write a couple of sentences based on the questions.
Here are the steps:
1. Make your asset inventory as shown in the instructions above.
2. Review "What does a good asset inventory look like?" step. Think carefully about your own answers.
3. Take screenshots or make a video capture of your asset inventory and upload it.
4. Look through the submissions on the gallery. We highly recommend to comment on at least two other course member’s submissions.
Please login to submit
5. What's Next?
In the next module you’ll learn how game professionals think about the timeline for making a game – the phases of a project and the meaning of particular milestones. You’ll learn about a tool for planning and organizing your code so it’s clear and easy to work with for the rest of the project.
You’ll also use what you learned in your prototypes to take your game to the first milestone: the vertical slice.
Complete this Tutorial
Submission Gallery

Asset Inventory
I updated this spreadsheet with all the assets I use in the Sky Troops project

I got my assets already-
hm

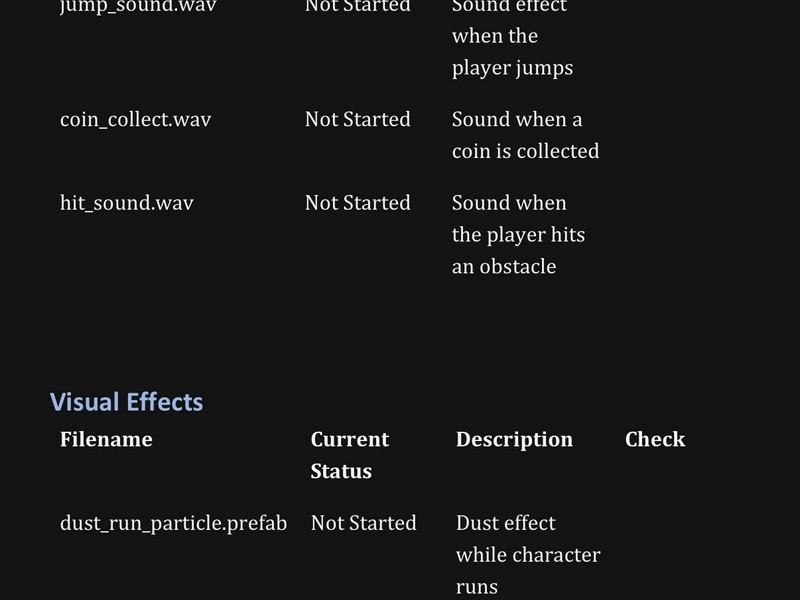
coin runner assets invertory
--
Endless runner
The Endless Runner game is a simple game where the player controls a character that runs continuously on a path. The player must avoid obstacles, jump over barriers, and collect coins to increase the score. The goal of the game is to survive as long as possible and achieve the highest score.

Catching the Falling Objects
Catching the Falling Objects is a simple game where objects fall from the top of the screen, and the player controls a character or basket to catch them before they hit the ground. The goal is to catch as many objects as possible to increase the score while avoiding missing them. The game tests the player's reaction speed

Catching_The_Falling_Objects_Assets
Catching the Falling Objects is a simple game where objects fall from the top of the screen, and the player controls a character or basket to catch them before they hit the ground. The goal is to catch as many objects as possible to increase the score while avoiding missing them. The game tests the player's reaction speed