
Audio Setup
Tutorial
Beginner
+10XP
1h
(496)
Unity Technologies
The Unity Editor enables you to work with high fidelity audio using specialized features of customization. When working with audio in Unity, you can efficiently design high quality soundscapes containing multiple sources, background music, and sound effects.
In this tutorial, you will learn how to get set up with audio in your scene, as well as customize your sound using specific audio tools and techniques, including:
- Setting up sound files in your project.
- Adding and customizing audio sources to your Scene.
- Working with the Audio Mixer.
- Audio filters and sound effects.
By the end of the tutorial, you will have a solid understanding of how versatile working with audio can be, and how easy it is to create customized soundscapes containing multiple audio clips, and with additional effect filters.
Languages available:
1. Getting Set Up With Your Project
Working with audio files in Unity is as straightforward and similar to working with other types of media assets. Unity accepts most standard audio file formats such as .wav, .mp3, and .ogg files. When working with sound files in Unity, it’s best to have already prepared your sound files in an external audio editor to make sure their levels are consistent and normalized. You will then need to import the audio clips directly into your project’s Assets folder.
For this tutorial, we will demonstrate with audio clips provided in the 3D Game Kit Template. Available for download in the Unity Asset Store, the 3D Game Kit Template includes audio sound effects in the .ogg file format. If you prefer to download a Template with a smaller file size, the 3D Game Kit Lite also includes audio files to experiment with and incorporate into your Scene.
It is not required that you download the large 3D Game Kit Template package for this tutorial, however. Feel free to practice with external audio sources using your own custom Project’s Assets. There are many additional resources containing sound files to help you get started.
To download the 3D Game Kit Template, proceed to the instructions given below, otherwise go ahead and skip to the next section.
1. From a web browser, go to the Unity Asset Store and open the 3D Game Kit Package by selecting the Open in Unity button.
2. Select the Open Unity.app button from the pop-up window.
3. Select the Import button in the Unity Editor’s Package Manager window.
4. Because the 3D Game Kit includes additional package dependencies such as Cinemachine, Select the Install/Upgrade button from the popup warning dialogue window to ensure the Package Manager dependencies are installed.
5. Select the Import button at the bottom of the Import Unity Package window.
6. Open the 3D Game Kit’s template scene by navigating to The Assets/3DGamekit/Scenes folder in the Project window, and opening the scene titled “_TemplateScene”.
7. For simplicity, delete the scene’s GameObjects in the Hierarchy window, leaving only the environment’s GameObjects shown below.
2. Adding an Audio Listener
The Audio Listener component is automatically included in a Scene’s camera. It is equivalent to your ears perceiving sound propagating in the game environment, from the perspective of the camera’s listening position.
1. From the top menu dropdown, select GameObject > Camera. This will add a new camera into your Scene, with the Audio Listener Component automatically included.
The Audio Listener component is not configurable, and must only be present once per Scene. If adding game characters containing separate cameras, ensure that there is only one Audio Listener component in the Scene.
3. Preparing and Previewing Audio in the Project
Audio files can be configured in preparation for how they will be loaded in a Scene or in an exported Build. First we will preview the audio files themselves in the Inspector.
1. With an audio file selected directly from the Project’s Assets folder, select the Play button in the lower right corner of the Inspector window, just above the audio waveform to play back the audio.
There are additional settings which may affect how audio data is handled in a Scene.
- Force to Mono: When this checkbox is selected, multi-channel audio will be mixed down into a mono track. To keep your stereo audio clip preserved in high quality, leave this checkbox unchecked.
- Load in Background: It’s best to use this feature when loading multiple sound clips or very large audio files which aren’t crucial to play at the very beginning of your Scene. This will help speed up the game load time. The audio clips will still load into memory when the Scene starts. This feature works in conjunction with the Preload Audio Data checkbox, which is enabled by default.
- Ambisonic: When importing a multi-channel surround-sound audio file, enable this checkbox, otherwise this selection remains unchecked by default.
2. If any of the settings have been changed or modified for your project’s needs, make sure to apply the settings by selecting the Apply button. Otherwise, we’ll leave everything unchanged at their default values.
4. Adding an Audio Source
The Audio Source component is what actually plays back the sound in a Scene, and can be considered to be the speaker for the audio clip. Let’s first add a background sound clip as ambience to play automatically when the Scene starts.
1. Create an Empty GameObject by selecting from the top menu dropdown:
GameObject > Create Empty. Rename the newly created GameObject to “Background_Sound”.
2. Select an audio file in the Project window. We will select the audio file titled: “Atmos_Overground_01” provided in the 3D Game Kit’s Audio folder. Drag the clip into the Scene or Hierarchy windows to add the Audio Source into your Scene. Child this new GameObject to the Background_Sound game object.
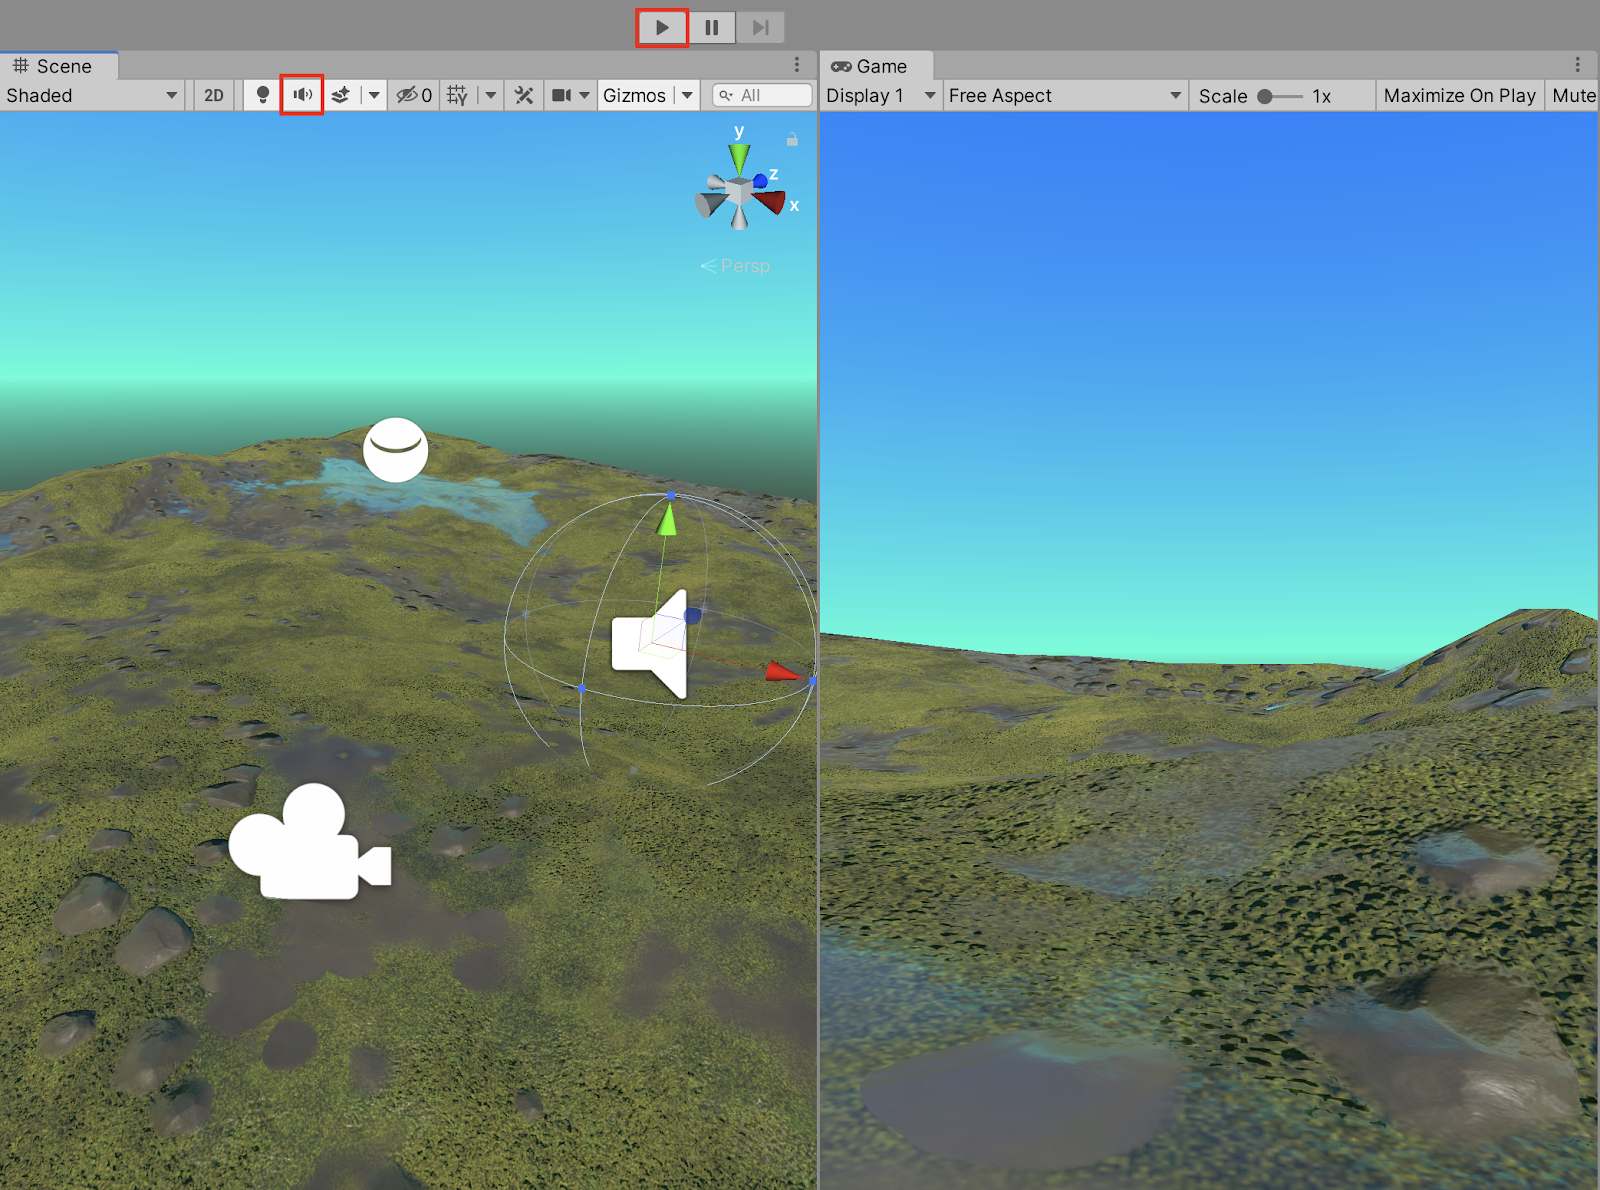
3. Play the Audio Source by entering Play mode, or by selecting the Toggle Audio gizmo button at the top of the Scene window.
4. You are able to hear the atmospheric background sound clip play automatically when starting Play mode, as the Play On Awake checkbox within the Audio Source component of the Audio game object is enabled by default. To loop the audio clip, select the Loop checkbox.
An Audio Source can also be added onto other GameObjects as a component. To demonstrate, we’ll first add a monster character to the Scene.
5. Select a character file in the Project window. We will select the character titled: “ChomperRagdoll”, provided in the 3DGame Kit’s Prefabs/Characters/Enemies/Chomper folder. Place and orient the monster into your Scene.
6. Because the Chomper’s behavior is set to disappear a few moments after entering Play mode, disable this feature by deselecting the checkbox next to the Dissolve (Script) component.
7. Select the monster GameObject in the Hierarchy window, and then select the Add Component button in the Inspector, searching for and then selecting: Audio Source.
8. Link an audio file into the AudioClip field in the Inspector by first selecting the Object Loader Circle button next to the AudioClip property in the Inspector, and then selecting the sound clip. Alternatively, select the audio file in the Project window and drag and drop it into the AudioClip field.
9. Preview the audio by selecting the Play button to enter Play mode.
10. To loop the Chomper’s sound during playback, select the checkbox next to Loop.
5. Working with the Audio Mixer
The Unity Audio Mixer gives you further flexibility to mix various audio sources. You can use the Mixer to master your audio, route audio channels, and add effects.
1. From the top menu dropdown, select Window > Audio > Audio Mixer.
2. Beneath Mixers, select ResonanceAudioMixer (Audio Listener) - Inactive to open up the Groups side panel, which reveals the Music, Spatial, and FX Groups, contained within the Master.
3. To send audio to the Mixer, you must first select an audio GameObject in the Hierarchy. We will select the background ambient sound. Next, select the Output field’s object loader circle button in the Inspector. Set the ResonanceAudioMixer to the Music group in the Select AudioMixerGroup popup window, to categorize our ambient sound as background music.
4. Select the Play button to enter Play mode. You’ll be able to preview the audio signal through the Audio Mixer, in both the Music and Master groups.
5. To adjust the levels while previewing in Play mode, Select the Edit in Play Mode button. Drag the Music Mixer Group controller levels slider up to increase the volume.
6. You can also drag the Master levels slider to affect the overall sound. After adjusting the levels, exit Play mode and the new values will remain modified.
6. Applying Audio Effects Using the Mixer
We are able to enhance audio clips by applying effect filters. The Normalize effect, for example, keeps an audio signal’s levels more consistent. You would apply this effect if your audio source had varying volume levels that you wanted to even out. Additionally, you could apply a Flange effect to simulate an acoustic environment where a listener is traveling out of an enclosed space into the open. You might also want more bass in your source audio, in which case you would use the ParamEQ effect to adjust the audio equalizer.
We will add these effects, as well as others, in the Audio Mixer window. Let’s first add the ParamEQ effect to the ambient background Music Group.
1. In the Audio Mixer window, select the Add button at the bottom of the Music Group column, and then select ParamEQ from the drop-down menu.
2. With the ParamEQ effect enabled, you can start to make adjustments in the Inspector window.
3. Select at a location on the graph by clicking and holding the mouse and dragging a curve upward to enhance a specific frequency range. Drag the slider for Center freq to adjust the curve left and right for a lower or higher frequency. Adjust the Octave range slider to narrow or widen the range of the curve. Adjust the Frequency gain slider to raise or lower the curve. Practice matching your curve to the example below, in which the lower bass frequencies are enhanced.
4. Enter Play mode to play back your audio track. Continue to make fine-tuned adjustments to the audio effects in real time, by selecting the Edit in Play Mode button in either the Audio Mixer or Inspector windows.
5. We will now assign the monster character’s audio to its own group in the Audio Mixer. First select the character in the Hierarchy, and then select the Output field’s object loader circle button in the Inspector. Set the ResonanceAudioMixer to the FX group in the Select AudioMixerGroup popup window.
In a real world environment, terrain geography or surrounding objects will have an influence over how sounds are propagated. Various environments can dampen, reflect, or amplify sounds, affecting the way they are perceived. The sound of a monster’s roar, for instance, will have different qualities from within a semi-enclosed rocky canyon, versus a wide open hilltop. In order to simulate these types of scenarios, we can apply a reverb effect in a variety of ways, giving sounds a more spatial quality.
6. In the Audio Mixer window, select the Add button at the bottom of the FX Group column, and then select SFX Reverb from the drop-down menu.
7. With the SFX Reverb effect applied, enter Play mode to preview the audio. To make real-time adjustments to the SFX Reverb effect, first select to enable the
Edit in Play Mode button in either the Inspector or Audio Mixer windows, and then drag the SFX Reverb value sliders to a desired effect in the Inspector.
7. Applying Audio Effects Using the Inspector
You are able to apply audio effect filters and adjust their values directly from the Inspector. The Audio Reverb Component sound effect, for example, contains additional features not available within the Audio Mixer’s SFX Reverb filter.
1. Since we will be applying a reverb effect as a separate component, we must first disable (or bypass) the previously added reverb effect we made in the Audio Mixer window, so that there are not two overlapping reverb filters. To bypass the effect, select the Bypass button in the FX mixer group.
Alternatively, instead of bypassing an effect, you can delete the effect altogether, by right-clicking on the SFX Reverb field in the Audio Mixer window, and then selecting Remove from the drop-down menu.
2. With the monster character “ChomperRagdoll” GameObject selected in the Hierarchy window, select the Add Component button in the Inspector, type in “audio,” and then select Audio Reverb Filter.
2. In the Audio Reverb Filter component settings in the Inspector, select the field labelled User in the Reverb Preset option, to choose from a list of drop-down menu options.
3. Select any of the presets while in Play mode to preview the reverb’s 3D spatial effects in real time. Note that there is a chance you might not readily notice the difference between subtle Reverb Presets like Livingroom or Stoneroom. Experiment with changing the Reverb Presets to more dramatic options, like Cave or Concerthall to notice the difference. For our monster character example Scene, select Stone Corridor for an audio effect that may closely resemble coming from inside a rocky enclosure.
4. Additional audio effects are available as separate components. If you’re going for a more rhythmic sound, add an echo filter, which produces a stylistically unique effect. Select the Add Component button in the Inspector window, search by typing in “audio,” and then select Audio Echo Filter.
4. Experiment adjusting the Echo Filter values while in Play mode to fine-tune the effect in real time.
8. Next Steps
When working with audio in Unity, you have the ability to mix and fine-tune multiple sounds in a sonic environment. With practice, you will be able to make confident and creative decisions, ranging from applying specific adjustments to sound clips, background music, and even creature sounds! Further practice and experiment with the tools as a great way to become proficient at creating finely-tuned high quality audio soundscape environments.