Bring the Sequence Asset to life
Tutorial
Beginner
+5XP
10 mins
367
Unity Technologies
In this tutorial, you’ll record a short animation of the Sequence Asset you just created.
Languages available:
1. Overview
Now that you’ve created a Sequence Asset and added it to a Sequence, you’re ready to create and record a short animation to bring this Sequence Asset to life.
2. Lock the Timeline window
In the following steps, you’re going to edit your Sequence Asset directly in the sequence where you added it. To keep the context of the cinematic timeline throughout this process, you must lock the Timeline window:
1. In the Sequences window, select the Master Sequence (MICH-L_Cinematic).
2. In the Timeline window, enable the lock icon at the top right.

This keeps the cinematic loaded even when you select and iterate on other GameObjects in the Hierarchy.
3. Adjust the character position for the shot
Now you’re ready to get started. First, let’s adjust the character position for the shot:
1. In the Sequences window, select S01.
Note: To be able to see the chicken in the Scene, you need to ensure to place the Timeline playhead somewhere within S01.
2. Locate the chicken within the Sequence Asset you added in the Sequence:
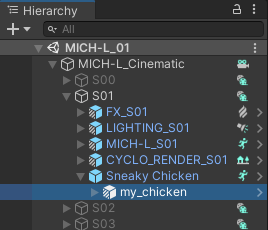
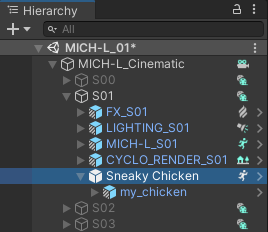
In the Hierarchy window, expand the content of the S01 GameObject, expand the Sneaky Chicken Prefab instance.
3. Place the chicken closer to the camera:
In the Hierarchy, select my_chicken, and in the Inspector, set the Z Position coordinate to 5.5, for example.
4. Prepare the character for the animation
Next you need to prepare the character for the animation:
1. In the Sequences window, select S01.
2. In the Timeline window, expand the Character group, and in the Sneaky Chicken track, double click on the Sneaky Chicken Timeline clip.

3. The Timeline window now shows the empty timeline of the Sequence Asset used in S01. Add an Animation track to it:
Select the + (plus) button at the top left of the Timeline window and select Animation Track.

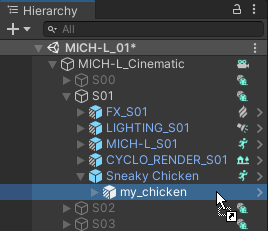
4. Drag and drop the my_chicken Prefab from the Hierarchy to the animation track header field and select Create Animator on my_chicken.

5. Record the animation
Now you can record the animation:
1. In the Animation track header, double-click my_chicken (Animator) in the target field.
This selects the targeted Prefab in the Hierarchy.

2. In the Animation track header, click the record button.

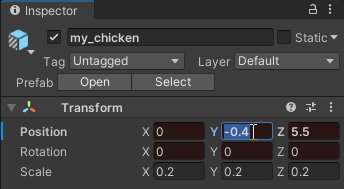
3. Add three keyframes to change the vertical (Y) position of the chicken through time, for example:
- At Frame 96, set the Y Position to -0.4
- At Frame 102, set the Y Position to 0
- At Frame 144, set the Y Position to -0.4
To set each keyframe, place the Timeline playhead on the specified frame, and in the Inspector, edit the Y Position to the corresponding specified value.

4. Select Record again to stop the recording.
5. Scrub the Timeline playhead to preview the animation result.
6. Save and play
You must never forget to save your Prefab, which means applying the overrides of the Prefab instance from the Scene to the source Prefab stored in your project folder:
1. In the Hierarchy, select the Sneaky Chicken Prefab.
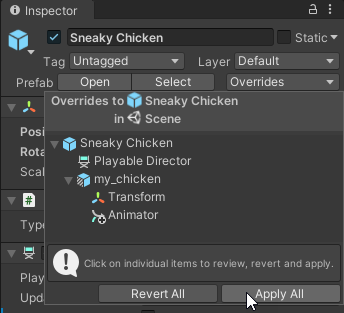
2. In the Inspector, select Overrides and click on Apply All.
3. In the Editor main menu, select File > Save.
4. Select Play at the top of the Editor layout to play your cinematic and see the result.

7. Next steps
In the next tutorial, you’ll create a Sequence Asset Variant from the Sequence Asset you just animated, to see how you can test variations of the same content directly in the context of the movie.