
Configuring an Xbox Controller for User Input - 2019.3
Tutorial
Beginner
+10XP
20m
(203)
Unity Technologies
Configuring an Xbox controller for user input in Unity is easily achieved through Unity’s new Input System, available as an installable Package. In this tutorial, we will set up a simple scenario that uses the Xbox game controller buttons.
Languages available:
1. Installing the Input System Package
If you are using Unity 2019.2 or below, click here.
1. From the Unity Editor’s top menu drop-down, select Window > Package Manager.
2. In the Project Settings window, from the Advanced dropdown menu, select Show Preview Packages.
3. In the All Packages column, select Input System, and select Install (Figure 01).
4. A Warning dialogue appears, verifying that the Project needs to enable Native Platform Backends. Select Yes, and Restart the Unity Editor.
5. After restarting, you can verify your Project’s newly installed Input System, by opening up the Project Settings. Select from the top dropdown menu Edit > Project Settings.
In the left column, select Player. In the main window of the Project Settings Window, select Other Settings (Figure 02). Expand Other Settings, and scroll down to Active Input Handling. Select either Both, or Input System Package (New) (Figure 03).
2. Creating Your Custom Inputs
1. Create a new Input Action by right-clicking in the Project Window, and select Create > Input Actions. Rename the new Input Action to “InputMaster”.
2. Double-click the newly created “InputMaster” in the Project Window, to open up the Input Actions Window.
3. On the top left corner of the Input Actions Window, select the No Control Schemes dropdown, and then select Add Control Scheme (Figure 04).
4. In the Add Control Scheme Window, select the + button to create a new Control Scheme, and rename the Scheme Name to “Xbox Control Scheme” (Figure 05). Later, you can always create additional Control Schemes for adding other input sources, such as from the keyboard.
5. Within the menu, select Gamepad > Xbox Controller > Xbox Controller (Figure 06).
6. Next, in the Add Control Scheme Window, select Save (Figure 07).
7. Next, on the left Action Maps panel of the Input Actions Window, select the + button to create a New Action Map. Action Maps are categories for how your inputs will be organized, for example, you might have separate Action Map categories for the player, menu-items, camera views, or vehicles. Here, rename your Action Map to “Player”.
8. A New Action has now been added to the middle Actions panel. Actions are essentially events, such as a player running or jumping. Double-click the New Action and rename it to “Jump”. We will then Bind specific buttons on the gamepad controller to trigger each Action. Select the + button to the right of the ”Jump” Action, and then select Add Binding (Figure 08).
9. Next, in the Properties panel of the “InputMaster” Window, select the Binding Path field (Figure 09).
10. You will see a list of Gamepad buttons and controls. Scroll all the way down to select the specific list of buttons for the Xbox Controller (Figure 10).
11. Select the specific button for the Xbox Controller from the list of available choices. Alternatively, select the Listen button, and press the corresponding button on your controller itself (Figure 11).
12. We can further assign controller Actions for player movement, much in the same way as the previous steps for triggering a jump with a button. For the sake of efficiency, you can also set up an Action to encompass movement along 2 Vectors. Here we will create a new Action, rename it to “Movement”, and select Button to change the Action Type (Figure 12).
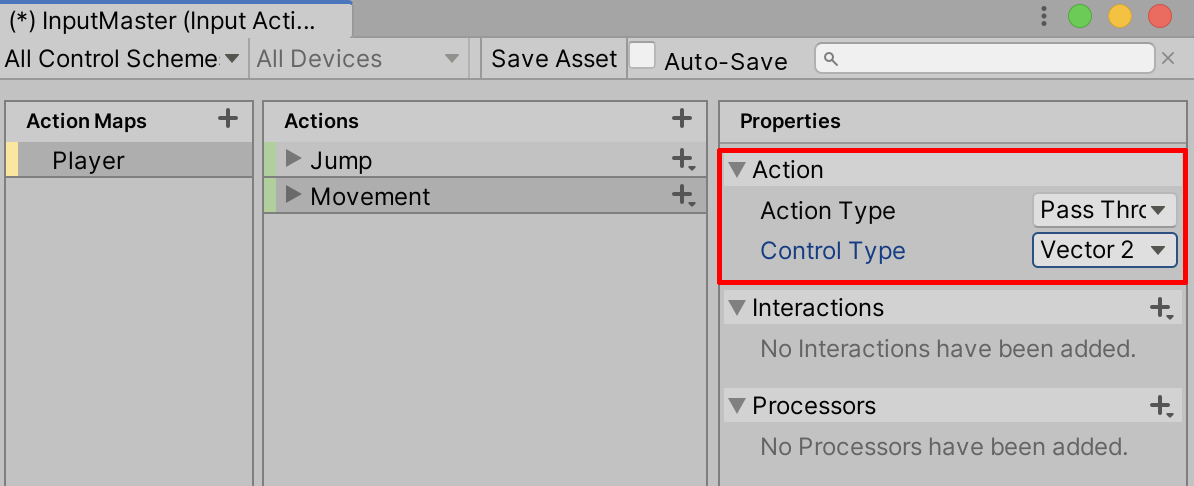
13. Select Pass Through as the Action Type, and then select Vector 2 for its Control Type (Figure 13).
14. Now when you select the + button next to the Movement Action, you can select to add a 2D Vector Composite (Figure 14).
15. Assign the Movement Vectors to the corresponding Xbox Controller inputs in the same manner as the previous steps (Figure 15).
16. Create any additional Input Actions you will need for your Project, exploring through the various features that the Input System offers. When finished, select Save Asset. For the full documentation of the Input System, follow this link.
17. We will now set up the Player Input Component to the Player. With the Player GameObject selected in the Hierarchy Window, select Add Component in the Inspector Window, and search for Player Input (Figure 16).
18. Next, Select the Object Picker Button to assign the Input Actions Asset we named “InputMaster”, to the Player Input Component (Figure 17).
19. Next, assign the Default Scheme to the Xbox Control Scheme, and assign the Default Map to Player (Figure 18).
20. Lastly, the Input System will generate the C# Script for your Input Actions for further modification of your Project’s needs. Select “InputMaster” from the Project Window, select the Generate C# Class checkbox in the Inspector Window, and select Apply (Figure 19).
21. The resulting code is saved as a C# Script, with the saved name of “InputMaster.cs” (Figure 20).
22. Enter Play Mode and test out your Project’s Xbox Game Controller inputs. Your individual project will determine which Input Action is more appropriate based on the desired feel.
3. Conclusion
The Xbox game controller is easy to configure and use within Unity's Input System Package. The Input System enables a variety of input control options to bind to your specific Xbox game controller’s buttons.