Configuring an XR Rig with the XR Interaction Toolkit
Tutorial
intermediate
+0XP
15 mins
169
Unity Technologies

In this tutorial, we’ll explore XR Rigs. An XR Rig is the user’s eyes, ears, and hands in the virtual world. It works together with the Locomotion and/or Teleportation Systems, which allow the user to move in the virtual world. The XR Interaction Toolkit includes two types of XR Rig: Stationary and Room-Scale.
Languages available:
1. Configuring an XR Rig with the XR Interaction Toolkit
This tutorial has been verified using Unity 2019.4.12f1 LTS and XR Interaction Toolkit 0.9.3-preview
In this tutorial, we’ll explore XR Rigs. An XR Rig is the user’s eyes, ears, and hands in the virtual world. It works together with the Locomotion and/or Teleportation Systems, which allow the user to move in the virtual world. The XR Interaction Toolkit includes two types of XR Rig: Stationary and Room-Scale.
The Stationary XR Rig uses the user’s device as the tracking origin, allowing them to look around for three degrees of freedom, and is a good fit for projects where the user remains seated. Examples include virtual roller coasters and other seated experiences that make use of the head-mounted display’s rotational movement (pitch, yaw, and roll). The Stationary Rig works on all devices capable of supporting XR.
The Room-Scale XR Rig uses the floor of the user’s physical space as the tracking origin, allowing six degrees of freedom (rotational and positional movement) to explore the virtual world at the scale of their physical environment. It’s a good fit for projects where the user stands and/or walks in the virtual environment. The Room-Scale XR Rig requires a headset capable of mapping the user’s environment and tracking their motion within it.
2. Working with the XR Rig
The XR Rig Component comes preconfigured with options for Room-Scale and Stationary experiences, the only difference being the Tracking Origin Mode (Figure 01). The only setting you might need to adjust is the Camera Y Offset, depending on the height of the in-world avatar/character in the VR experience.

The exposed data members of the XR Rig include:
Rig Base Game Object: This is the root object of the XR Rig hierarchy, which is translated and rotated for locomotion. By default, it's the GameObject to which the XR Rig component is attached.
Camera Floor Offset Object: This is the object from which the Camera is offset. If none is specified, the XR Rig GameObject is used.
Camera Game Object: The Camera used to render the Scene; this GameObject serves as the head of the XR Rig.
Tracking Origin Mode: This setting determines the location of the center of the world.
Camera Y Offset: This determines the distance between the ground and the avatar's eyes, in meters. Increase this value for a taller avatar.
1. In the Hierarchy view, right-click and select XR > Room-Scale XR Rig (Figure 02) or Stationary.
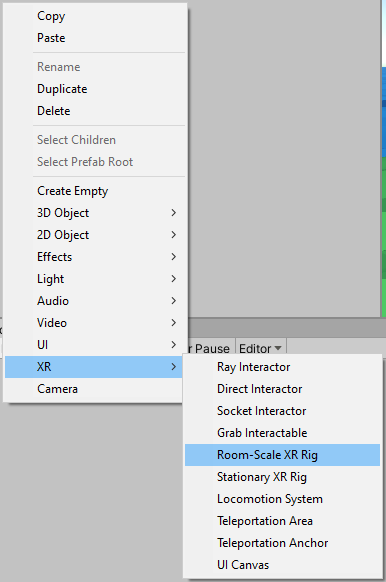
2. If one isn’t already in the Scene, an XR Interaction Manager is also created. The XR Interaction Manager handles communication between Interactors and Interactables.
3. The XR Rig takes control of the Main Camera in the Scene, placing it under the control of a Camera Floor Offset Object, which places the Main Camera at the height specified by Camera Y Offset (Figure 02). If none is specified, the XR Rig GameObject is used. Also included are the left- and right-hand controllers (Figure 03).

4. By default, the only visual representation the user has in the virtual world are the Line Renderers used by the default Ray Interactors attached to the left- and right-hand controllers (Figure 04).
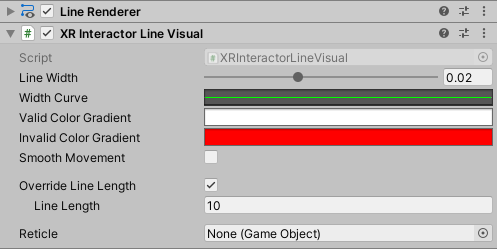
To fix this, let’s make visualizers for the controllers. This will allow us to debug controller behavior and, in production, would be replaced with the user/player avatar’s hands. This allows the user to see their avatar’s hands (or a representation) even when using the Direct Interactor.
5. Select 3D > Sphere from the GameObject drop-down.
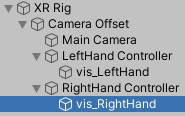
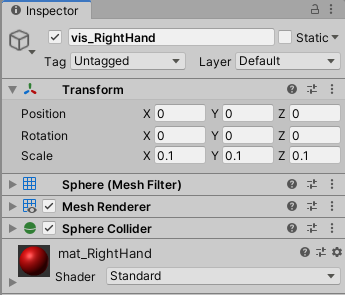
6. Expand the XR Rig in the Hierarchy view and drop the Sphere onto the RightHand Controller (Figure 05). Zero out its local translation and rotation and set its local scale to 0.1 in all dimensions (Figure 06).
7. Repeat steps 5 and 6 for the LeftHand Controller. You may wish to assign each Sphere a unique Material and/or a different 3D primitive to distinguish them.
3. Customizing the XR Controller
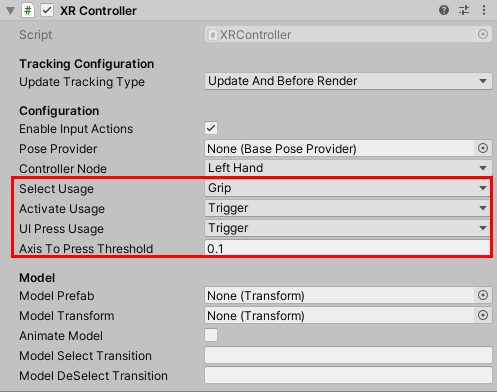
The developer can choose to set different buttons on the controller for selecting and activating objects and for pressing on UI elements. Additionally, the developer can adjust the sensitivity threshold for UI presses (Figure 08).
4. Working with the Controller Manager
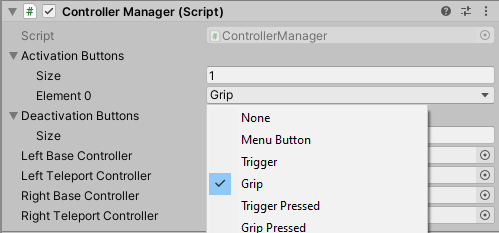
The Controller Manager is included with the XR Interaction Toolkit Examples. It allows the developer to choose which buttons on a controller activate and deactivate the option to teleport within the Scene. It also allows the user to specify GameObjects to represent the left and right hands in normal interaction and while teleporting.
1. In the Hierarchy view, select XR Interaction Manager.
2. In its Inspector, add the Controller Manager component.
3. If you’re working with multiple XR Interaction Managers, you may wish to put the Controller Manager component on its own GameObject.
5. Conclusion
The XR Rig is a powerful, versatile, and easily customizable way for players and users to experience virtual worlds.