Control animation with an Animator
Tutorial
Beginner
+10XP
50 mins
223
Unity Technologies

In this tutorial, you’ll create a door that animates based on the proximity of the player. In doing so, you’ll learn about Animators, Animator Controllers, and basic State Machines.
By the end of this tutorial, you'll be able to:
- Set up a new Animation Clip.
- Record a GameObject animation using Record Mode
- Add keyframes to an Animation Clip.
- Identify the purpose of a specified parameter.
- Describe the relationship between parameters and transitions.
Materials
Languages available:
1. Overview
Throughout these tutorials so far, you’ve created animations that loop continuously as soon as the scene is played. However, there are many situations where you might only want an animation to play once or control at what point it should play.
In this tutorial, you’ll create a door that animates based on its proximity to the player. In doing so, you’ll learn about Animators, Animator Controllers, and basic State Machines.
2. Create the door animation
Although you’ll be creating functionality for the door to both open and close, you only need to create a single animation for the door opening. From that single animation, you will be able to create everything else in the following steps.
1. In Unity, open TutorialScene_Animation_Door found in the Scenes folder.
2. Select the Door GameObject in the Hierarchy.
Before you begin animating, it’s important to check where the door’s pivot point is. A pivot point is the point on an object where movement occurs. In previous animation exercises, the location of the pivot point didn’t matter, but doors are different because they move in a very specific way. It’s important to replicate the proper kind of movement so the animation doesn’t look odd! For doors, the pivot point is where the door would attach to its frame on a wall. The door in your scene is set up with the proper pivot point, but it’s important to check that Unity is referencing it appropriately.
3. Select the door. When selected, the move widget should appear at the edge of the door. If it appears in the center, select the Toggle Tool Handle Position button above the Scene view to change the selection value from Center to Pivot.
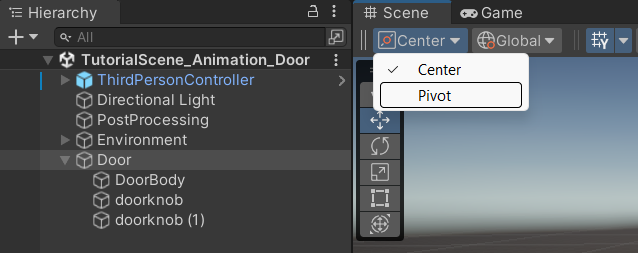
Note that the Door GameObject has several nested child objects! Take care to only animate the Door object itself and not one of its child GameObjects.
4. In the Animation editor window, click the Create button to create a new Animation Clip. When prompted, save the animation as Door_Open in the project animation folder.
5. Click the Record button in the Animation editor.
6. Click the Add Property button and select Transform > Rotation.
7. Advance the Playhead to the keyframe generated at the 1:00 mark and rotate the Y rotation of the door to 90.
8. Preview the animation by pressing Play in the Animation editor. The door should rotate to an open position. If you prefer to have the door open the opposite way, edit the final keyframe to rotate -90.
9. Press the Record button again to exit edit mode.
10. In the Project window, navigate to the Animations folder, and select the Door_Open animation you just created.
11. In the Inspector, disable Loop Time. With this option disabled, the animation will only play once rather than loop endlessly when the scene is played.
Note: The animation will continue on loop when pressing Play in the Animation window, as it is a visualization. But the animation in the scene will only play once.
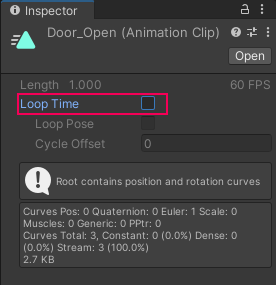
3. Explore the Animator Controller
Select the Door object now. You can see that a new Animator component has been added in the Inspector. Animator components are automatically created whenever the first Animation Clip is created for a selected GameObject. The Animator is responsible for assigning animation; however, it doesn’t control the actual Animation Clips. This task falls to the Animator Controller, which is also automatically created with the first Animation Clip. On the Door’s Animator component, you can see that an Animator Controller asset named Door has been automatically assigned. You can use this asset to create the door opening and closing functionality.
1. In the Animations folder, select the Door Animator Controller and rename it "Door_Controller".
In the Project window, notice that the Animator Controller icon is two rectangles connected by lines, signifying that it can control transitions between animation states. The Animation Clip icon is a triangle in motion, representing a single movement.
Double-clicking on an Animator Controller asset will open the Animator window, while double-clicking an Animation Clip asset will open the Animation window. The difference between these two windows is subtle but important.
2. Double-click the Door_Controller to open the Animator window.

3. Drag the Animator window down to dock next to the Animation Editor so you can see the Scene view and the Animator window at the same time.
4. Select the Door in the Hierarchy, and select Play to start the scene.
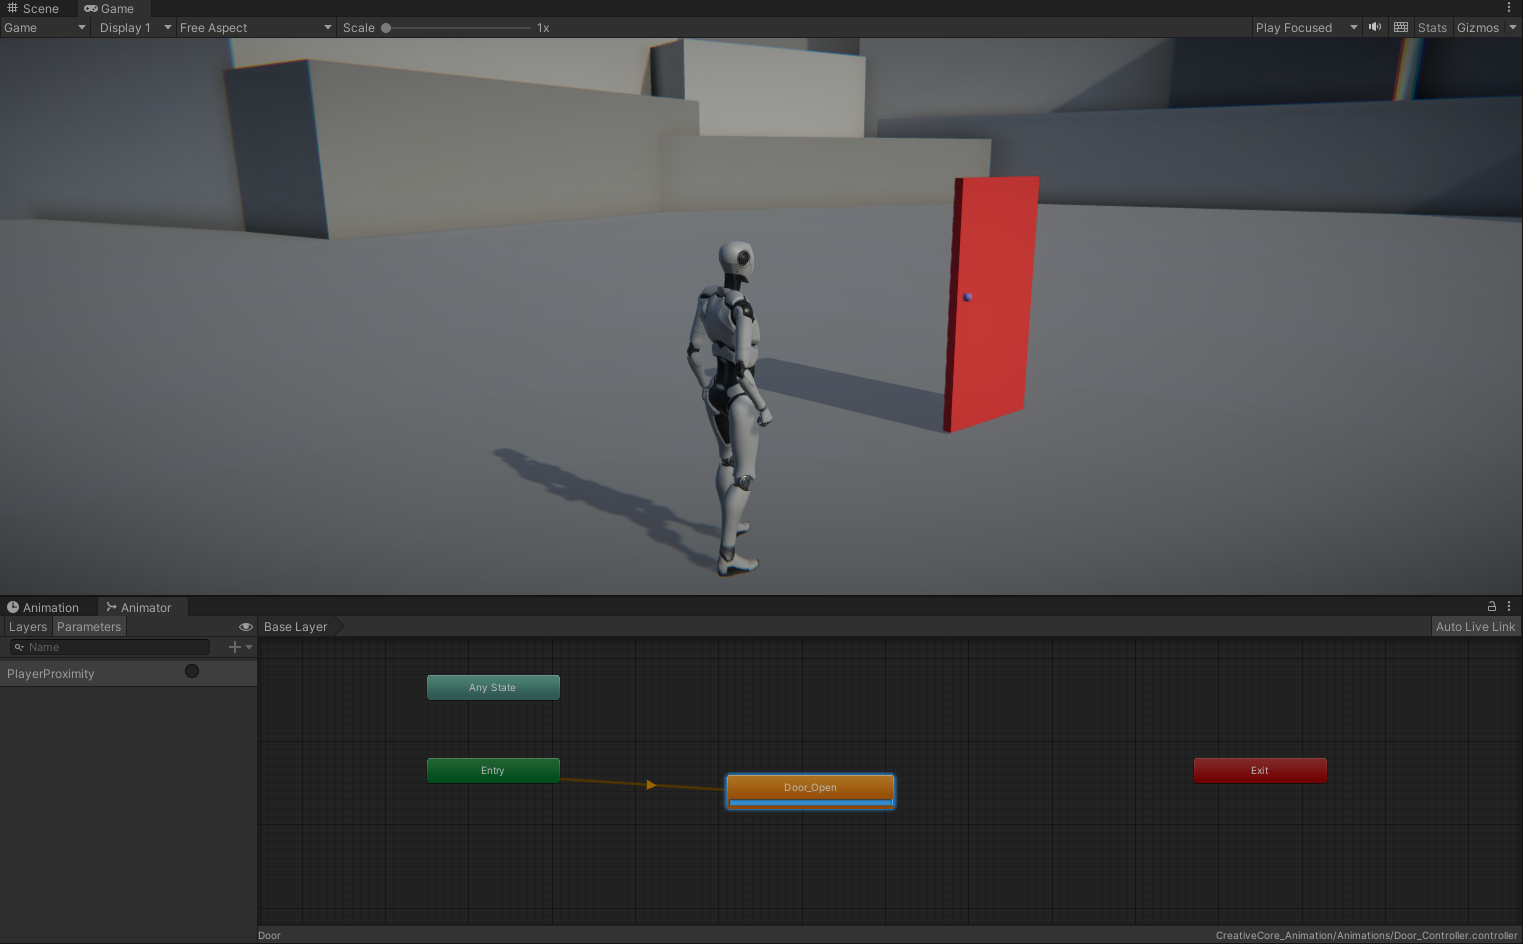
When the scene plays, the Door opens, and at the same time, a blue progress bar runs across the bottom of the node labeled Door_Open–this is your Animation Clip, and the Animator shows you what’s happening in the Animation Controller in real time.
5. Exit Play mode.
4. Explore State Machines
Animation Controllers run on a special type of system called a State Machine. A State Machine keeps track of all of the possible actions an object can perform, and selects the appropriate one based on what the current situation (or state) calls for. The logic that communicates the current state is controlled externally, usually via a script, but the process of moving from one action to another is handled directly by a State Machine and is called a Transition.
To better understand how State Machines work, first consider all the actions a door can perform:
- Open
- Close
And here are the states the door can be in:
- Currently opening
- Currently closing
- Currently open
- Currently closed
The last two on the list might be unexpected–After all, being open and being closed aren’t actions per se, but they are states that a door can be in, and therefore must be taken into account. With all of the states identified, they can now be charted out based on how the Door will be interacted with:

As previously mentioned, the door will be set up so that it will open based on its proximity to the player character. This means that the default state of the door will be closed. When the player character gets close enough, the State Machine will transition to its opening state, and then immediately transition to the open state. The door will remain in this state until the player character leaves, at which point it will transition to its closing state, and then immediately transition to its closed state, restarting the whole process.
Based on this assessment, there are two transitions that will require some kind of logical input (detecting when the player approaches and leaves), and two states that will automatically transition from one to the next (opening to open, and closing to closed).
5. Create the default state
Using what you learned in the previous step, you’ll now create the State Machine for the door. Currently, the Door_Open animation plays automatically as soon as the scene is run. This is because it’s currently the only animation associated with the door, and was automatically added as the Controller’s default state. However, the starting state of the door should actually be the Closed state, which doesn’t have any associated animation. To account for this, add a Closed node to the Controller and set it as the default state.
1. In the gridded Animator work area, right-click and select Create State > Empty.
2. Select the new state node, and in the Inspector, change the name from New State to Closed.
3. Right-click the Closed state and select Set as Layer Default State.

The Closed state will turn orange and will become connected to the Entry node via an orange line, which represents a transition. The Entry node represents what should occur at the start of the State Machine. It will run automatically as soon as the scene is played, as well as whenever the Exit node is used, which will be explored later in the tutorial.
4. Playtest the scene.
The Door no longer opens, and the status bar repeatedly runs on the Closed state. The first part of the State Machine works!
6. Open the door
The next state is one that will be determined by the proximity of the player character. The logic for detecting the player character will be with a script and a Trigger Collider, but that will be set up later. For now, you’ll finish up the State Machine and add in references for the script to use.
1. Right-click the Closed node, and select Make Transition. A white transition arrow will appear on your mouse cursor.
2. Select the Door_Open node. The transition arrow will attach to the node.
3. Playtest the scene.
The Animation Controller will run through the Closed node once. When finished, it will immediately transition to the Door_Open animation, then sit idle at the end of the animation. In order to prevent one node immediately transitioning into another, some kind of logic gate must be placed on the transition. This is what the script you’ll use will check for in the final version. This will be accomplished through the use of Parameters. Parameters are variables that are created directly within the Animator, and can be found on the Parameters tab on the left side of the Animator editor.
4. Select the Parameters tab to access the currently empty Parameter list.
5. At the top of the Parameters list, select the Add (+) and select Trigger.
A Trigger Parameter will immediately transition as soon as it’s called via script. Trigger parameters are useful when you want to initiate an immediate action or event in response to a specific condition or user input, which is exactly the situation for this door.
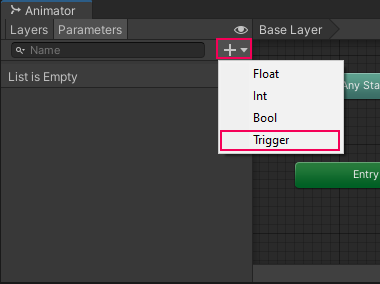
6. Name the Trigger PlayerProximity, taking care to spell and case it exactly as written here. It will be referenced in the script later.
7. Select the Transition between Closed and Door_Open by clicking on the white arrow. In the Inspector, locate the Conditions section.
8. Select the Add (+) button at the bottom of the Conditions list. Since it’s the only parameter, PlayerProximity will auto populate in the list.
9. Play the scene.
10. Select the radio button next to PlayerProximity in the parameters list to trigger it.
Now the Door Controller remains in the Closed state until PlayerProximity is selected, at which point it transitions to the Door_Open state, and the door animates.
11. Exit Play mode.
Other parameter types
Although you just used a trigger parameter to open the door, it will be useful to be familiar with the other three parameter types, which can be used in different situations.

- Bool: A bool parameter represents a binary state, either true or false. Bool parameters are useful when you want to control transitions between different animation states based on simple on/off conditions. For example, A bool parameter named "IsRunning" can be used to switch between walking and running animations based on whether the player is moving at a faster speed.
- Int: An int parameter represents an integer value and is useful for controlling different animation states or variations. Int parameters are useful when you want to control different animation variations or states based on discrete integer values. For example, An int parameter named "Health" can be used to trigger different animations based on the player's current health level (for example, idle animation if health > 75, injured animation if health <= 50, etc.).
- Float: A float parameter represents a decimal value and is typically used for controlling continuous transitions and blending between animations. Float parameters are useful when you want to smoothly transition or blend between animations based on continuous numerical values. For example, a float parameter named "Speed" can be used to smoothly transition between walking and running animations based on the player's movement speed.
7. Close the door
Refer back to the door state machine design:

As you can see above, as soon as the door opens, it should immediately transition to an open state. The way you animated the door already accounts for this! The animation ends with the door standing open, and with looping on the animation turned off, it remains idle at the final keyframe. This means that the next step for the State Machine is to create the door closing state. Rather than create a new animation, you can reuse the Door_Open animation and simply reverse it.
1. Select the Door_Open node in the Animator and press Ctrl/Cmd+D on the keyboard to duplicate it.
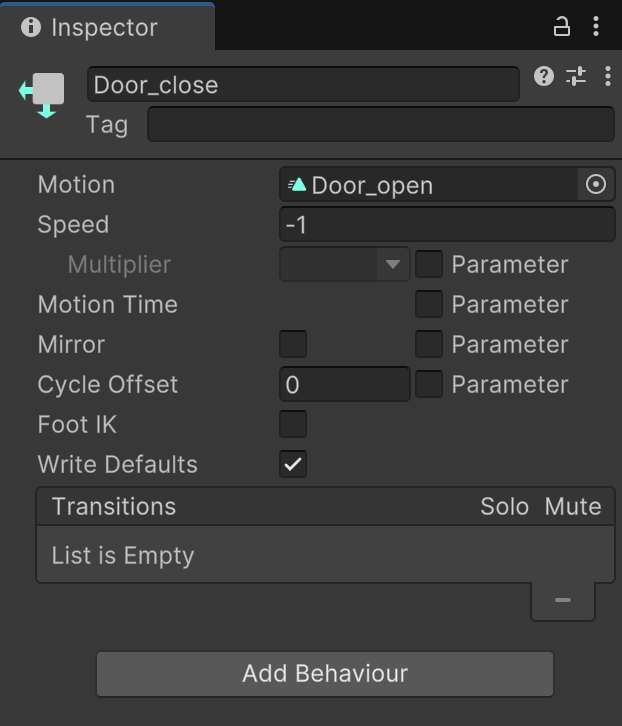
2. In the Inspector, rename the new node to Door_Close
3. Still in the Inspector, locate the Speed parameter and set it to -1. This will reverse the animation.
4. Right-click the Door_Open node and select Make Transition.
5. Select the Door_Close node to connect the Transition between the two nodes.
6. Select the new Transition and in the Inspector, click the + button in the Conditions list. PlayerProximity will auto populate.
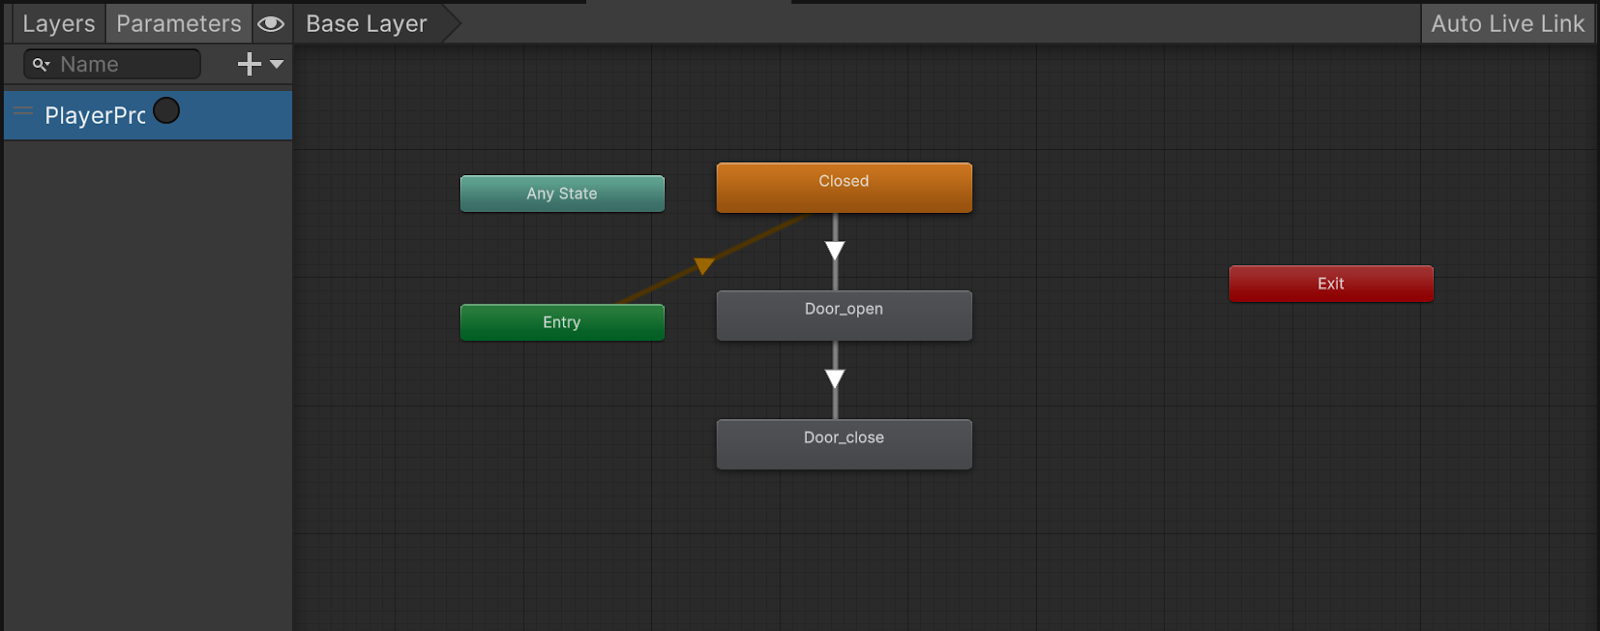
7. Playtest the scene. Press the PlayerProximity radio button to open the door, and again to close it.
Trigger parameters in the Animator immediately disable after the transition from one state to the next is complete, meaning you can safely reuse the same parameter for situations like the door opening and closing. This means that later on, the script applied to detect whether the player character is near the door only needs to reference a single parameter.
8. Reset the State Machine
The progression through the various door states is now complete; however, as it is right now, the door can only be interacted with once. In order to reuse the door infinitely, the State Machine must be reset back to its original state once the door close animation is complete. You’ll be able to accomplish this by making use of the Exit node. When transitioned to, the Exit node will automatically transition to the Entry node, which pushes back to the default state. This will allow you to restart the Door’s State Machine infinitely.
1. Right-click the Door_Close node and select Make Transition.
2. Click the Exit node to connect the transition between the two nodes.
3. Playtest the scene.
Now when you press PlayerProximity to close the door, the Door_Close animation will play and automatically transition to Exit, and will loop back to the Closed state! You may have noticed that sometimes there’s a slight delay between the time that you press PlayerProximity and when the door opens. This is because, by default, a state node will complete its active play time (represented by the progress bar) before making a transition. This can be disabled, making the transition to the Door_Open state immediate.
4. Select the transition between the Closed and Door_Open nodes.
5. In the Inspector, disable Has Exit Time.
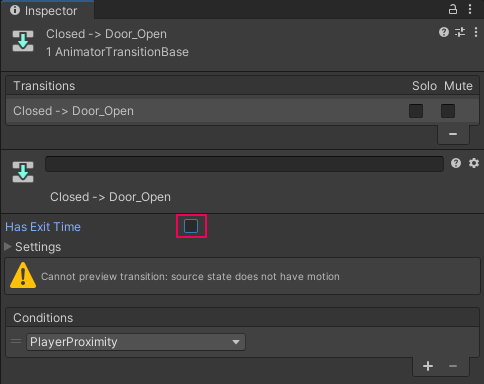
6. Play the scene and test the State Machine. The door should immediately open whenever PlayerProximity is pressed.
9. Create the proximity trigger
While manually pressing the PlayerProximity Trigger works for testing the State Machine, it doesn’t work for the actual experience. Instead, a Trigger Collider will be used with a script to call on the parameter when the player controller is in range. Unlike normal colliders that prevent other objects from passing through whatever they’re assigned to, Trigger Colliders detect when another object has interacted with the object the trigger is attached to, and this information can be used by a script to make specific things occur.
1. In the Hierarchy right-click and select Create Empty.
2. Rename the Empty GameObject to Door Trigger.
Important: Make sure the Door Trigger gameObject is not a child of the Door object, as doing so will make the Door trigger move with the door as it opens.
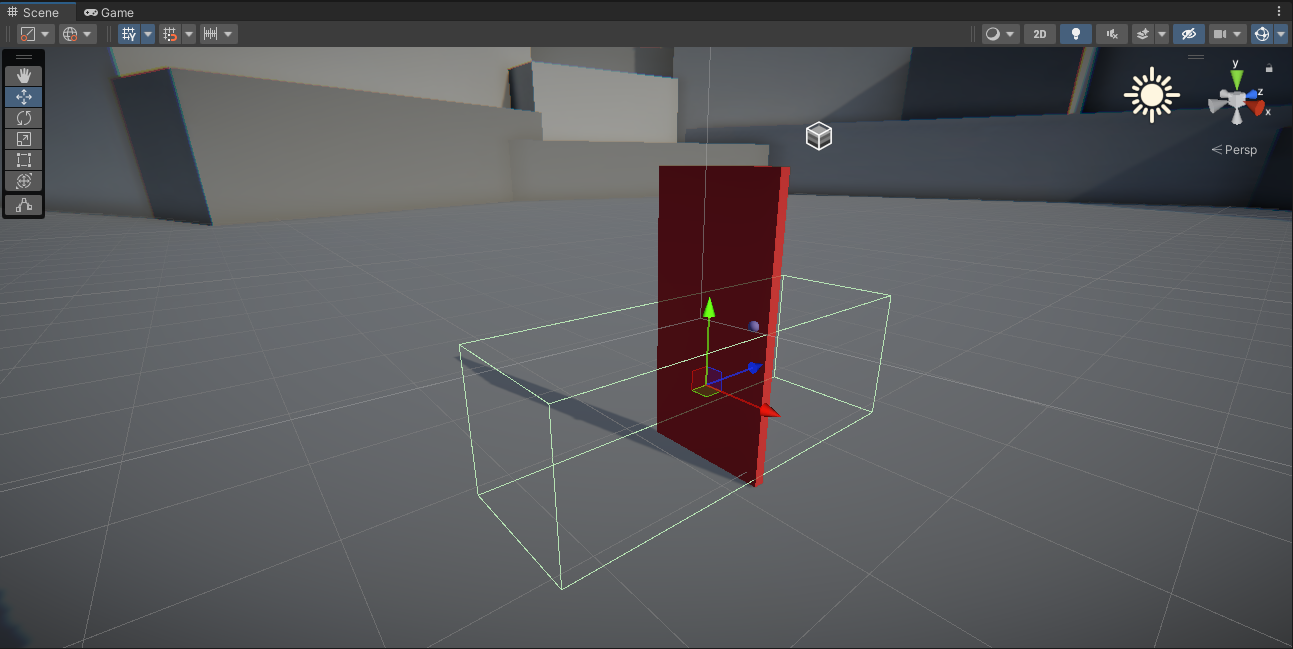
3. With Door Trigger selected, click the Add Component button in the Inspector and search for Box Collider and add it.
4. In the Box Collider component, enable Is Trigger. This will change the Box Collider to a Trigger.
5. Increase the Box Collider size to 3 in the Z axis.
6. Arrange the Door Trigger so that it overlaps the door mesh, with half of the trigger arranged on either side of the door. This will create a good-sized zone for the player controller to enter to trigger the door to open.
7. Locate the DoorTrigger script in the Project Script’s folder, and add it to the Door Trigger GameObject.
8. Drag the Door GameObject into the Anim parameter of the DoorTrigger script. This will automatically assign the Door’s animator to the parameter.
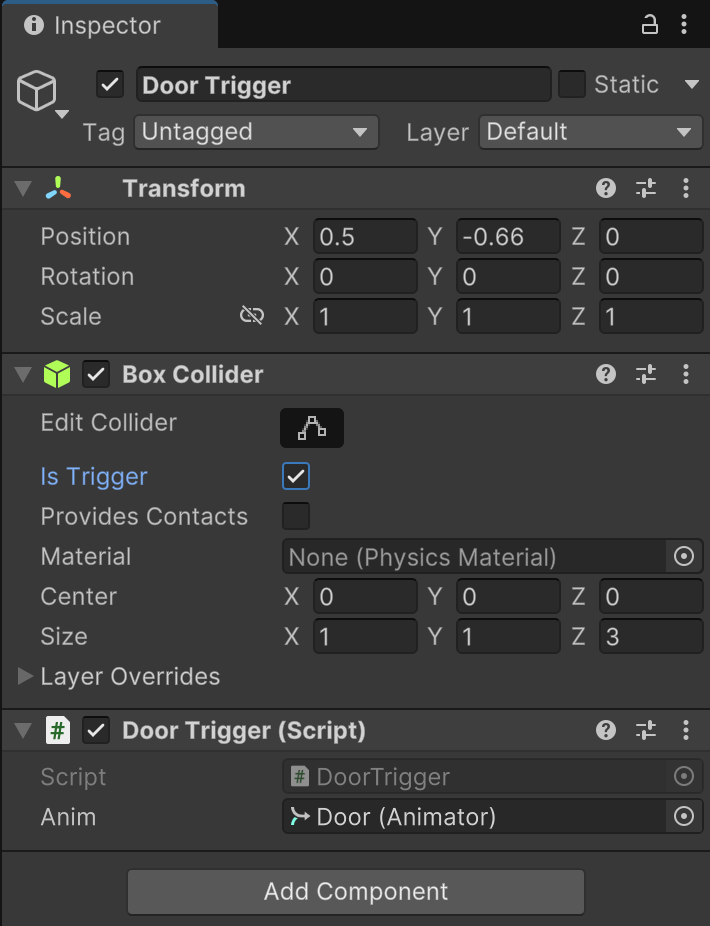
9. Playtest the scene and walk to the door
When the player controller enters the Trigger, the script will access the Door’s Animator Controller and trigger PlayerProximity. The same thing will occur when the player controller leaves the Trigger. The door is now fully functional in the scene!
10. Explore: More triggered animation
A door opening when a player controller comes near to it is useful, but it’s not particularly exciting. One of the great things about using triggers with animation is that the user can’t see when they’re entering a trigger, so they might not immediately realize that entering a specific area caused something to happen.
To practice what you just learned, create a trigger that will cause the sun to set in the sky when the user enters a certain area with the player controller, and rise when they leave.
To accomplish this, you’ll need to:
- Animate the scene’s directional light.
- Create an Animator Controller with states to manage the following: the sun rising, being risen, set, and being set.
- The State Machine should loop endlessly.
- Create a trigger that calls on the State Machine to run.
Remember, you can control the size of the area that causes the sun to rise and set by changing the size of the trigger!
11. Next steps
Every object in Unity with at least one animation will have an Animator component and an Animator Controller. In this tutorial you analyzed the requirements for a State Machine and recreated it in Unity. Although what you built was simple, you worked with all of the major components needed for making larger scale and more complex State Machines. You learned how to control and modify animations in an Animator Controller, and how to transition between them both based on animation completion and parameters. In the next tutorial, you’ll begin to explore the second type of animation in Unity: Imported animation.