
Controlling Unity Camera Behavior - 2019.3
Tutorial
intermediate
+10XP
25 mins
(78)
Unity Technologies
In this tutorial, we’ll dive deeper into Unity Cameras with scripts that control their behavior. We’ll start out with a 2D Camera that works from any perspective (in this case, we’ll be using it in an overhead view). Next, we’ll move on to 3D with a Camera that smoothly transitions — with a flick of the mouse scroll wheel — from first-person to third-person and back. This Camera is suitable for games, VR, or architectural walkthroughs, as seen in many modern and classic 3D titles.
Languages available:
1. Introduction
If you are using Unity 2019.2 or below, click here.
In this tutorial, we’ll dive deeper into Unity Cameras with scripts that control their behavior. We’ll start out with a 2D Camera that works from any perspective (in this case, we’ll be using it in an overhead view). Next, we’ll move on to 3D with a Camera that smoothly transitions — with a flick of the mouse scroll wheel — from first-person to third-person and back. This Camera is suitable for games, VR, or architectural walkthroughs, as seen in many modern and classic 3D titles.
In most cases, rather than remain static, you want Unity’s Camera to follow or track your player or avatar. In Unity, to tie the position of object A (Camera) to object B (player or avatar), a common tactic is to set object A as a child of the controlling object B. The position, scale, and rotation of A are then directly influenced by B. In practice, this isn’t usually a good approach for games or walkthroughs. Because the player or avatar can move, stop, and turn quickly, parenting it to the Camera would result in a very uncomfortable experience for the user. Instead, it’s better to have an object track the player, and the camera, in turn, track that object. This keeps the player in view, but smooths Camera motion.
2. Smooth 2D Camera Motion
In this section, we’ll build a simple system for tracking the player. This works with any perspective in 2D. We include a simple player movement script for an overhead perspective game like The Legend of Zelda from Nintendo.
1. Create an empty object by selecting Create Empty from the GameObject drop-down. Name it Player. Set its position to 0 on the Z axis.
2. Add a Sprite Renderer component and set the Sprite to your player Sprite. If you don’t have one, you can right-click in the Project view and select Create > Sprites > Square.
3. Add a new C# script to Player, named PlayerMovement.
4. Double-click PlayerMovement in the Project view to open the script editor.
5. Beginning on line 7, type:
public float speed = 20;
private Vector2 motion;
6. Delete Start, as we won’t be using it.
7. In Update, type:
motion = new Vector2(Input.GetAxisRaw("Horizontal"), Input.GetAxisRaw("Vertical"));
transform.Translate(motion * speed * Time.deltaTime);
Below is the completed PlayerMovement script:
using UnityEngine;

public class PlayerMovement : MonoBehaviour
{
    public float speed = 20;
    private Vector2 motion;

    void Update()
    {
        motion = new Vector2(Input.GetAxisRaw("Horizontal"), Input.GetAxisRaw("Vertical"));
        transform.Translate(motion * speed * Time.deltaTime);
    }
}
8. Save changes and return to the Unity Editor.
9. Create another empty GameObject, named TrackerObject. Set its position to 0 on the Z axis.
10. Attach a new C# script component, called Tracker, to TrackerObject.
11. Double-click Tracker to open the script in your editor.
12. Beginning on line 7, type:
public Transform trackedObject;
public float updateSpeed = 3;
public Vector2 trackingOffset;
private Vector3 offset;
13. In Start, type:
offset = (Vector3)trackingOffset;
offset.z = transform.position.z - trackedObject.position.z;
14. This allows the Camera to maintain its distance from the Scene when tracking Scene objects.
15. Change Update to LateUpdate. This makes sure the player is done moving for this frame before the tracker moves toward its position. In LateUpdate, type:
transform.position = Vector3.MoveTowards(transform.position, trackedObject.position + offset, updateSpeed * Time.deltaTime);Below is the completed Tracker script:
using UnityEngine;

public class TrackerObject : MonoBehaviour
{
    public Transform trackedObject;
    public float updateSpeed = 3;
    public Vector2 trackingOffset;
    private Vector3 offset;

    void Start()
    {
        offset = (Vector3)trackingOffset;
        offset.z = transform.position.z - trackedObject.position.z;

    }

    void LateUpdate()
    {
        transform.position = Vector3.MoveTowards(transform.position, trackedObject.position + offset, updateSpeed * Time.deltaTime);
    }
}
16. Save changes and return to the Unity Editor.
17. Select TrackerObject.
18. In the Tracker Inspector, drag the Player into the slot marked Tracked Object (Figure 01).
19. Set Update Speed to 7.
20. Attach the Tracker component to the Main Camera.
21. Set TrackerObject as the Tracked Object, and set Update Speed to 10.
22. Enter Play mode. Move the player using the arrow keys, WASD, or a controller. Notice that the Camera now smoothly tracks the player.
3. Smooth 3D Camera Motion
In this section, we’ll build a Camera for 3D Scenes that can be either first- or third-person, with a controllable distance behind the avatar. The distance is controllable via the mouse scroll wheel, and in the Unity Editor, via a slider in the Inspector. When the Camera gets within a specified distance, the player disappears, allowing for first-person views. This time the Camera will track the player directly, rather than an intermediate object.
1. If you already have a 3D player set up in your Scene, skip to step 5. If not, create a 3D cube by selecting 3D Object > Cube from the GameObject drop-down. Name it Ground.
2. Scale this in the X and Z axes to create enough ground for your player to cover (Figure 02).
3. Create a capsule by selecting 3D Object > Capsule from the GameObject drop-down. Name it Player. Set its position to 0 on the Z axis.
4. Attach a Rigidbody component to Player, and set the constraints to lock rotation on the X and Z axes to prevent the Player from falling over (Figure 03).
5. Add a new C# script to Player, named PlayerMovement3D.
6. Double-click PlayerMovement3D in the Project view to open the script editor.
7. Beginning on line 7, type:
public float speed = 20;
private Vector3 motion;
private Rigidbody rb;
8. In Start, type:
rb = GetComponent<Rigidbody>(); 9. In Update, type:
motion = new Vector3(Input.GetAxisRaw("Horizontal"), 0, Input.GetAxisRaw("Vertical"));
rb.velocity = motion * speed;
Below is the completed PlayerMovement3D script:
using UnityEngine;

public class PlayerMovement3D : MonoBehaviour
{
    public float speed = 20;
    private Vector3 motion;
    private Rigidbody rb;

    void Start()
    {
        rb = GetComponent<Rigidbody>();
    }

    void Update()
    {
        motion = new Vector3(Input.GetAxisRaw("Horizontal"), 0, Input.GetAxisRaw("Vertical"));
rb.velocity = motion * speed;
    }
}
10. Save changes and return to the Unity Editor.
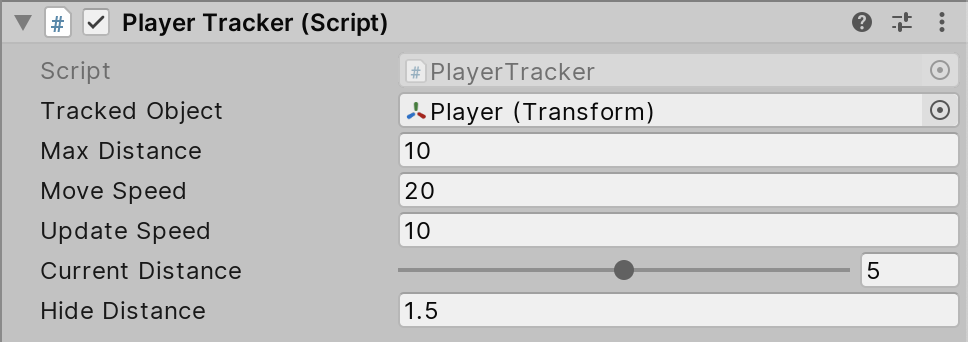
11. Add a new C# script to the Main Camera, called PlayerTracker.
12. Double-click PlayerTracker to open the script editor.
13. Beginning on line 7, type:
public Transform trackedObject;
public float maxDistance = 10;
public float moveSpeed = 20;
public float updateSpeed = 10;
[Range(0,10)]
public float currentDistance = 5;
private string moveAxis = "Mouse ScrollWheel";
private GameObject ahead;
private MeshRenderer _renderer;
public float hideDistance = 1.5f;
14. In Start, type:
ahead = new GameObject("ahead");
    	_renderer = trackedObject.gameObject.GetComponent<MeshRenderer>();
15. Change Update to LateUpdate. In LateUpdate, type:
ahead.transform.position = trackedObject.position + trackedObject.forward * (maxDistance * 0.25f);
  	currentDistance += Input.GetAxisRaw(moveAxis) * moveSpeed * Time.deltaTime;
     	currentDistance = Mathf.Clamp(currentDistance, 0, maxDistance);
    	transform.position = Vector3.MoveTowards(transform.position, trackedObject.position + Vector3.up * currentDistance - trackedObject.forward * (currentDistance + maxDistance * 0.5f), updateSpeed * Time.deltaTime);
    	transform.LookAt(ahead.transform);
   	_renderer.enabled = (currentDistance > hideDistance);
Below is the completed PlayerTracker script:
using UnityEngine;

public class PlayerTracker : MonoBehaviour
{
    public Transform trackedObject;
    public float maxDistance = 10;
    public float moveSpeed = 20;
    public float updateSpeed = 10;
    [Range(0,10)]
    public float currentDistance = 5;
    private string moveAxis = "Mouse ScrollWheel";
    private GameObject ahead;
    private MeshRenderer _renderer;
    public float hideDistance = 1.5f;

    void Start()
    {
        ahead = new GameObject("ahead");
    	_renderer = trackedObject.gameObject.GetComponent<MeshRenderer>();
    }

    void LateUpdate()
    {
        ahead.transform.position = trackedObject.position + trackedObject.forward * (maxDistance * 0.25f);
  	currentDistance += Input.GetAxisRaw(moveAxis) * moveSpeed * Time.deltaTime;
     	currentDistance = Mathf.Clamp(currentDistance, 0, maxDistance);
    	transform.position = Vector3.MoveTowards(transform.position, trackedObject.position + Vector3.up * currentDistance - trackedObject.forward * (currentDistance + maxDistance * 0.5f), updateSpeed * Time.deltaTime);
    	transform.LookAt(ahead.transform);
   	_renderer.enabled = (currentDistance > hideDistance);
    }
}
16. Save changes and return to the Unity Editor.
17. In the slot labeled Tracked Object in PlayerTracker, add the Player object (Figure 04).
18. Enter Play mode. Move the player using the arrow keys, WASD, or a controller. Try moving the Camera toward and away from the player by using the mouse scroll wheel, or, if using a touchpad, the virtual scroll.
19. Notice that the Camera smoothly tracks the player, hiding the player when it gets too close to prevent obstruction of view.
20. Exit Play mode.
4. Conclusion
The Camera is the window into your project’s world, and its behavior is as important as that of any character to ensure a positive player experience.