Create a World to Explore
Tutorial
Beginner
+10XP
15 mins
1254
Unity Technologies

Now you’re ready to build your own RPG game! The first step is to create the world that players will explore. This kit includes lots of pre-made elements which you can use to design a fun and engaging environment without using any code.
In this tutorial, you’ll:
- Explore the template that you’ll use to create your world
- Paint a Tilemap background
- Create a house
Let’s start by exploring the template that you’ll use to create the world.
Languages available:
1. Create a new Scene
First, make a copy of the template Scene:
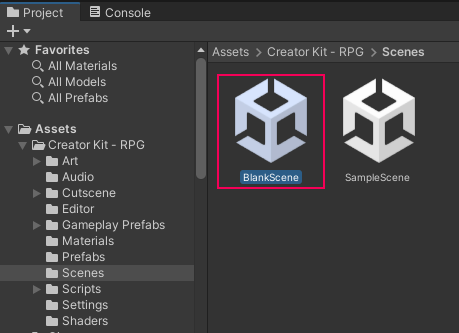
1. In the Project window, go to Assets > Creator Kit - RPG > Scenes.
2. Select the BlankScene template.
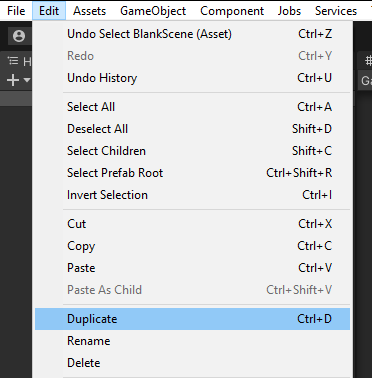
3. In the top menu bar, go to Edit > Duplicate.
4. In the Project window, right-click on the new Scene (BlankScene 1) and select Rename. Call your Scene something memorable.
5. Press Ctrl + S (Windows) or Cmd + S (macOS) to save your changes.
6. Double-click on your new Scene to open it for editing.
2. Explore the Template Scene
Before you begin creating your game world, let's explore the Scene template.
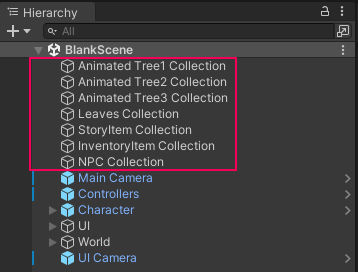
Collection GameObjects
The Hierarchy contains all the GameObjects in your Scene. GameObjects with Collection in their titles are containers which will be used to organise different elements that you can use to create your Tilemap. When you create them, their GameObjects will be stored here.
Prefab GameObjects
Beneath the Collection GameObjects are three GameObjects with blue icons:
- Main Camera
- Controllers
- Character
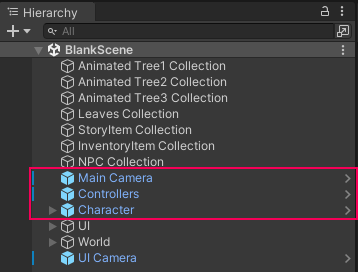
These GameObjects have been configured for you in advance to make your game work properly. They are Prefab GameObjects, which work like templates that you can duplicate to use in different Scenes.
UI GameObject
The UI GameObject includes Prefab GameObjects with user interface settings. These control what the player sees on screen — for example, messages relating to the character’s inventory.
World GameObject
The World GameObject contains a child Prefab called Tilemaps. Inside Tilemaps are four GameObjects you will be using to design your game:
- Background
- Midground
- Fences
- Foreground
3. Explore the Tilemap Palette
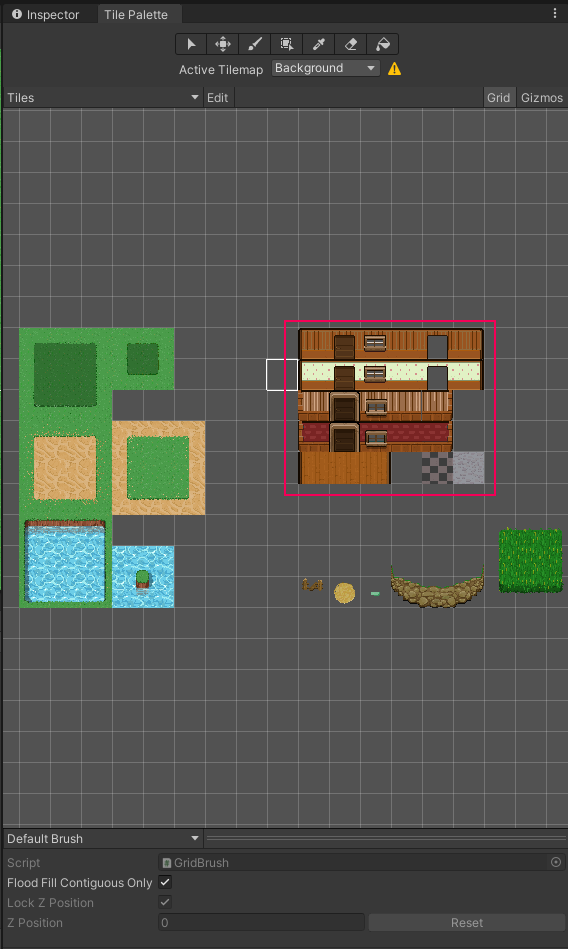
To create a world for your RPG, you’re going to use the Tile Palette. This is a window with image tiles that you can use to paint in a background. Before you get started, let’s explore this window:
1. In the top menu, go to Window > 2D > Tile Palette. This will open the Tile Palette window:
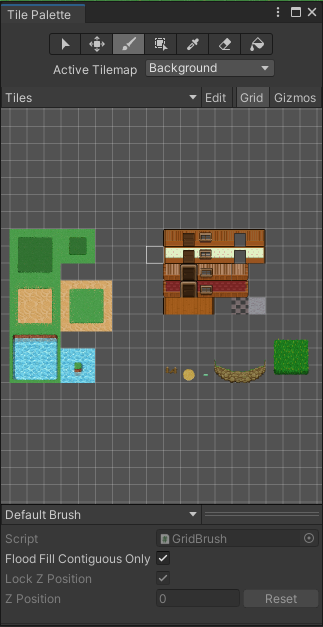
You will use this window to paint in a background for your RPG.
2. Click the Tile Palette window name and drag it to the Inspector window. This will dock it in a new tab there.
What does the Tilemap Palette include?
This Tilemap Palette includes four different types of Tiles:
- Background terrain — grass, desert, and water
- House — walls and flooring
- Land features — a small rock cliff and tall grass
- Other items — fences, dirt circles, and footpaths
You can use these tiles to paint on different Tilemaps and create a world to explore. Think of these different Tilemaps like layers sitting on top of each other, providing different levels of detail:
- Background
- Midground
- Fences
- Foreground
4. Introduction to Tilemap Painting
There are two useful tools you can use to paint with the Tilemap Palette: the Tile Palette toolbar and other shortcuts.
The Tile Palette toolbar
There are a number of useful tools within this toolbar.

The most helpful ones for this Creator Kit are:
Select Tool

You can use this tool to select Tiles to paint. You can select one or multiple Tiles. Alternatively, click to select a Tile and drag to select multiple Tiles.
Move Tool

You can use the Move Tool to select and drag Tiles to another position on the Tilemap.
Paintbrush Tool

This tool paints the selected Tiles into the Scene view.
Fill Box Tool

You can use this tool to select a Tile in the Tilemap Palette, or hold and drag over multiple Tiles.
You can then hold and drag the Rectangle Tool over the Tilemap to draw a rectangular shape, which is filled with the selected Tile(s).
Picker Tool

You can use this tool to select one or more Tiles. When you have selected them, this tool switches to the Paintbrush tool so you can immediately paint on the Tilemap.
Eraser Tool

This tool will erase Tiles that you have painted in the Scene view.
Fill Tool

This tool can be used to paint larger areas of your world with one or more selected Tiles.
Keyboard and mouse shortcuts
There are also a few useful shortcuts which will help you to paint your Tilemap:
- Alt + left button drag — pan
- Wheel button drag — pan
- Rotate the wheel button — zoom in or out
Now that you’ve explored the Tilemap Palette, you’re ready to start painting your own Tilemaps!
5. Paint your Background Tilemap
Let’s start with the Background layer of your Tilemap. This includes everything that the player character will always be standing on top of, for example grass and the floor of houses.
To paint this Tilemap:
1. In the Hierarchy, select the Background GameObject.
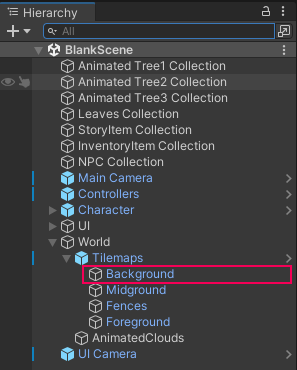
2. In the Tile Palette window, make sure that the Active Tilemap is set to Background. If it isn’t, change this using the drop-down menu.
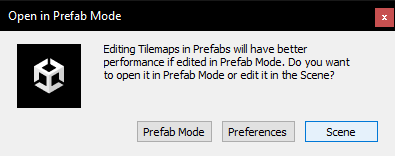
If an Open in Prefab Mode dialogue window appears, choose to edit the Scene.
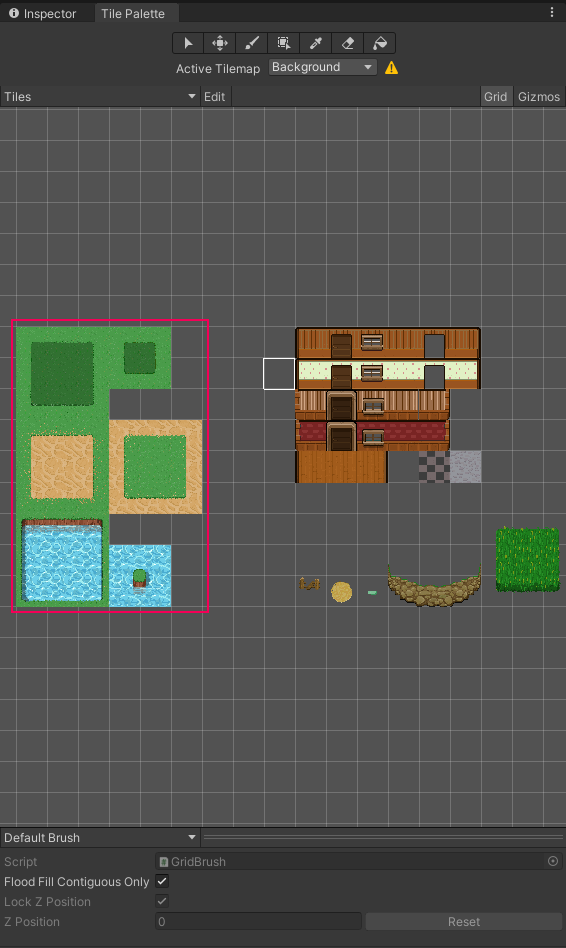
3. You’re now ready to paint in the background! Select tiles in the Tile Palette and then click tiles in the Scene view to paint them. Remember, you can:
- Select individual tiles to paint, for example one square of grass.
- Select multiple tiles to paint, in the blocks designed for this Creator Kit.
4. Press Ctrl + S (Windows) or Cmd + S (macOS) to save your Scene.
6. Add a House to your World
You can also add houses to your world, to give its inhabitants places to live. This starts in the Background Tilemap.
To add a house:
1. In the Hierarchy, check that the Background Tilemap is still selected.
2. In the Tile Palette window, check that the Active Tilemap drop-down menu is still set to Background.
(If you need to change this drop-down menu and an Open in Prefab Mode dialog window appears, select Scene.)
3. Take a look at the Tiles that are available to make your house.
Here’s a quick reference guide to the main Tile types:
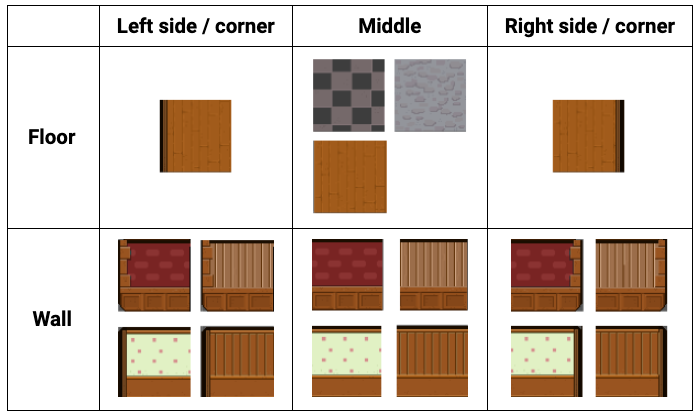
There are also Tiles with doors and windows — these Tiles are aesthetic-only (your character won’t be able to walk through them). You’ll be able to add a door to empty archways or empty Tiles later in this tutorial.
4. First, select Tiles and paint the floor for your house into the Background Tilemap.
5. Now you can paint in the walls. These include Colliders to stop the player character walking through them, so are added to the Midground Tilemap. In the Hierarchy, select this Tilemap.
6. In the Tile Palette window, set the Active Tilemap to Midground using the drop-down menu. If an Open in Prefab Mode dialog window appears, select Scene.
7. Select tiles and paint in the walls of the house. Remember to leave space for a door or an open entrance.
8. Press Ctrl + S (Windows) or Cmd + S (macOS) to save your changes to the Scene.
Your house is unique, but it should look something like this:
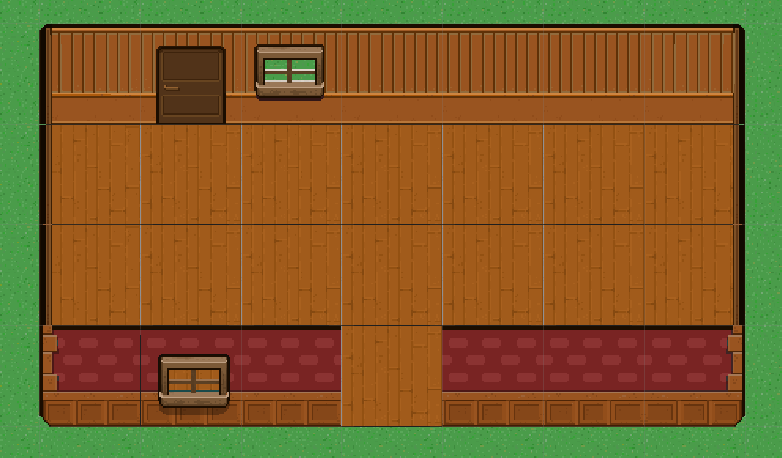
It's almost there, but not quite complete — it’s missing a roof and a door, which you need to add in a slightly different way.
7. Add a Roof to your House
In this Creator Kit, roofs and doors are a little more complex than walls. Because of this, you need to add them in a slightly different way.
Let’s start with a roof:
1. In the Hierarchy, right-click the World GameObject and select Create Empty. This creates a new child GameObject called “GameObject”.
2. Right-click GameObject and select Rename from the context menu. Call your new GameObject “Objects”.
3. In the Project window, go to Assets > Creator Kit - RPG > Prefabs. Select the HouseRoof Prefab.
4. Drag the HouseRoof Prefab from the Project window to the Objects GameObject in the Hierarchy.
5. With the HouseRoof GameObject selected, place your cursor over Scene view and press F. This will focus the Scene view on the roof.
6. If you need to move the roof, you can do this using the Move Tool. In the Toolbar, select the Move Tool icon. Alternatively, press W on your keyboard to use the shortcut.

In the Scene view, click and drag the roof until it is aligned with one of the corners of the house that you have drawn.
7. Next, you need to resize the roof so that it fits the house properly. In the toolbar, select the Rect Transform Tool.

With your cursor, click and drag a corner of the roof to resize it for your house.
8. Save your changes to the Scene.
TIP: To delete a roof GameObject you have added (or any other GameObject), select the GameObject in the Hierarchy. Then you can either:
- Right-click the GameObject and select Delete from the context menu.
- Select the GameObject and press Del (Windows) or Cmd + Backspace (macOS).
8. Give the Roof a Fade Effect
Now your house has a roof and looks great — but it does make it much more difficult to see inside as you explore. To fix that, let’s give the roof a fade effect when the player character enters the building:
1. In the Hierarchy, select the HouseRoof GameObject.
2. In the Inspector, find the HouseRoof GameObject’s Sprite Renderer component. Set the Order in Layer parameter to 1000.
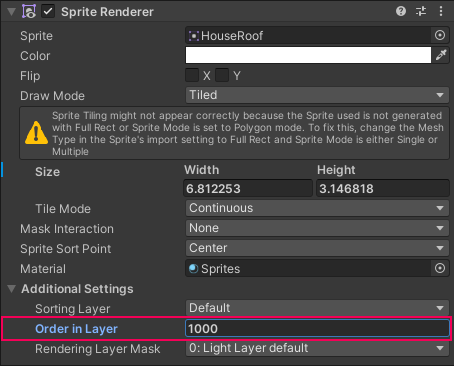
This means that when the player character enters the house, the roof will be on top of them rather than beneath them.
3. Next, let’s make the roof fade so the player can see into houses when their character enters. First, you need to make sure that the fade effect is only triggered when the player enters the space covered by the roof.
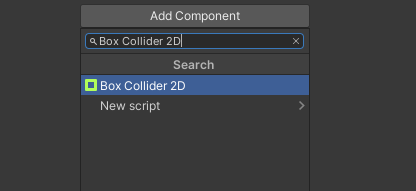
Click the Add Component button in the Inspector. Search for “Box Collider 2D” and add this to HouseRoof.
4. In the Inspector, enable the Box Collider 2D Component’s Is Trigger checkbox.
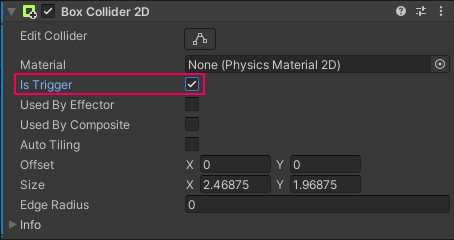
Colliders define the space of an object for physical collisions or other interactions. In this case, when the player enters the space covered by the roof, a specific effect will be triggered.
5. Click Add Component again. Search for and add a Fading Sprite script component to HouseRoof. This script will provide the effect you need: it fades a Sprite when the Collider is triggered.
6. Press Ctrl + S (Windows) or Cmd + S (macOS) to save your changes to the Scene.
7. Enter Play Mode to test out your house and its roof effect! Remember to press Play again to exit Play Mode when you’re done.
9. Adjust the Fade Effect for Your Roof
If you created a small house, the roof fade effect should work well. However, if you made a big house and had to make the roof much larger than the default size, you might find that the character has to move quite far into the house before the roof fades.
This is because the fade effect is controlled by the size of the Box Collider 2D Component.
To make the effect start as soon as the character moves inside the house, you need to resize the Collider:
1. In the Hierarchy, go to World > Objects. Select the HouseRoof GameObject you have added to your Scene.
2. In the Inspector, find the roof’s Box Collider 2D component.
3. Click the Edit Collider button.
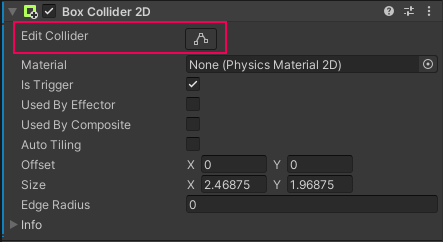
4. In the Scene view, you’ll see that the green Collider box on (or around) the roof has turned white. Click and drag the small square on each side of the box to resize the Collider.
You may want to fade the roof as soon as the character steps through the door or have the effect start when they're slightly inside — either is fine!
5. When you’re happy with the size of the Collider, click Edit Collider again.
6. Save your changes, and then test them in Play Mode. Remember to leave Play Mode again when you’re done.
Now your house is ready for a door.
10. Add a Door to your House
Doors are created in a similar way to roofs. Because they’re a little more complicated, we’ve created a Prefab that you can drag and drop into your world. Prefabs are templates that you can use instead of creating a GameObject from scratch.
To add a door to your house:
1. In the Project window, go to Assets > Creator Kit - RPG > Prefabs.
2. Drag the HouseOpenDoor Prefab from the Project window to the Objects GameObject in the Hierarchy.
3. With the HouseOpenDoor GameObject selected, place your cursor over Scene view and press F. This will focus the Scene view on the door.
4. If you need to move the door, you can do this using the Move Tool. In the Toolbar, select the Move Tool icon. Alternatively, press W on your keyboard to use the shortcut.

In the Scene view, click and drag the door until it is aligned with the entrance space that you have left.
5. Next, you may need to resize the door so that it fits the house properly. In the toolbar, select the Rect Transform Tool.

6. With your cursor, click and drag a corner of the door to resize it for your house.
7. Save your changes to the Scene.
11. Add a Chimney to your House
You can also add a chimney Prefab to your house, to give it a lived-in atmosphere:
1. In the Project window, go to Assets > Creator Kit - RPG > Prefabs.
2. Drag the HouseChimney from the Project window to the Objects GameObject in the Hierarchy.
3. With the HouseChimney GameObject selected, place your cursor over Scene view and press F. This will focus the Scene view on the chimney.
4. In the Toolbar, select the Move Tool icon. Alternatively, press W on your keyboard to use the shortcut.
In the Scene view, click and drag the chimney until it is located where you would like it to be located on the roof.
5. Next you need to resize the chimney so that it looks good on your house. In the toolbar, select the Rect Transform Tool.
6. With your cursor, click and drag a corner of the chimney to resize it for your house.
7. Save your changes to the Scene.
8. Follow the same process you used for the roof to add a fade effect to the Chimney GameObject.
9. Save your changes to the Scene again, then enter Play Mode and test out the changes.