
Create and calibrate an illuminated object using HDRP
Tutorial
intermediate
+10XP
35m
(39)
Unity Technologies
In this tutorial, you will learn how to use the emissive properties of HDRP Materials to contribute to a Scene’s Global Illumination.
Languages available:
1. Create and calibrate an illuminated object using HDRP
This tutorial has been verified using Unity 2019.4 LTS
Unity’s High Definition Render Pipeline (HDRP) is a high-fidelity Scriptable Render Pipeline that targets modern high-end graphics platforms. HDRP uses Physically-Based Lighting techniques, linear lighting, and HDR lighting.
A light can illuminate a Scene directly and provide indirect lighting when it bounces off an object’s surface onto other surfaces. Unity produces indirect lighting through a process called Global Illumination.
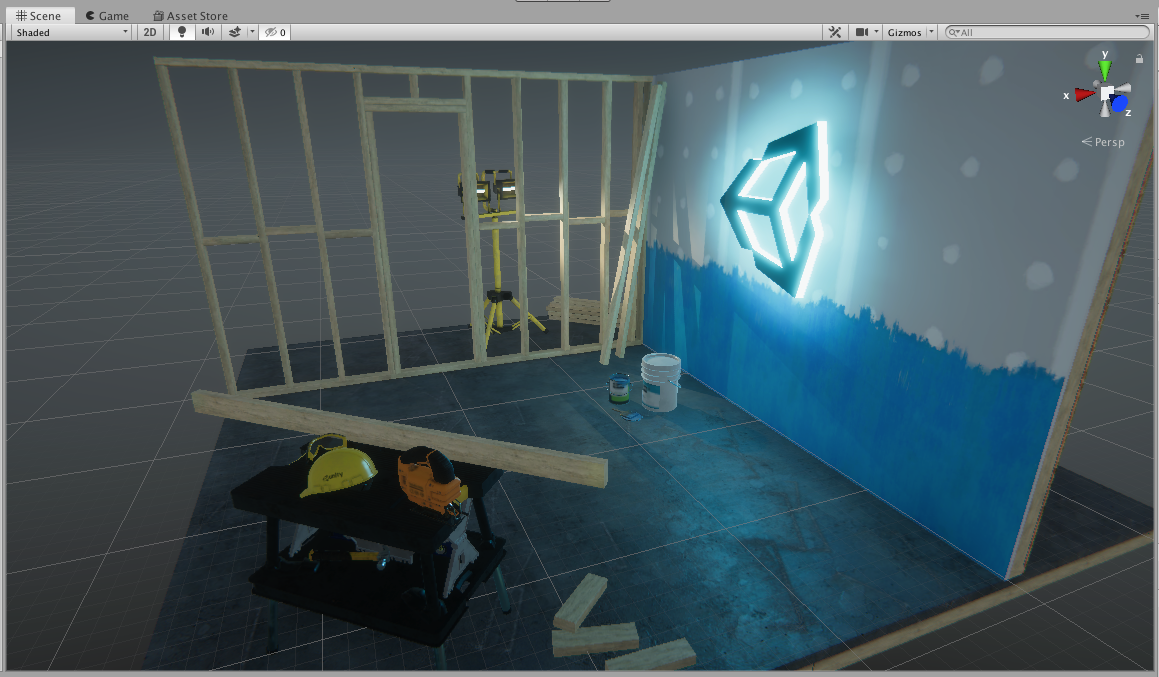
Like other Materials in Unity, HDRP Materials have emissive properties that can contribute to a Scene’s Global Illumination. Once you understand emissive properties, you can begin using objects to provide illumination (Figure 01).
2. Open an HDRP project
You can upgrade an existing project to HDRP by adding the High Definition RP plug-in with the Package Manager (Figure 02), or you can create a new project in the Unity Hub and select the High Definition RP project template (Figure 03).
Note: When updating an existing Scene to the High Definition RP, make sure you update all your current Materials to HDRP Materials. Do this by choosing
Edit > Render Pipeline > Update Project Materials to High Definition Materials.
3. Set a model to emit light
You can set an object Model to emit light by adjusting the emissive properties of a Material attached to an Asset.
To set a Model to emit light:
1. Add a Model, a GameObject that is a Mesh, to the Scene or select an existing Model in the Hierarchy or the Scene.
2. If the object already has a Material attached, you can modify the Material. If there is no Material attached, you need to create one. To create a new Material, right-click in the Project window and choose Create > Material (Figure 04).
3. Name the new “Material”.
4. In the Inspector window, with the new Material selected, make sure the Shader is set to HDRP/Lit. This is the default Material when using HDRP.
5. In the Emission Inputs section, select the Emissive Color picker and adjust the color and intensity (Figure 05).
Important: Make sure the Emission Color is not set to Black.
Alternatively, you can assign a Texture to the Emissive Color. This allows finer control of the light emitted over the area covered by the Material. The emitted light’s color and brightness will be used from the assigned Texture file.
6. Enable the Emission checkbox to allow the emissive properties of the Material to interact with Global Illumination in the Scene.
7. Once Emission is enabled, you can either use Realtime or Baked from the Global Illumination drop-down. Set this to Baked as Realtime GI is not used in HDRP (Figure 07).
8. If it’s not already assigned, assign the new Material to the object to be illuminated. To do this, drag and drop the Material from the Project window onto the object in the Scene, or onto the object in the Hierarchy window (Figure 08).
Note: If the Model you are illuminating is an imported file, and the UVs aren’t unwrapped, or aren’t properly unwrapped, select the original imported Model in the Project window and turn on Generate Lightmap UVs in the Model tab, then click Apply (Figure 10). Unity will unwrap the UVs for the Mesh to generate the lightmap UVs.
4. Generating Global Illumination
After setting the object’s initial Emission Properties, make sure Global Illumination lighting is rendered for the Scene.
To generate Global Illumination:
1. Open the Lighting settings by selecting Window > Rendering > Lighting Settings (Figure 10).
2. In the Realtime Lighting section, uncheck the box next to Realtime Global Illumination to disable it.
3. In the Mixed Lighting section, check the box next to Baked Global Illumination to enable it. Set the Lighting mode to Baked Indirect.
4. In the Lightmapper Settings section, change the Lightmapper to Progressive CPU. Alternatively, the Lightmapper can be set to Progressive GPU (Preview), which will be faster if you have a supported OpenCL-capable GPU. Since this is currently a preview feature, it may not be ideal for all projects (Figure 11).
5. To automatically generate the lighting every time you make changes to the Material or the Scene, check the box next to Auto Generate. Or you can manually select the Generate Lighting button and prevent Unity from automatically generating Global Illumination when you adjust properties (Figure 12).
5. Adjusting emissive properties
To control how light is emitted from an object, you can add a Texture to the Base Map of the Material and add a Texture to the Emissive Map. Color and strength values can be changed in the Material’s Emissive settings.
To adjust emissive properties:
Select the object in the Scene or the Hierarchy window and scroll down in the Inspector window to find the attached Material.
Add a Texture to the Base Map of the Material by clicking the Base Map button to open the Assign Texture window (Figure 13).
To add a Texture to the Material’s Emissive Color, select the Emissive Color button to open the Assign Texture window (Figure 15), then select a Texture. The Texture is used as the color that’s emitted from the object.
To change the color of the light emitted from the object, select the Emissive Color chip and adjust the color value (Figure 16).
After making changes to these settings, make sure you click the Generate Lighting button in the Lighting Settings (Window > Rendering > Lighting Settings), unless you checked the Auto Generate box. Texture Baking will begin and progress will be displayed in the lower-right of the main Unity window (Figure 17). The Scene file will display the final result (Figure 18).
One way to make the light-emitting object appear brighter is to lower the Exposure Weight. This affects the exposure in the post processor. The exposure normally compensates for light emitted from an object when the post processor exposure is set to auto.
While the exposure can be manually adjusted, it’s set to auto by default. Lowering the Exposure Weight value allows the object illumination to have less of an effect on the auto exposure adjustment and appear to have greater intensity.
The Exposure Weight just tricks the camera by allowing the emissive Material to be brighter (Figure 19).
The final Scene displays light with the object’s Texture (Figure 20).
6. Conclusion
By following these steps, you can create objects that emit light in a Scene using High Definition RP Materials. Use these settings and apply adjustments to create illuminated objects for your own projects.