Create dynamic sound effects
Tutorial
Beginner
+10XP
35 mins
124
Unity Technologies
In this tutorial, you’ll begin the process of creating a complex soundscape by adding footstep sound effects to the player character.
By the end of this tutorial, you'll be able to:
- Choose time-based or action-based methods, such as triggers or events in order to play audio clips.
- Explain the role of audio in developing atmosphere.
Languages available:
1. Overview
As previously established, audio is very important for creating a sense of believability in your digital experiences. If you haven’t worked through the audio mission in Unity Essentials or would like to refresh your knowledge, it may be helpful to do so before proceeding. You can find the Essentials audio mission here.
Audio is an exciting area of development. Let’s hear some thoughts from our creators about creating audio for real-time 3D experiences:
Despite its importance, audio is often overlooked. As creators, it’s easy to forget about audio, as there are often many other challenges to address, like scripting errors or designing accessible UIs. However, few things tend to give more of a sense of dissonance than an interactive experience without audio at all, or audio that’s poorly designed. In this tutorial, you’ll begin the process of creating a complex soundscape by adding footstep sound effects to the player character.
2. Assess scene needs
Audio effects layer on top of each other to create a full soundscape, so you’re going to start by creating the most consistent sound the user will hear as they interact with the game: the player’s footsteps.
Footsteps are often things that we don’t pay attention to in the real world, unless we’re trying to be quiet or are listening for someone else. However, footsteps can tell us a lot about an environment. Take a moment and walk around your immediate surroundings, preferably on a few different surfaces, if possible. What do your footsteps sound like on a carpet? What about bare floor, brick, or wood? How do your footsteps sound when you wear shoes versus being barefoot? Each change in variables will produce a different sound.
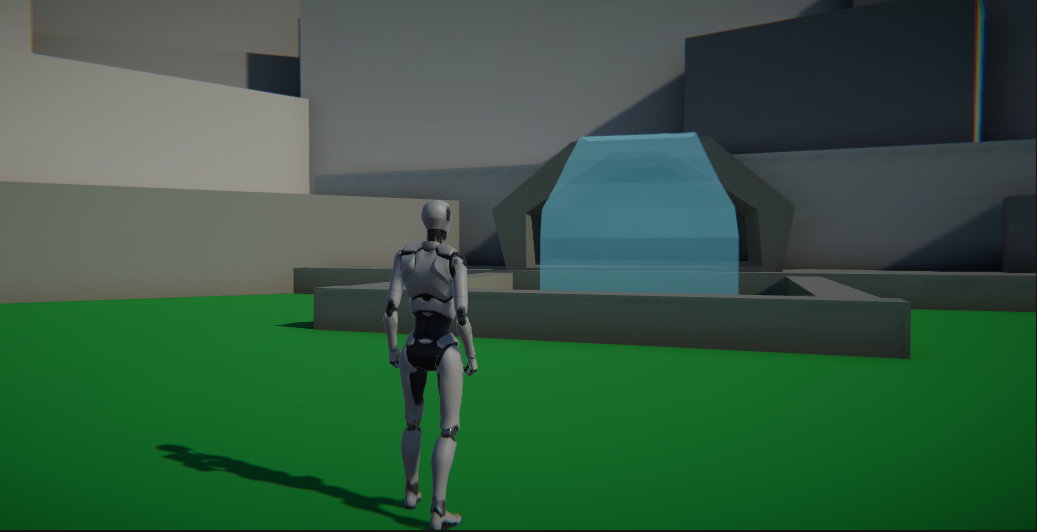
If you observe the scene, you can see that there are in fact three different surfaces that the player can move around on: the open grassy area, the shallow pond, and the stone cave. All three surfaces should produce a different type of footstep sound!
3. Add Animation Events
With footsteps, you want to create a sound that plays at the precise moment the character’s foot hits the ground. You can do this in Unity by tying the sound effect to a specific part of the character’s movement through the use of Animation Events. An Animation Event works very similarly to a keyframe, but rather than telling the character to move in some specific way, it sends a message that can be used by a script to make something happen. You'll use it to call a pre-made script to play a footstep sound.
1. Navigate to the Animations folder for the Animator Controller by going to:
Assets > CreativeCore_Audio > StarterAssets > ThirdPersonController > Character > TutorialAnimations.
2. Select Locomotion--Walk_N animation to select it in the Inspector.
3. In the Inspector, select the Animation tab and unfold the Events section.
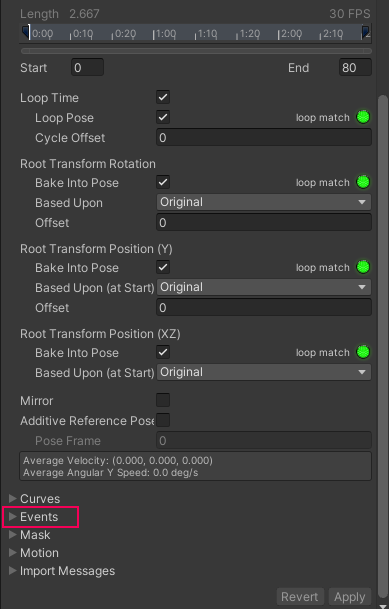
The Events section features a small timeline and a list of different types of data that can be sent out, but these will remain grayed out and unavailable until you add your first event.
4. Increase the size of the Animation Preview window at the bottom of the Inspector by left-clicking and dragging the double lines next to the animation name.
You want to place an Animation Event at the exact point the character’s foot hits the ground. To accomplish this, you first need to locate that point in the animation, which can be accomplished by manually scrolling through the keyframes in the Preview window. This process is referred to as scrubbing. To scrub through the animation, left-click and drag on the gray bar to the right of the Play button in the Animation Preview window. As you scrub through the animation, the Event timeline adjusts to reflect where in the animation you’re previewing.
5. Scrub through the animation until you locate the moment the character’s left foot hits the ground, at about frame 9.
6. Return to the Events section in the Inspector. Click the Add Event button.

A small flag icon will appear on the Event timeline at the specified point of the animation. This will enable the data types directly below the timeline.
7. In the function parameter, Enter “PlayStep”. This will be referenced in a script later in the tutorial, so it’s important that you spell and case it precisely as shown here.
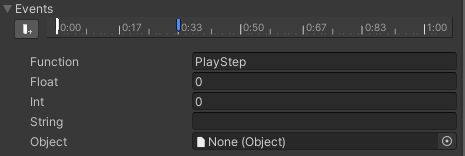
8. Repeat the process of scrubbing through the animation, creating an event and setting the function as PlayStep for the character’s right footfall.
9. At the bottom of the Inspector, click the Apply button to save the events to the animation.
10. Locate the Run and Jump Landing animations in the Animations folder and repeat the process of adding events at the moment the character’s feet hit the ground. Remember to apply the events once you’ve finished with each animation.
4. Apply the audio script
The animations are now configured to send out an event request whenever the player character’s foot hits the ground. This event call will be made to the object the animations are connected to, so the script managing the footsteps must be applied to the player character. In order to actually play the sounds for the animations, an Audio Source must be added to the player character as well.
1. Locate the FootstepManager script in the Scripts folder of the project. Add the script to the PlayerArmature object next in the ThirdPersonController in the Hierarchy.
2. With the player still selected, click the Add Component button in the Inspector, then search for and select Audio Source.
5. Explore the audio script
Take a moment to look at the FootstepManager script. Notice that in the Inspector, there are three dropdowns, labeled as steps for grass, water, and cave – the three different step sound types required! These dropdowns represent a list for multiple footstep sounds. We’ll discuss why that’s important shortly.

If you would like to better understand the programming that goes into the script, open Visual Studio by double clicking on the Footstep Manager script and refer to the following notes:
- The OnControllerColliderHit method detects what type of surface the player is walking on/in by checking its associated tag. (You’ll apply tags to the scene surfaces in the next step, but for now just know that this method is running at all times, making sure that it knows what the player is standing on.)
- When an event plays in the scene, it calls the PlayStep method, which selects a random audio clip from the audio lists you saw in the Inspector, and plays it.
6. Tag scene surfaces
In order to know what audio clip to play, the FootstepManager first needs to know what type of surface the player is standing on. This is accomplished through the use of tags.
1. Select the grass surface in the Scene view. At the top of the Inspector, select the dropdown labeled Tag, and at the bottom of the list, select Add Tag.
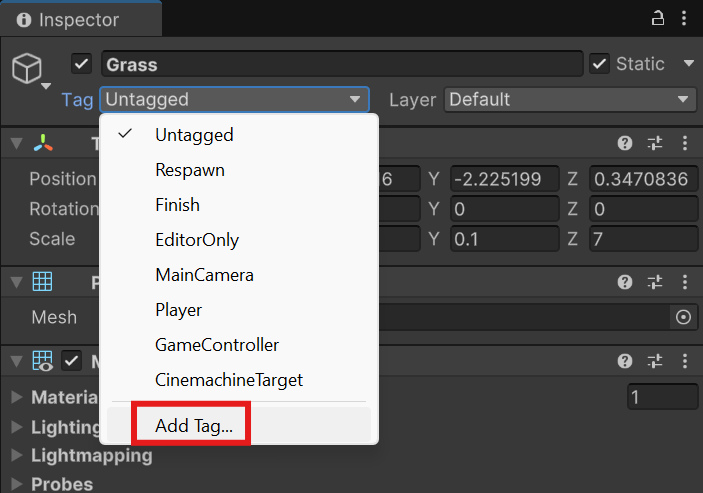
2. In Tags and Layers, select the + button to add a new tag. Name the new tag “Grass”, taking care to spell and case the word correctly so it may be called through script.
3. Create two more tags: one for Water and one for Cave.
4. Select the grass surface in the Scene view once again. Set the tag to Grass.
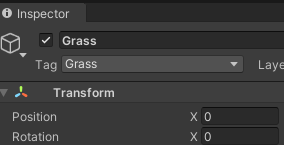
5. Select the water surface in the Scene view and tag it as “Water”.
6. Select the cave in the Scene view and tag it as “Cave”.
7. Add a footstep clip
The scene is now properly configured for the footstep script to play the appropriate sound based on what the player character is standing in/on, so all that remains is to add the footstep audio clips themselves. A question now arises: why is there a list for multiple footsteps rather than just an audio clip variable for one? Let’s experiment with just a single audio clip and see what the results are.
1. In the audio folder, select one of the grass steps and drag it on top of the Grass Steps variable of the Footstep Manager script(associated with PlayerArmature) in the Inspector . This will automatically add it to the list.
2. Repeat the previous step for the water and cave steps so that each of the three step variables in the FootstepManager has a single audio clip assigned.
3. Playtest the scene. Spend a few minutes running around the area and across the different surfaces to hear the footsteps change dynamically.
At first it might not be immediately apparent, but if you spend some time running around, you’ll eventually become aware of the fact that the footsteps all sound exactly the same. One footstep type may be more obvious than the others, but eventually, you’ll notice they’re all just the same sounds repeating over and over again.
Because the player character is the one consistent thing that will appear in every scene that the user experiences, it’s all but certain that these repeated audio effects will eventually be noticed and may become quite annoying. This is also not reflective of how people move in the real world. The way that people place their feet changes with each step, and as a result the sound will vary greatly as well. While it wouldn’t be reasonable to have hundreds of different footstep audio clips, having even a handful can prevent the user from noticing the repeated effects.
Time to add in that needed variety!
4. Select all of the grass steps in the audio folder, then drag them on top of the grass steps variable of the Footstep Manager script(associated with PlayerArmature) in the Inspector to assign them to the list.
5. Repeat the previous step for the water and cave audio clips.
6. Playtest the scene again. As you move around, you should notice that the footsteps seem more dynamic and significantly less repetitive!
8. Explore: customize the footsteps
As you explored in a previous tutorial, sound can play a huge role in changing the mood of a scene. In Unity, it’s incredibly easy to switch out audio clips, enabling you to rapidly iterate on different audio scenarios.
Try switching out the audio clips for the different surfaces to see how it changes the scene. What would happen if the grass steps sounded like the crunching of leaves or dry grass? What if rather than splashes, stepping on the water produced the sound of an ice surface cracking?
You learned a little bit about where and how to access audio files in the Audio mission in Unity Essentials. If you need a refresher, revisit the tutorial here. Unity supports a variety of audio file formats, so as you search, keep in mind that you can use the following: .aif, .wav, .mp3 and .ogg.
In addition to the Unity Asset Store and other resources referenced in the tutorial, you can also find a huge variety of sound effects on Open Game Art and FreeSound.org. If you’re interested in audio design in general, you might even consider trying to create your own sound effects by recording audio on your phone.
Regardless of how you get your audio, make sure you know what kind of license it has and that you’re able to use it in your own projects. Reputable repositories will clearly mark the license type an audio file has, as can be seen here from Open Game Art:

If an audio file is free to use with credit, be sure to credit the original author!
The more you practice with audio design, the better you’ll get. Take this opportunity to experiment with audio on a small scale and see what kind of scene you can set!