
Creating a High Dynamic Range Image Skybox
Tutorial
Beginner
+10XP
5 mins
Unity Technologies
Setting up an HDRI Skybox in Unity just takes a few steps. In this tutorial, we’ll create a Skybox material and set up our scene.
Resources
Languages available:
1. Introduction
High Dynamic Range Images use various techniques to capture a greater range of lighting information in a photograph. Unity is able to read this additional lighting information and convert it to a representation of the environment lighting represented in the image. It’s possible to light entire Scenes using only a HDRI Skybox. Setting up a HDRI Skybox in Unity just takes a few steps. In this tutorial, we’ll create a Skybox Material and setup our Scene.
2. Creating a High Dynamic Range Image Skybox
High Dynamic Range Images use various techniques to capture a greater range of lighting information in a photograph. Unity is able to read this additional lighting information and convert it to a representation of the environment lighting represented in the image. It’s possible to light entire Scenes using only a HDRI Skybox. Setting up a HDRI Skybox in Unity just takes a few steps. In this tutorial, we’ll create a Skybox Material and setup our Scene.
- Download and import the Unity HDRI Pack from the Asset Store. If you’d like to use your own image, it needs to be in the Cube format. For more information on formatting your Cubemap, see the Unity Manual. For this workflow, we’ll use the Kirby Cove HDRI from the Unity HDRI Pack.
- Right-click in the Project pane and select Create > Material. Name this material KCSky.
- In the Inspector for KCSky, click Shader and set it to Skybox > Cubemap (Figure 01).
- Click the Select button to set the Cubemap (Figure 02).
- In the “Select Cubemap” pop-up, double-click on KirbyCoveWhiteBalanced (Figure 03).
- From the Window drop-down, select Rendering > Lighting Settings (Figure 04).
- Drag and drop KCSky into the Skybox Material slot (Figure 05).
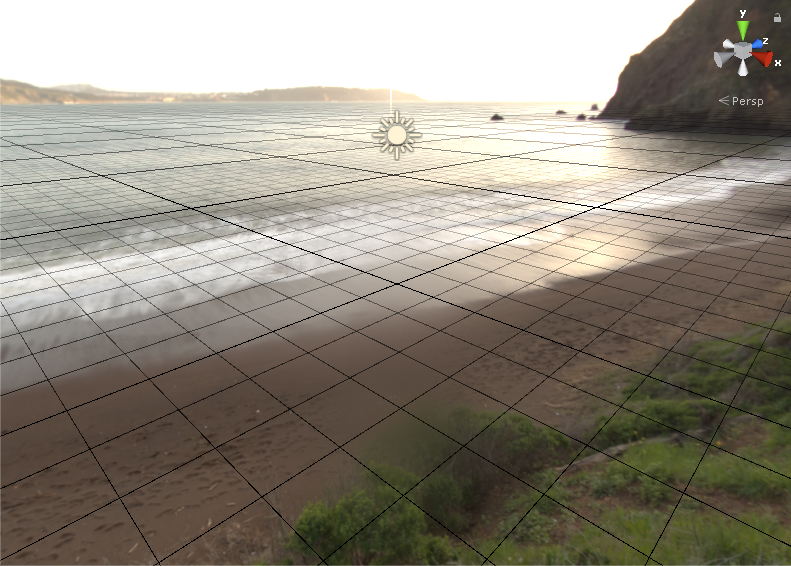
- The Skybox is now in place and ready for use (Figure 06).
3. Conclusion
As the lighting is recalculated, notice how the Skybox affects the lighting in the scene. Each object appears to pick up lighting color and intensity from the Skybox, which makes the objects look like they belong in the environment. A Skybox is a quick way to add immersive realism to your world, whether it’s based in reality or fantasy.