
Creating a Screen Space Overlay UI
Tutorial
Beginner
+10XP
5 mins
(710)
Unity Technologies
Unity features several different types of User Interface options that allow users to create UI that precisely fit their application’s needs. There are two main types of UI categories: Screen Space and World Space. In this tutorial, you will learn to create a Screen Space UI.
Languages available:
1. Creating a Screen Space Overlay UI
This tutorial has been verified using Unity 2019.4.10f1 LTS.
Unity features several different types of User Interface options that allow users to create UI that precisely fits their application’s needs. There are two main types of UI categories: Screen Space and World Space. Screen Space projects the UI onto the viewer’s screen and is what most people think of when discussing UI. World Space UI places the interface directly within the scene environment so that it exists in 3D space. XR applications often make use of this kind of UI as it helps make the experience feel more natural.
Creating UI in Unity begins by creating a Canvas. The Canvas object defines what is and is not part of the UI system and governs how the UI is rendered on the screen.
1. In the Hierarchy, right-click and select UI > Canvas.
2. To more easily view the new canvas, click the 2D button in the scene view. UI elements can still be edited in 3D, but working in 2D allows you to more easily select UI components and use the rect transform tool (Figure 01).
By default, canvases are set to be a constant pixel size. This means, regardless of the size of the screen, that the application is viewed on the canvas will remain the same, which may result in parts of the UI being cut off. This can be seen in action by contracting the scene view in the editor. As the window is scaled in, eventually the UI cuts off on the sides. Generally, a UI should scale with the size of the window it's being viewed on, so a different UI mode should be selected.
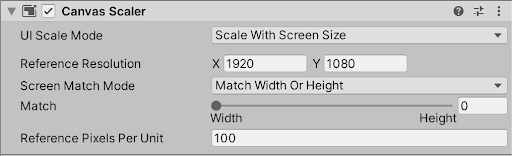
3. In the Inspector, locate the Canvas Scaler and change the UI Scale Mode to Scale With Screen Size.
4. If your application has a specific target resolution, place it in the Reference Resolution input.
5. Configure the Match slider based on the UI needs. A Match setting of 0 will scale the canvas proportionally along its width, while a setting of 1 will scale along the height. A setting of 0.5 will scale evenly in width and height (Figure 02).
Multiple canvases of the same and different screen space can be used in the same scene, which can be helpful for organization or specific functionality needs.
2. Conclusion
You now know how to create a canvas and make it scale with screen size. Now if you create a game or application for mobile devices with different screen sizes you will be able to create UI that will not be cut off and can scale properly with each individual screen.