
Creating a VR Menu - 2019.2
Tutorial
Beginner
+10XP
30m
(131)
Unity Technologies
In this tutorial, you’ll set up a VR Menu in World space and configure it so users can interact with it accordingly. By the end, you will be able to set the color of a panel by pointing at a button and pulling the trigger on the handset.
Languages available:
1. Create a WorldSpace Canvas
1. Right-click in the Hierarchy window and navigate to 3D Object > Cube (Figure 01). Click the gear widget at the top right of the Inspector window for the cube and choose Reset. This should put your cube at the origin and set the scale to 1,1,1.
2. Next, right-click in the Hierarchy window again and select UI > Canvas (Figure 02).
3. Select the Canvas and, in the Canvas component in the Inspector, change the Render Mode to World Space (Figure 03).
4. Make the Canvas a child of the cube primitive (Figure 04).
5. Then, click the gear icon on the Rect Transform component of the Canvas and click Reset. Change the Pos X, Pos Y and, Pos Z values to .1, 3.8, 0, respectively, and set the width to 15 and the height to 5 (Figure 05).
6. Right-click on the Canvas in the Hierarchy window and select UI > Panel. Set the Source Image on the Image component to None and change the color on the color picker to a color you like. This tutorial has it set to a light grey (Figure 06).
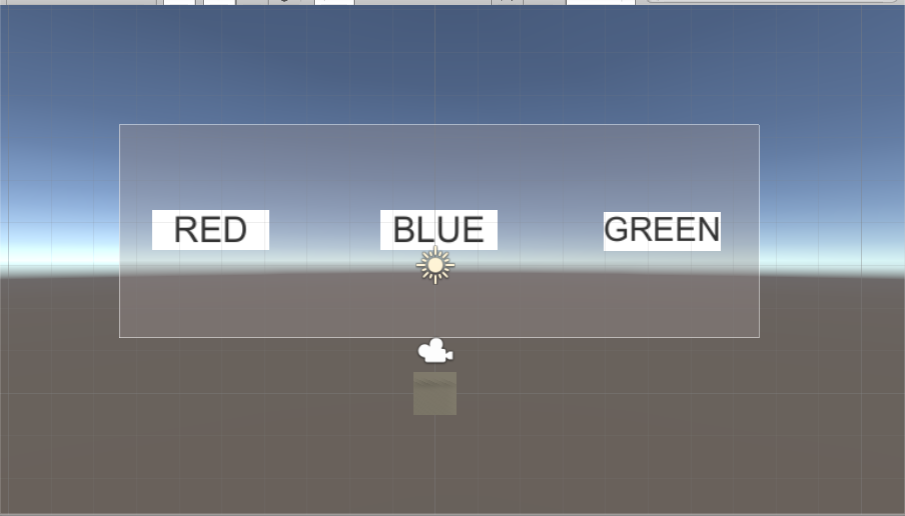
7. Your Game view should now look something like the image below (Figure 07).
8. Right-click on the panel in the Hierarchy window and select UI > Button. Rename the new button to "red_btn". Expand the button in the Hierarchy and select the text GameObject. In the Inspector window on the Text component, enter RED in all caps and select Best Fit in the Paragraph section (Figure 08).
9. Set the button’s width to 100 and the height to 33, then press the R key to select the scale tool. Scale the button down until it fits within the Canvas. Next, select the Rect Transform tool, and move the button into the left third of the Canvas (Figure 09).
10. Set the button as a child of the panel by clicking and dragging it into the panel in the Hierarchy window. With the button selected, press CTRL+D to duplicate it (CMD+D on a Mac). Select the Rect Transform tool and move the button to the center of the panel. Repeat this process one more time to create a third button and put it in the right third of the panel. Rename the new buttons to be "blue_btn" and "green_btn". Change the text on the buttons to be different colors. For this tutorial, use RED, BLUE, and GREEN (Figure 10).
2. Create a Material for the cube
1. Right-click in the Project window and select Create > Material (Figure 11).
2. Name the Material what you would like. In this tutorial, we’ll call it Cube_Mat. Set the color to black and apply the Material to the cube.
3. Configuring hand tracking
1. First you will need to make sure you have OpenVR enabled. Click on Window > Package Manager. In the Package Manager, scroll to OpenVR and if it’s not installed, install it. If it’s installed, verify that it is up to date (Figure 12).
2. Next, go to Edit > Project Settings and click on the Player tab. Scroll to the bottom and make sure Virtual Reality Supported is checked and that OpenVR is added under Virtual Reality SDKs. If it’s not, click on the plus sign and select OpenVR (Figure 13).
3. Create a capsule primitive and in its Inspector view, click the gear widget and choose Reset. Press W to select the move tool and move the capsule a little bit to the right and below the cube. This will be your “hand,” or VR Motion Controller.
4. Next, you will need to install and enable XR Legacy Input Helpers from the Package Manager. If you don’t have that window open from before, go to Window > Package Manager, scroll to the bottom of the list, and install XR Legacy Input Helpers (Figure 14).
5. Next, click Add Component in the Inspector, search for Tracked Pose Driver and add it to the capsule (Figure 15).
6. This driver will track the position of your XR controller. It can be used to track other items, such as your HMD or generic devices, but for this purpose, you will want to set it to track Generic XR Controller (Figure 16).
7. Once you’ve set this, set the Pose Source to the controller you’d like to be tracked. For this tutorial, we’ll be tracking the right controller.
4. LineRenderers for pointing
Now we will set up a way to track where your hand is pointing and get the UI to interact with our controller using Raycasts, Colliders, and a LineRenderer.
1. Add a LineRenderer Component to the capsule you are using for hand tracking.
2. Create a new script by right-clicking in the Project window and choosing Create > C# Script. Name the script LineRendererSettings.
3. Add the following code to the script.
//Declare a LineRenderer to store the component attached to the GameObject.
[SerializeField] LineRenderer rend;

//Settings for the LineRenderer are stored as a Vector3 array of points. Set up a V3 array to //initialize in Start.
Vector3[] points;

//Start is called before the first frame update
void Start()
{
    //get the LineRenderer attached to the gameobject.
    rend = gameObject.GetComponent<LineRenderer>();

    //initialize the LineRenderer
    points = new Vector3[2];

    //set the start point of the linerenderer to the position of the gameObject.
    points[0] = Vector3.zero;

    //set the end point 20 units away from the GO on the Z axis (pointing forward)
    points[1] = transform.position + new Vector3(0, 0, 20);

    //finally set the positions array on the LineRenderer to our new values
    rend.SetPositions(points);
    rend.enabled = true;
}
This code sets the initial points to the LineRenderer starting at the position of the capsule and ending 20 units away, in the Z-direction (forward). Because your hand is being tracked, the LineRenderer will not be centered on your capsule and will not follow your hand. We’ll set that up next.
Now we need to get the LineRenderer to stay aligned with our Raycast so that our user knows which way they are pointing.
1. Add the following code to the LineRenderSetttings script:
public LayerMask layerMask;

public void AlignLineRenderer(LineRenderer rend)
{
    Ray ray;
    ray = new Ray(transform.position, transform.forward);
    RaycastHit hit;

    if (Physics.Raycast(ray, out hit, layerMask))
    {
        points[1] = transform.forward + new Vector3(0, 0, hit.distance);
    }
    else
    {
        points[1] = transform.forward + new Vector3(0, 0, 20);
    }

    rend.SetPositions(points);
}
2. In the Update() method, add:
AlignLineRenderer(rend);3. Finally, make sure that Use World Space is unchecked and that Alignment is set to View on your LineRenderer Component (Figure 17).
Now the LineRenderer should follow the ray you are casting. You can now create a Material for the LineRenderer. In this tutorial, the Material will have an Albedo color of green.
5. Interacting with the UI
Now that you’ve set up a way to track where you’re pointing, it’s time to configure interacting with the UI.
1. Add a Box Collider to each of the buttons and set the X and Y dimensions to match the button size. Set the Z to .1 (Figure 18).
You are already changing the LineRenderer length if it collides with a piece of the UI. Now let’s change our LineRenderer color so users will know they’ve hit a button.
1. Inside of the if (Physics.Raycast(ray, out hit, layerMask)) block, add:
rend.startColor = Color.red;
rend.endColor = Color.red;
2. Next in the else block of the same if statement, add:
rend.startColor = Color.green;
rend.endColor = Color.green;
3. Finally, at the bottom of the AlignLineRenderer() method, add:
rend.material.color = rend.startColor;Now let’s make something happen when the user clicks on the button.
1. On the top of your using statements, add using UnityEngine.UI (Figure 19).
2. Declare a new public GameObject variable called “panel”, a new Image variable called “img”, and a Button variable called “btn” (Figure 20).
public GameObject panel;
public Image img;
public Button btn;
3. Left-click and drag the panel from your Hierarchy window into the slot on the LineRendererSettings script on your Capsule (Figure 21).
4. Back in the LineRendererSettings script inside the Start() method, add the following:
img = panel.GetComponent<Image>();5. Inside of the AlignLineRenderer() method inside the if(raycast) block, add:
btn = hit.collider.gameObject.GetComponent<Button>();Now we can set the background panel image according to the button that is clicked. But, first, we will need a method to call when the buttons are clicked.
1. Declare a new method called ColorChangeOnClick()(Figure 22):
public void ColorChangeOnClick() 2. Inside that method, add the following code (Figure 23):
if (btn != null)
           {
           if (btn.name == "red_btn")
           {
               img.color = Color.red;
           }
           else if(btn.name == "blue_btn")
           {
               img.color = Color.blue;
           }
           else if (btn.name == "green_btn")
           {
               img.color = Color.green;
           }
       }
3. Now, let’s modify our AlignLineRenderer(Renderer rend) method to return a boolean if it hits a button. That way, we can decide when to invoke the button.
4. Change the return type from void to bool(Figure 24):
public bool AlignLineRenderer(Renderer rend) 5. At the beginning of the AlignLineRenderer() method, declare a new boolean variable called isHit and set it to false.
bool hitBtn = false;6. Inside the if(Physics.Raycast) block, after the code you’ve already added, add:
hitBtn = true;7. Inside the else{} block add hitBtn = false; (Figure 25).
6. Fire the event when your user points and clicks
Now you will configure the input from your VR controller and set the events up.
1. Click on red_btn in the Hierarchy. In the Inspector, navigate to the OnClick() event and click the + symbol.
2. Left-click and drag your Capsule from the Hierarchy window into the object slot in the newly created event (Figure 26).
3. Next, click the drop-down to the right of the runtime Only drop-down and navigate to your LineRendererSettings component. When that expands, select the ChangeColorOnClick() method. This will make the method fire when the OnClick() event is called (Figure 27).
4. Repeat this process with the other two buttons.
Now that your buttons are set up, all you need to do is have something listen for when a button is hit by your Raycast and if the trigger on your VR Controller is pulled.
- Inside your Update() method, add the following code:
if (AlignLineRenderer(rend) && Input.GetAxis("Submit") > 0)
       {
           btn.onClick.Invoke();
 }
This code will call the OnClick() eEvent hHandler of the button the user has targeted with the controller. If they pull the trigger (which you will verify is mapped to the Submit Axis), it will set the color of the panel to match the button.
Click on Edit > Project Settings and select Input. Look for the Item named Submit. Click the arrow to the left of Submit and make sure the Alt Positive Button option says joystick button 15. This will register the right-hand controller trigger to the Submit Axis (Figure 28).
And that’s it! When you hit the Play button with your HMD connected, you should be able to point at a button and pull the trigger to change the color of the panel. You can use this method to fire off other events when users interact with menus. You may want to display information on the object they click, change a game setting, or even give the player power-ups.