
Creating Believable Visuals
Tutorial
intermediate
+0XP
1h 30m
(73)
Unity Technologies
This guide looks at the fundamental steps for setting up a good baseline for believable visuals. The advice in this guide is provided by the Spotlight Team at Unity. The Spotlight Team help developers and content creators achieve the desired look and quality for their projects. They hear stories from across the industry, and can identify the common issues that customers face. Questions that often arise when making a Scene are “How do we build to a fairly realistic standard visual?” and “How do we make a Scene in Unity that looks believable?”.
Light, texture, scale, and material all need to work together to make digital content look real. With massive amounts of features, functions, options, properties, systems and variables to tweak, you could ask “Where do I start?” and “In what order do I proceed?”. This guide aims to answer these questions.
Resources
Languages available:
1. Believable visuals in URP and HDRP
This step contains supplementary information for the Making believable visuals in Unity guide. While the general concepts in that guide still apply, this page contains updated guidance on converting a similar project to the Universal Render Pipeline (URP) and the High Definition Render Pipeline (HDRP), and highlights some key differences between Unity’s render pipelines.
Note that URP and HDRP are in active development, and new features are frequently added. See the latest versions of the URP documentation and the HDRP documentation for further information.
Downloadable example projects
Here are example projects for each render pipeline. You can download these to understand how to create similar visual effects in the different render pipelines, and to explore the different settings:
- Spotlight Tunnel using the Built-In Render Pipeline
- Spotlight Tunnel using URP
- Spotlight Tunnel using HDRP
Converting your project from the Built-in Render Pipeline to URP or HDRP
Before you convert a project from the Built-in Render Pipeline, you should carefully read this page in full.
You should then perform these steps in order:
- Project preparation
- Removing incompatible plug-ins and assets
- Upgrading shaders and materials
- Upgrading post-processing
- Upgrading lighting
1. Project preparation
Make a backup of your existing project before upgrading.
It is risky to upgrade your version of Unity and change your project’s render pipeline at the same time. If you need to do both, upgrade your project to the new version of Unity first, and then switch to a new render pipeline. This allows you to fix any issues with the upgrade and ensure you have the correct package versions.
2. Removing incompatible plug-ins and assets
Plug-ins or Asset Store assets that relate to lit shaders or perform rendering modifications in the Built-in Render Pipeline are not typically compatible with URP or HDRP out of the box, unless noted by the author. Remove any incompatible plug-ins and assets from your Project.
3. Upgrading shaders and materials
Lit shaders
Materials that work with Unity’s Standard Shader (or any shaders that are lit per pixel) do not work in URP or HDRP. They either render as pink, or not render at all.
You must replace these Materials with the equivalent shaders in the render pipeline you are using. The URP replacement for the Standard Shader is UniversalRP/Lit. The HDRP replacement for the Standard Shader is HDRP/Lit.
Alternatively, you can use the Render Pipeline Wizard to perform Material conversion:
- In URP, go to Edit > Render Pipeline > Universal Render Pipeline > Upgrade Project Materials to UniversalRP Materials.
- In HDRP, go to Edit > Render Pipeline > Upgrade Project Materials to High Definition Materials.
Unlit shaders
Some unlit shaders might work in URP or HDRP, but this is not guaranteed and might not be consistent across render pipelines. For example, the Skybox Material is transferable to URP but not HDRP. To ensure forward compatibility, it is best to replace these shaders with their unlit equivalent for your new render pipeline.
Custom shaders
You must recreate custom Surface Shaders and custom lit shaders in Shader Graph for them to work properly in URP or HDRP. For information on Shader Graph, see the Shader Graph documentation.
4. Upgrading post-processing
The Built-in Render Pipeline works with the Post Processing Stack V2 package, and the now-deprecated Post Processing V1 solution. URP and HDRP contain their own integrated post-processing solutions.
To prepare to convert your post-processing solution from Post Processing Stack V1 to URP or HDRP:
- Remove the Post Processing Behaviour component from all Cameras.
To prepare to convert your post-processing solution from Post Processing Stack V2 to URP or HDRP:
- Remove the Post-process Layer component from all Cameras.
- Remove all Post-process Volume components, and delete the Profile Assets from the project.
To begin working with the integrated post-processing solution in URP or HDRP:
1. Create a new Global Volume, and assign a new Volume Profile to it.
2. Configure the Volume Profile by adding overrides for the desired post-processing effects.
- URP only: Select the Camera your application uses and make sure “Render Post Processing” is enabled. You can enable Anti-Aliasing for the in game camera without adding additional components.
- HDRP only: You can enable different types of Anti-Aliasing in the viewport unrelated to what you use on the game camera.
Post-processing effects
Some post-processing effects are available in HDRP, but not URP. Some are in development while others are not suitable for the particular render pipeline. You should check which post-processing effects are available in the render pipeline that you are using, and determine how to recreate the visual effects in your project.
In Spotlight Tunnel, the most important post-processing effect is the Tonemapper. This effect works the same in URP and HDRP.
Key differences in post-processing between URP and HDRP that affect this update to the Spotlight Tunnel project:
- Bloom works differently in URP and HDRP, and requires different settings. For more information, see the URP documentation and the HDRP documentation.
- The Screen Space Reflections effect is not available in URP.
- Screen Space Ambient Occlusion was not available in URP at the time this update was created.
5. Upgrading lighting
Lighting strategy
Support for lighting features varies considerably between render pipelines. For example, the Built-in Render Pipeline supports Realtime Global Illumination, but URP and HDRP do not. The different render pipelines also support different Lighting Modes for Mixed Lights; for example, HDRP does not support Subtractive Lighting Mode, and URP does not support Shadowmask Lighting Mode. For full details of which render pipeline supports which lighting features, see Setting up the lighting pipeline.
Before you convert your project to a different render pipeline, you should choose a lighting strategy that is compatible with your desired render pipeline and works well on your target hardware. The different lighting strategies in the URP and HDRP versions of Spotlight Tunnel demonstrate this.
The URP version of Spotlight Tunnel focuses on runtime performance:
- Baked Global Illumination is enabled, with the CPU Progressive Lightmapper as a backend.
- Most Lights have their Mode set to Baked; a minimal number of Lights have their Mode set to Realtime.
- The Main Directional Light (sun) has its Mode set to Mixed to cast real-time shadows while still producing bounce lighting.
The HDRP version of Spotlight Tunnel focuses on high fidelity rendering:
- Baked Global Illumination is enabled, with the CPU Progressive Lightmapper as a backend.
- Most Lights have their Mode set to Mixed to preserve high quality specular lighting on stationary lights; Lights with their Mode set to Realtime are used wherever they are needed for consistent shadowing.
Note that, depending on your hardware configuration, the GPU Progressive Lightmapper might result in faster lightmap baking than the CPU Progressive Lightmapper.
Light types
In addition to choosing an overall lighting strategy, you should be aware of the differences in Light types between different render pipelines.
Differences between the Built-in Render Pipeline and URP:
- In the Built-in Render Pipeline, the distance fall-off for Spot and Point Lights doesn’t follow any physical laws. In URP, the distance fall-off for Spot and Point Lights follows the inverse square law. Generally speaking, Lights lose more intensity over distance in URP, and you need to amend your Scene’s lighting accordingly.
- To convert the Intensity value of Directional Lights from the Built-in Render Pipeline to URP, use the following formula: URP Directional Light Intensity = (Built-in Renderer Pipeline Directional Light Intensity)^2.2. For example, a value of 7.5 in the Built-in Render Pipeline is equivalent to a value of 84.17 in URP.
Differences between the Built-in Render Pipeline and HDRP:
- HDRP uses a physically based lighting unit and fall-off for all Light types. You must completely recreate your lighting using physically based values.
- HDRP supports additional Light types, such as Spotlight Pyramid/Box, Realtime Tube, and Realtime Rectangular lights. These can help you achieve different realistic effects.
Reflection
Each render pipeline has slight differences in how they handle reflection capturing and reflection blending, and it is likely that you will have to change the position and distribution of the Reflection Probes in your Scene.
For comparison are the reflection systems used in the different versions of Spotlight Tunnel:
- Built-in Render Pipeline: Reflection Probe (Deferred w/blending), ScreenSpace Reflection, Skybox.
- URP: Reflection Probe (Forward), Skybox.
- HDRP: Reflection Probe w/blending. ScreenSpace Reflection, Skybox. In URP:
Converting from the Built-in Render Pipeline’s Deferred reflection to URP requires some manual work, as URP’s Forward Reflection Probe doesn’t blend. Converting from Built-in Render Pipeline’s Deferred reflection to HDRP reflection is straight forward as they both have equivalent blending methods.
Converting your project between URP and HDRP
Conversion from HDRP to URP and vice versa is possible, but it is not automatic and the manual process may be difficult. How difficult the process is mainly depends on how complex your project’s shaders are; if your project mostly uses the render pipeline’s built-in shaders, the process is much easier.
Spotlight Tunnel project was successfully converted from HDRP to URP, with these caveats:
- There is no wizard to assist with Material conversion, but you can select multiple Materials and switch them to the new render pipeline shader. Most of the Materials in Spotlight Tunnel HDRP are HDRP Lit with basic Texture packing, and in most cases they translated to URP Lit without problems. Note that not all texture assignments can transfer directly, because there are many shader features that are different between URP and HDRP; double check each material to make sure texture assignments are properly set.
- Post-processing profiles and settings are different between URP and HDRP. Post-processing effects needed to be manually recreated.
- Some Light types from HDRP are not available in URP.
- The Lighting Unit in URP is different to that in HDRP. Lighting effects needed to be manually recreated.
- The Skybox Material is not compatible between URP and HDRP. We replaced the HDRP Skybox Material with one suitable for URP.
2. Preparing Assets for Unity
Note that this guide was originally created for use with the Built-in Render Pipeline in Unity 2017.3. For information on adapting this guide for use with the Universal Render Pipeline (URP) and the High Definition Render Pipeline (HDRP), see Update: believable visuals in URP and HDRP.
The first step is to get your Assets into a format suitable for what you want to do. It’s very important to set up a proper workflow from your 3D modeling application, such as Autodesk® 3ds Max®, Autodesk® Maya®, Blender, and Houdini, into Unity. When exporting assets from 3D modeling applications for import into Unity, you need to consider:
Scale and units
Your project scale, and your preferred unit of measurement, play a very important role in a believable Scene. In many “real world” setups, we recommend you assume 1 Unity unit = 1 meter (100cm), because many physics systems assume this unit size. For more advice, see the Art Asset best practice guide.
To maintain consistency between your 3D modeling application and Unity, always validate the imported GameObject scale and size. 3D modeling applications have units and scale settings in the FBX export configuration (see the documentation for your 3D modelling software for configuration advice). Generally, the best way to match the scale when importing to Unity is to set these tools to work in centimeters, and export FBX at automatic scale. However, you should always check that the unit and scale settings match when starting a new project.
To quickly validate your export settings, In your 3D modeling application, create a simple 1x1x1m cube and import it into Unity. In Unity, create a default Cube (GameObject > 3D Object > Cube). This is 1x1x1m. Use this as a scale reference to compare with your imported model. These cubes should look identical when the Transform component’s Scale property is set to 1,1,1 in the Inspector:
NOTES:
- Maya and 3DsMax can override your default unit depending on the last opened file.
Be aware that 3D Software can display different unit in the workspace while having different settings in their "internal unit". This might cause some confusion.
Point of reference scale model
When blocking out a Scene with placeholders or sketching geometry, having a point of reference scale model can be helpful. Choose a point of reference scale model that is appropriate for the Scene you’re making. In the Spotlight Tunnel Sample Scene case, we use a park bench:
Your Scene doesn’t have to use exactly the same proportions as real life. Using a point of reference scale model simply allows consistencies of scale to be relative between GameObjects, even if the Scene is intended to have exaggerated proportions.
Texture output and channels
The information inside a texture needs to contain the correct information to give a proper result when added to a Material. Texture authoring software, such as Photoshop and Substance Painter, outputs consistent and predictable textures when you configure them correctly.
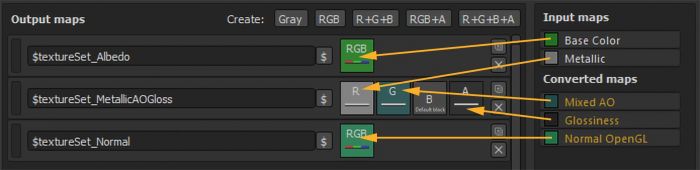
Here’s an example of a pre-set configuration for Substance Painter to output textures for use with a Unity Standard Opaque material:
The texture assignment in the Unity Standard Material is:
- $textureSet_Albedo: assigned to Albedo Slot.
- $textureSet_MetallicAOGloss: assigned to Metallic and Occlusion, smoothness Source set to Metallic Alpha.
- $textureSet_Normal: assigned to Normal Map Slot.
Note: Packing multiple channels to a single texture, such as the MetallicAOGloss, saves texture memory compared to exporting Ambient Occlusion (AO) as a separate texture. This is the best way of working with a Unity Standard Material.
When creating textures, it’s important not to mix up the alpha channel. The example below shows how transparency in a PNG file can be confusing to author in Photoshop because of the way Photoshop deals with a PNG alpha channel (without using an external plugin). In this case, an uncompressed 32-bit TGA with a dedicated alpha channel might be a better option, assuming the source texture file size is not an issue:
The transparent PNG file shown above was created in Photoshop with its alpha channel coming through as a black value. The TGA with a dedicated alpha channel shows the expected value. As you can see above, when each texture assigned to the Standard Shader material reads smoothness data from the alpha channel, the smoothness of the material with PNG textures is unexpectedly inverted, while the smoothness of the material with TGA textures is normal.
Normal map direction
Unity reads tangent space normal maps with the following interpretation:
- Red channel X+ as Right
- Green channel Y+ as Up
For example, a Autodesk® 3ds Max® Render to Texture normal map outputs the Green Channel Y+ as Down by default. This causes an inverted surface direction along the Y axis and creates invalid results when lit. To validate the normal map direction, create a simple plane with concave bevel (middle picture on the example below) and bake it to a flat plane. Then assign the baked normal map into a plane in Unity with identifiable light direction and see if any of the axes are inverted.
For advice on axis settings, refer to your 3D modelling application’s documentation.
3. Preparing render settings in Unity
Note that this guide was originally created for use with the Built-in Render Pipeline in Unity 2017.3. For information on adapting this guide for use with the Universal Render Pipeline (URP) and the High Definition Render Pipeline (HDRP), see Update: believable visuals in URP and HDRP.
The following advice helps you understand how to use Unity’s rendering features to realistically mimic the real world, and quickly achieve your project’s believable visual goal.
For more in-depth information, see Unity’s lighting and rendering tutorial.
Linear rendering mode
In simple terms, the linear rendering mode prepares Unity to do lighting and shading calculations using physically accurate mathematics before transforming the final output into the format that works best for monitors.
To specify a gamma or linear workflow:
- In Unity, navigate to Edit > Project Settings from the main menu, and then select the Player category.
- Go to Other Settings > Rendering and change the Color Space to Linear.
Defining your color space should be one of the earliest decisions in your project because of the drastic impact on the final shading and lighting results. For more advice on each workflow, see Linear or gamma workflow.
Rendering mode
The Spotlight Tunnel Sample Scene uses the deferred shading rendering path. This allows you to:
- Work with multiple dynamic lights efficiently
- Combine multiple reflection cubemaps
- Use the existing Screen Space Reflection features in Unity 2017+
To set the rendering path in the Editor, select Edit > Project Settings, and then select the Graphics category. Alternatively, you can select the Main Camera in your Scene, and then set the Rendering Path in the Inspector window.
For more information on the rendering mode, see Rendering Pipeline Details.
Enabling post-processing
To display HDR lighting properly, follow these steps to set it up and enable tonemapping:
- Create a Post-Processing Profile Asset in your project and configure it:
- Enable Color Grading > Tonemapper > Filmic (ACES) (Academy Color Encoding Standards). For advice on using ACES tonemapping to handle high intensity color values, such as colored light or fire, see High intensity color.
- Enable Dithering. Dithering allows the Scene to alleviate banding artifacts introduced by 8 Bit/channel output from an HDR Scene. Modern engines use this technique to circumvent the limitation of 16M color output.
- Leave the rest of the Tonemapper settings with their default values.
- Select the Main Camera in your Scene, click Add Component in the Inspector window, and choose Post-Processing Behaviour.
- In the Profile field, enter the post-processing profile you created.
The Spotlight Tunnel sample scene uses the post-processing stack V1. For advice on using post-processing stack V2, refer to the package readme.
High Dynamic Range (HDR) Camera
When rendering believable lighting, you’re dealing with lighting values and emissive surfaces that have a brightness higher than 1 (high dynamic range), much like real life. You then need to remap these values to the proper screen range (see tonemapping). The high dynamic range setting is crucial because it allows the Unity camera to process high values, rather than clip them. To enable HDR, select the Main Camera in your Scene and ensure that Allow HDR is checked in the Inspector window.
HDR Lightmap encoding (optional)
The Spotlight Tunnel Sample Scene doesn’t use baked lighting. However, if you’re planning to use HDR baked lighting, set the light map encoding to HDR light map for consistent results.
To set lightmap encoding in Unity, go to Edit > Project Settings, and then select the Player category, expand the Other Settings panel, and navigate to Lightmap Encoding. For more information, see Lightmaps: Technical information.
Enabling image effects in the viewport
To see the tonemapper while working with the Scene, enable Image Effects in the drop-down toolbar menu at the top of the Scene view. In the following image, notice the highlight rendition and the dark tunnel value separation improvements in the tonemapped Scene. If you look at the non-tonemapped Scene, you can see how the highlights didn’t converge to a unified color (the yellowish burning sun in this case).
This setup essentially tries to replicate how a digital camera captures a Scene with a fixed exposure (without exposure adaptation/eye adaptation features enabled).
At this point, you have a proper foundational Scene rendering setup that should give believable results with a wide range of content:
4. Lighting strategy
Note that this guide was originally created for use with the Built-in Render Pipeline in Unity 2017.3. For information on adapting this guide for use with the Universal Render Pipeline (URP) and the High Definition Render Pipeline (HDRP), see Update: believable visuals in URP and HDRP.
Before starting to create final assets and approaching lighting for a Scene, it is important to figure out your lighting strategy. At the start of a project, it is very easy for content creators - eager to start making cool things - to overlook this important step. Altering your lighting strategy late in development is a costly operation. Taking the time to get this right before you enter production will save time while giving better performance and a higher visual fidelity.
Much like anything in real life, there’s almost always trade-off between the benefits and costs of one setup or another. Just as a Formula 1 Car isn’t well suited for everyday grocery shopping compared to its gas saving hybrid car siblings. There are times, however, where certain technologies will give you options to mitigate these trade-offs within specific constraints and knowing each features and trade-off will allow you to choose what’s best for your project.
A typical daytime Scene with outdoor areas has the following lighting components:
- Hemisphere (Sky contribution)
- Direct lights (Sun + Local lights)
- Indirect lights (Bounced lighting)
This seems like three simple components. But because you can mix and match Realtime lights, Mixed lights, Baked lights, static GameObjects and dynamic GameObjects, you can end up with a diverse range of lighting options.
Unity caters to lots of different lighting strategies and project scenarios. To understand lighting modes and setup, see documentation on Lighting Modes.
For newcomers, it can be overwhelming to figure out which setup works best for their Scene, and what the trade-offs are. So let’s consider the most commonly used lighting setups:
- Basic real-time lighting: The specular highlights from the light are visible, but there is no indirect lighting.
- Baked lighting: Soft baked shadows are visible, and static indirect lighting is visible in high resolution, but there are no specular highlights from lights, and dynamically lit GameObjects don’t cast shadows.
- Mixed lighting: Similar to Baked lighting, but there is specular response from lights, and dynamically lit GameObjects do cast shadows.
- Real-time lighting and GI: Proper indirect lighting response and specular response are visible, lights are all moveable and updateable, but there’s no angular soft shadow.
- All options enabled: Depending on the settings of each light, you can achieve the combination of all the above options.
The following images show the notable differences between these setups:
Note: Realtime GI can’t bake static ambient occlusion, so it’s not included.
Here are the general characteristics for each configuration:
Basic Realtime lighting and Ambient (with no Realtime GI or Baked GI)
Basic real-time lighting is generally used in stylistic visual projects and prototype phases.
Typical platform target: Console and PC.
Advantages:
- All direct lights and shadows are applied in real time, and are therefore movable.
- Allows for fast iteration, because there is no precomputation, baking, or mesh preparation.
- Dynamic and Static GameObjects are lit using the same method, so Light Probes are not required.
Disadvantages:
- No hemisphere occlusion, just skybox/ambient value, and the color in the area is not lit by direct lighting.
- Without GI or indirect lighting component, the Scene might not give the best visual outcome.
All baked lighting and Light Probe
Baked lighting is generally useful for games where run-time performance is an issue but there’s room in memory, such as top-down isometric mobile games and high frame-rate VR games.
Typical platform target: Mobile platform, VR, console and low end PC.
Advantages:
- All lights are baked for static GameObjects. They produce ambient occlusion and indirect lighting.
- Unity can bake area light bake support and soft shadow angles onto statically lit GameObjects.
- Fastest run-time performance among the common setups listed here.
Disadvantages:
- Can slow down lighting iteration because lights are baked, which means Unity needs to re-compute lights whenever the Scene changes (unless you’re using Progressive Lightmapper).
- Dynamically lit GameObjects are only lit using Light Probes.
- Specular highlights only rely on cubemaps and reflections, not on light sources.
- There is no shadowing from dynamic GameObjects.
- Can require a lot of run-time memory, depending on how many light map textures are used in the Scene.
- Might require authoring texture coordinates channel 2 (UV2 for light map) if GameObjects texture charts overlap.
Mixed lighting with Shadowmask and Light Probe
Mixed lighting is often useful in games where time-of-day lighting (such as sun movement) is not important.
Typical platform target: VR, console and PC.
Advantages:
- Similar to all Baked lighting, but in Mixed lighting, Dynamic GameObjects get real-time specular lighting and cast real-time shadows, while static GameObjects get baked shadowmasking, resulting in better visual quality.
Disadvantages:
- GameObjects have a limit of 4 Shadowmasks. Additional shadow casting lights gets baked.
- Rendering real-time lights at run time is more resource-intensive.
- Mixed lights can drastically affect performance in certain setups.
For more information on Shadowmask lighting, see Shadowmask
Realtime lighting with Realtime GI and Light Probe
This setup is useful in open area games where you need time-of-day lighting updates (such as the sun moving) and dynamic lighting effects.
Typical platform target: Console and PC.
Advantages:
- This allows for fast lighting iteration with real-time indirect lighting.
- Dynamic and static GameObjects get real-time specular lighting and shadows.
- Can use less memory than Baked lighting for indirect lighting.
- Has a fixed CPU performance impact for updating global illumination.
Disadvantages:
- Occlusion isn’t as detailed as Baked lighting, and usually must be augmented by Screen Space Ambient Occlusion (SSAO) and per-object texture baked AO.
- No area/light angle soft shadows for static GameObjects.
- Real-time lights can drastically affect performance in certain setups.
- Precompute times can take a significant amount of time if there are too many GameObjects contributing to the static lighting, especially without an optimized UV setup. For more information, see Global Illumination UVs.
For in-depth information on optimizing Realtime GI, see Unity’s tutorial on Introduction to Precomputed Realtime GI.
All options enabled
You would only want to generally enable all lighting options in games with high fidelity requirements that have tightly controlled memory usage and performance limits. You should only do this if you fully understand each individual system, and know how to handle each lighting combination.
Typical platform target: Console and PC.
Advantages:
- This is the complete set of lighting features, giving you full functionality.
Disadvantages:
- Has high performance requirements at run time, with high memory usage.
- Increases the workflow time, by requiring more UV authoring and baking time.
To help you learn about lighting, the Spotlight Tunnel Sample Scene uses real-time lighting with Realtime GI. This provides a diverse range of specular responses, good bounce lighting, and allows you to quickly iterate on lighting.
5. Modeling
One of the mistakes that content creators usually make is not planning for what’s ahead before modelling. It’s ok to do fast and loose modelling during pre production or for roughing out a space, but the moment there’s a need for the asset to be somewhat finalized, there are a few things that need to be thought out ahead of time. Here are few things to keep in mind when modeling a proper Scene that might be overlooked even by seasoned content creators.
Make every polygon count
Despite modern hardware being more capable than ever, simple geometry is always beneficial in a Scene. Unnecessary tessellation and complex geometry is difficult to manage for a real-time setup, and it can impact performance and use memory unnecessarily. The following example demonstrates how geometry that is never seen by the players wastes resources such as lightmap and overdraw, and causes light leakage:
GameObject contribution to lighting
If you are using Baked lighting or Realtime GI with Light Probes, you need to decide whether a GameObject contributes to lighting in a Scene, or only receives indirect/baked lighting in the Scene.
GameObjects that contribute to lighting
To set a GameObject to contribute to lighting, make sure Contribute GI in checked in the Inspector window. This provides simpler and smoother surface areas that produce better indirect bounces/baked lighting because of their efficiency in space usage for lightmap textures. Note that:
- You might need to author UV2 for the geometry when doing a light bake, if the auto lightmap UV provides inefficient chart or generate undesirable seams.
- You might need to author UV3 for the geometry for efficient results in Realtime GI.
Sometimes, in Realtime GI, you can simplify a UV of a Mesh to make the geometry use significantly less resources, and produce the best result with fewer artifacts.
GameObjects that only receive lighting in the scene
When GameObjects only receive lighting from real-time lights and Light Probes, the geometry doesn’t have a lightmap UV restriction. The geometry still needs special attention if it’s large, because it might not be lit properly with a single Light Probe, and might require a Light Probe Proxy Volume component to stitch together multiple probe light definitions.
You don’t always need to use a lightmap or use Realtime GI for non-moving GameObjects. If a GameObject is small, or it doesn’t have surfaces that bounce much light, it probably doesn’t need to be included in the lightmap. The bench and railings shown below are a good example:
Model UV layout strategy
The UV layout can help improve visual quality while using the same amount of memory for normal map baking (typically UV1), lightmaps baking (UV2) and real-time lightmaps (UV3), especially for geometry with non-tileable textures.
Here are a few tips to consider when making a UV layout strategy:
- For UV1 charts, split the UV shell only as necessary, and try to lay out the UV chart as efficiently as possible to prevent wasting texture space for normal map baking. To put it into perspective, a 1024 square texture uses the same amount of memory whether you place details in the texture or not.
For lightmaps (UV2), try to make unbroken lightmap charts with borders that touch but do not overlap, to avoid bleeding or seams in the light bake. Keeping a consistent scale between UV charts/shells is important for even distribution of lightmap texels across your model.
For Realtime GI (UV3), prioritize UV space for large areas that represent big surfaces in your model to reduce memory usage and avoid seams. In many cases, the automatic UV settings in the model can really help optimize the chart. For in-depth information on chart optimization for Realtime GI, see the Unity tutorial Optimizing Unity’s auto unwrapping.
For GameObjects that don’t require lightmaps, don’t waste memory and time by authoring additional UVs, unless custom shaders require them.
Details in geometry
Real world GameObjects are highly detailed. To author real-time geometry, you need to identify which details to place in geometry, and which to place in the normal map and textures. When developing Assets for real-time Scenes, it’s normal to bake high-polygon to low-polygon normal maps.
One important detail to remember is the way edges on a GameObject catch highlights. It is unusual to find a real-life object with very sharp edges, with non bevelled edges, or without detailed edge definition. Replicating realistic edge effects improves the believability of the Scene.
Smoothing groups (Hard/Soft edges of polygon)
You can improve the efficiency of models and normal maps by using proper smoothing groups. Here are some tips on using smoothing groups:
- When dealing with normal map baking from high polygon to low polygon, use a simple configuration for smoothing groups rather than multiple faceted polygons. This is because tangent normal maps need to bend the hard split of the surface normal from the low-poly geometry.
A smooth polygon with a good normal map saves on vertex count, which equates to more efficient geometry to render. Here’s a simple example that compares the following setups:
- A single plane with split smoothing groups that is equal to 36 vertices.
- A simple 18 triangle plane in 1 smoothing group that is equal to 16 vertices.
A smooth polygon saves on chart splitting in Lightmap baking and Realtime GI that produces smoother visual result.
While this list doesn’t cover the complete process of modeling a 3D prop or Scene, hopefully it gives content creators a good idea what to look out for.
6. Standard Shader/Material PBS and texturing
Note that this guide was originally created for use with the Built-in Render Pipeline in Unity 2017.3. For information on adapting this guide for use with the Universal Render Pipeline (URP) and the High Definition Render Pipeline (HDRP), see Update: believable visuals in URP and HDRP.
Materials define how light reacts with the surface of a model and are an essential ingredient in making believable visuals. Once a model is created, it is time to define its surface properties.
Physically Based Rendering Shader innovations have had a massive impact on real-time rendering. It has done more to let us achieve believable visuals than anything since the normal map innovation comes along. The Unity Standard Shader is a great Shader that allows content creators to create plausible materials easily. It is highly recommended to master the use of the standard shader before veering off into making custom surface shaders in ShaderLab, ShaderGraph (Scriptable Render Pipeline) or other 3rd party Shader creation tools.
More detailed explanations for the Standard Shader in Unity can be found here.
While PBS allows you to easily create believable materials, just playing with the slider and color pickers on the Material will not get a content creator too far. Most real life surfaces are made up of multiple materials. Here are few things to keep in mind for a DCC to achieve their goal when texturing an object with the Unity Standard Material. To keep things simple, only Albedo, Smoothness, Normal Map and AO covered here.
- Standard or Standard Specular Setup. In Unity there’s two option in Standard Material, there’s Standard and Standard Specular Setup. Few things to be aware off for these two material:
- In general it is easier to use Standard setup material as the Specular brightness and color are calculated automatically based on Albedo, Smoothness and Metallic input.
In Standard setup material, Metal at 1 means the albedo drives the color of the specular and its brightness in tandem with smoothness that adjust the brightness and glossiness of the surface.
Metal at 0 means the albedo color don’t affect the specular color and show up as surface color.
- The Standard Specular Shader should be used when you want to untether the specular color from the material’s abedo. This is the case in some more exotics material.
More information can be found here.
- Albedo values and Material Validator. While a Physically Based Shader is working hard to properly model energy conservation (automatically calculating specular brightness and distribution from the light), the albedo of your material needs to be plausible. A material’s Albedo effects both direct and indirect lighting, and an unrealistic value will propagate through the rest of your Scene lighting.
A very dark albedo will absorb light significantly and causes unusual lighting response. A too bright albedo reflects significant amounts of light and indirect color that are not usually observed in real life.
Above sample showcase Albedo on non metal surface affecting indirect lighting.
- While there’s a chart of material people refer to for determining values for PBS, there is no defined value for non metal painted surfaces, which are very common in real life. Content creators can decide that a wooden wall is painted with charcoal black or white snow paint for example. There’s no single definitive value of that wall albedo other than the content creator preference. This is where the general guidelines comes in. It is safe to say that for a non metal, painted surface an albedo value below 0.2 is too dark and an albedo value above 0.8 is too bright. This is not a scientific measurement but simply an easy to remember guideline. A chart of proper PBS values can be found here.
For darker dielectric material information, please refer to this expert guide.
A chart can be simple to use when dealing with a single albedo surface, however determining validity of complex albedo textures can be difficult. Our rendering engineer on the Spotlight team developed a Material Validation tool for exactly this reason. This tool allows you to check whether material values follow the guidelines or not. This tool can be enabled in Scene viewport, switch from "Shaded" to “Material Validation” view.
- Metallic values The Metal value of a material defines how much of the environment gets reflected to the surfaces while also determining how much of the albedo color visible on the surface. When a surface is pure metal, the surface color (albedo) drives the color of the environment reflection. A few things to keep in mind with metal materials:
Pure metal gloss materials don’t bounce diffuse lighting. If your entire room is made out of metal, your room will be very dark and you can only see specular highlights and reflection.
Above example showcase how dark a smooth metal room with full pointlight coverage.
Deciding whether a surface is a metal or not can sometimes mix up content creators. Don’t get caught by the object core material, but pay attention to the final surface of an object. As an example, metal railings that is "painted" blue should only have their unpainted area designated as metal. The image below illustrate how a painted metal railing should be textured.
NOTE: While the chipped area of the painted metal bar is metallic, rust however is not metal a surface.
- While it is easy to imagine that material only needs either a metal value 0 or 1, there are cases where surface materials are mixed in / blended. Metal objects partially covered with dust or dirt is a good example where the value of metal is in between due to blending. Other than that, be really cautious to not use metal value in between 0 and 1 when creating plausible material.
More information about metal can be found here.
- Smoothness value. Smoothness controls the microsurface detail of the surface, a value of 1 will yield a pure reflective mirror like surface and a value of 0 will yield a very rough and dull surface. This is often straightforward and intuitive, but at other times can be downright confusing. A few things to keep in mind:
- Focus on the final surface quality of the object. Just because an object made of concrete, it doesn’t mean anything to the smoothness. It could be a rough surface concrete with a gloss paint on top of it. Another example is unpainted wood, how the wood got polished determines the final smoothness value.
- Don’t forget scuff, dirt, scratches and water stains. In real life the surface of a material gets affected by many variable and rarely are they a pure single surface.
How elements gets blended between surfaces also determines the characteristic of the material. (e.g. a water puddle on soil usually have a ring of absorbed water that has darkened the albedo instead of just a direct smoothness blend).
More information for smoothness can be found here.
Normal Map. A "normal map" usually refers to a tangent space normal map that bends the surface normal of a polygon as if the light direction comes in from the other direction. This is usually used by content creators to add many details on a seemingly simple mesh. While normal maps are usually used to add geometric details, it is important not to forget its role in defining a material. It can be used to show the original surface material, as an example, this wood painted with high gloss red finish.
More information about normal map can be found here.
Occlusion map. Occlusion map mimics the attenuation of ambient light and can enhance the perception of concavity and shape.
Why would we need this, since we already have light baking and an indirect lighting solution and SSAO (Screen Space Ambient Occlusion)? The answer is two fold.
- First, a detailed version of the occlusion map can be achieved at much higher quality during offline render especially if the data is coming from a higher detailed model (similar to normal map baking from high detailed model to low).
- Second, occlusion maps help dynamically lit object tremendously since dynamic objects don’t get occlusion from light baking and only receive Light Probe or ambient lighting and low detail Screen Space Ambient Occlusion (SSAO).
More information about occlusion maps can be found here.
- Reference picture, colour chart and photo source. Like trying to learn any new field, studying up on the general principle behind Digital Content Creation will make your results better. Taking pictures of the surface whether it’s for reference or texture source often times helped speed up the creation of surface material in digital content creation tool. There are not many rules for capturing reference, other than taking lots of pictures of the particular subject. It’s the equivalent of going to image search engine and searching for specific reference image.
On the other hand, taking pictures for texture source needs some guidelines in order to give DCC close enough results for texture capturing:
When taking pictures for a texture source, always neutralize the color cast and negate the light brightness effect of the surface. Use white balancing and proper exposure of an 18% gray card (such as Kodak R–27 card). For example:
The 18% grey card is a trusted value that you can use as an anchor when taking texture source pictures. Do not try to print your own 18% gray card, as this will most likely give you an inaccurate gray card and off balance color. A proper 18% gray card is equivalent to rgb(124,124,124) or #7C7C7C in sRGB color space. The camera uses this gray card to acquire the proper exposure (negating light brightness) and do white balancing (neutralizing the light color cast).
For more information on grey card, see Middle gray (Wikipedia).
For best results, use a Digital SLR / advanced camera. However, you can achieve a good result with the above setup on any camera, including a mobile phone with manual exposure control and RAW capability.
To take it further, a X-Rite ColorChecker profiled RAW image with polarized lighting and lens will produce higher accuracy in capturing of albedo texture.
Like the R-27 gray card, ColorChecker chart is a known trusted color reference that can be used as anchor. Camera sensor + lens + filter + lighting condition characteristic profile can be generated and be used to correct RAW images.
- Lighting condition when capturing a texture source need to be in diffused condition, such as cloudy day or in evenly lit shades.
- For purer albedo texture once the captured image are processed, additional processing using Unity’s de-lighting tool can be done.
7. Lighting and Setup
Note that this guide was originally created for use with the Built-in Render Pipeline in Unity 2017.3. For information on adapting this guide for use with the Universal Render Pipeline (URP) and the High Definition Render Pipeline (HDRP), see Update: believable visuals in URP and HDRP.
At this stage content creators have meshes that are properly textured, an assembled Scene with proper tonemapped Unity render settings, but the Scene will still not look good until a proper lighting setup in place. It is assumed that content creators set the Scene with a Realtime GI strategy and then lit with Realtime lights for instant feedback, despite similar principles also applied towards baking.
Outdoor lighting and Scene setup.
- Hemisphere lighting. First component for outdoor lighting is Hemisphere lighting, called Environment Lighting in Unity. This is a fancy word for skylight. Night sky has minimal contribution, while daytime sky has very bright contribution. Hemisphere settings can be found under the Lighting tab (Window > Lighting > Settings > Environment). For a start, procedural skybox material would be prefered instead of HDRI cubemap. Create a new material in the project, name it SkyMaterial and then set it to Skybox / Procedural.
Assigned it to Environment Skybox Material inside Lighting tab > Scene.
At this point the Scene is somewhat lit. There is ambient, but not exactly proper hemisphere lighting. We’ll leave this alone for now.
- Directional Light. Typical Sunlight or Moonlight is usually represented by a directional light. This is due to the parallel nature of its light and shadow direction mimicking light source at close to infinity distance.
- Global Illumination. Directional light + Ambient alone won’t create believable lighting. Proper hemisphere lighting requires occlusion of the skylight lighting and Sun requires indirect lighting bounce. The sky currently renders a single color value to the Scene making it flat. This is where Realtime Global Illumination or Baked Lighting is required to calculate occlusion and indirect bounce lighting. In order to achieve that, follow these steps:
- Make sure all meshes that need to contribute to the Realtime GI or baking are flagged with Enable Lightmap Static and Reflection probe static. (Typically large static meshes).
- Next is to enable Realtime Global Illumination (Leave at default-medium settings) in the Lighting tab > Scene > Realtime Lighting. Hit Generate Lighting or check Auto Generate.
The Scene is now dark after the Scene finished generating lighting. To make matters worse, some elements of the Scene are out of place (Notice the Tram and the door on the background). The static objects in the Scene currently have proper occlusion for hemisphere and indirect bounce response from the directional light, however the rest of the object lack a of proper lighting setup.
- Light Probes and Reflection Probes. For dynamic objects or non-lightmap objects to receive Realtime/Baked Global Illumination, there needs to be Light probes distributed in the Scene. Make sure to distribute Light probe groups in the Scene efficiently near the area where dynamically lit object located or will pass (such as player). More information for Light Probes group can be found here
Hit Generate Lighting again or wait for the precomputation to finish if Auto Generate is checked.
The Tram and the background door are grounded better, but reflections look out of place. Sky reflection is all over the place and shows up inside the tunnel. This is where reflection probes comes in. Efficiently place reflection probes with proper coverage in the Scene as needed (In the Scene above 1 reflection probe for the entire room is sufficient). 128 pixels Cubemap Resolution using box projection usually is a good baseline for typical cases and will keep memory and reflection bake times happy.
More information for reflection probe can be found here.
The Scene now looks properly grounded and cohesive, an important part of believable Scene. But everything is even darker than before and nowhere near believable quality.
- HDR Lighting Value. Many content creators don’t realize that, in reality, hemisphere lighting and Sunlights are very bright light sources. They’re much brighter than value 1. This is where HDR lighting comes into play. For now, turn off the directional light and then set the SkyMaterial Exposure to 16. This will give you a good idea what hemisphere lighting does to a Scene.
Things start to look believable. Think of this state as a cloudy day, where sunlight is completely diffused in the sky (directional light don’t show up). At this point sunlight can then be reintroduced back into the Scene at a much higher value, try Intensity 5 for a start. Despite the sun looking nearly white, it is important that color is chosen properly as the impact of indirect color from the strong sun can dramatically change the look of the Scene.
Now the sun (directional light) looks like a high energy light as expected from real life. The Scene looks quite believable at this point.
- Screen Space Ambient Occlusion and Screen Space Reflection. While the Scene lighting looks pretty good at this point there’s additional details can be added to Scene to push it further. Baking of detailed occlusion usually isn’t possible because of the limited resolution set in the Realtime GI for reasonable performance. This is where Screen Space Ambient Occlusion can help. Enable SSAO in Post Process Profile under Ambient occlusion. Settings for this example is set to Intensity 0.5, Radius 1, Medium Sample count w/ Downsampling and Ambient Only checked for a start.
While SSAO takes care of extra ambient lighting occlusion, reflection could use some accuracy improvements in addition to the simple reflection probes. Screen Space Ray trace Reflection can helps improve this situation. Enable the Screen Space Reflection in the post process profile.
Notice that the left side of the wet track no longer renders bright reflections as SSR gives the Scene more accurate reflections for on screen objects. Both of these post process incur performance costs at runtime, so enable it wisely and set the quality settings at reasonable performance impact to fit runtime requirements.
- Fog At this stage the content creators have achieved somewhat believable outdoor and indoor value separation on a fixed exposure. Reflection is visible in the dark indoor areas as strong highlights and not dim muddy values.
However the Scene foreground elements and background elements are not showing up despite having strong perspective elements. A subtle fog in the Scene can create a massive difference in giving the Scene additional dimension.
Notice the foreground railing have better definition compared to the zero fog Scene. Fog is enabled in Lighting tab > Scene > Other Settings. Fog color #6D6B4EFF, Exponential at 0.025 density is enabled here. In deferred rendering, fog might also need to be enabled in the post process profile if its not activated automatically.
Indoor and local lighting
- Spotlight / Pointlight The staples of real time local lighting are spotlights and pointlights. Area lighting can only be used when baking lighting, with the exception of HD Scriptable Render Pipeline. There are new area lights that can be rendered in realtime in HD SRP mode. Fundamentally both of these types of lights emit light from one point in space and are limited by range with the spotlight having an additional limit by angle. More information can be found here.
The big differences between the two lights have to do with the way they casts shadows and interact with cookies. Shadowing with a Pointlight costs 6 shadow maps compared to a Spotlight’s single shadow map. For this reason point lights are much more expensive and should be used very sparingly. NOTE: Baked lights don’t need to worry about this issue. Another difference is that a cookie texture on a Spotlight is a simple straight forward 2d texture while a pointlight requires a cubemap, usually authored in 3D software. More information here.
- Colour and Intensity of light. Choosing the proper colour and intensity for your lights needs to follow some loose guidelines to give plausible results. Factors that need to be considered is the effect of the color and value chosen. When selecting intensity for indoor lights, try to make sure no indoor lights have a greater intensity than the sun’s. This can create an unbalanced look depending on the Scene.
Given this Scene setting, it’s very unlikely that there’s a high intensity lights shining from the ceiling that exceed the brightness of the daylight time.
When selecting colour, try not to leave out any one of the colour channels completely. This creates a light that has problem converging to the white point.
While it is technically a valid light color, the light color on the left image removes all blue color from the final output. Having a limited final color palette in the Scene for a baseline is not a great idea, especially if color grading is expected to be done later on.
- Emissive Surfaces In Unity, emissive surfaces can contribute to lighting if Realtime GI or baked GI is enabled, giving the effect of area lighting. This is especially useful if Realtime GI is enabled. content creators can modify the intensity and color of the emissive surface and get the feedback immediately, assuming that precompute had been done ahead of time.
Image above showcase subtle diffuse lighting coming from small meshes on the ceiling.
At this point, your content creators should have a good understanding of how to setup and light a Scene to look believable.
8. Understanding post-processing
Note that this guide was originally created for use with the Built-in Render Pipeline in Unity 2017.3. For information on adapting this guide for use with the Universal Render Pipeline (URP) and the High Definition Render Pipeline (HDRP), see Update: believable visuals in URP and HDRP.
As you might expect given the name, Post Processes are rendering effects that are based on an existing rendered Scene. Effects in Post Process are usually Scene view dependant or layered on top of the rendered Scene before generating the final render. The clear advantage of this feature is the instant visual feedback and dramatic improvement to the Scene without the need to alter existing content. There are lots of features in Post Process that are not considered a baseline requirement for creating believable Scenes. However its capability to enhance a Scene further is certainly worth the time it takes to understand the system. The goal here is to give you the information needed to decide which Post Process effects are right for your situation and to avoid the pitfalls that can come with these advanced features. More info can be found here: https://docs.unity3d.com/Manual/PostProcessingOverview.html
- Anti aliasing. When rasterizing a 3D polygon into a 2D screen with limited resolution, the final pixels will show a stair-stepping effect (aliasing). There are different solutions for Anti-Aliasing techniques in real-time 3D (Supersampling, MSAA,FXAA, SMAA, Temporal, and any combination of those or newer methods). The most popular techniques currently are FXAA and Temporal Anti-Aliasing due to their effectiveness and relatively high performance.
The sample above showcases that FXAA does a good job of fixing some of the glaring aliasing effects. Temporal, however, takes it a step further and can be seen to perform a much better job in the tram rails.
FXAA is a pure post process anti-aliasing. In simple terms, the rasterized Scene is captured, edges are analyzed and an algorithm run on top of the existing image to smooth it out. It is straightforward, doesn’t have any complex dependencies, and is fast.
Temporal Anti-Aliasing is a lot more complex. Temporal uses jittering and the previous frame as additional data to be blended in. It uses motion vectors to predict which pixels need to be rejected or accepted to render the final frame. The idea is to increase the effective resolution of a frame with more data without the need to render the Scene larger than its final resolution (Supersampling). The benefit is clearly a much smoother anti-aliasing, similar to the quality given by SuperSampling, without the major performance impact.
Like everything in real time rendering, there’s always trade off. Temporal AA requires motion vectors to function and has a larger performance cost when compared to FXAA. Temporal’s complex nature of predicting the final image can cause some artifacts for fast moving objects and texture blurines which might not be suitable for some applications.
- Ambient Occlusion. Ambient occlusion post process is an approximation of ambient occlusion based on screen space data, mainly depth, hence it is usually called Screen Space Ambient Occlusion (SSAO). As explained on the lighting setup section, SSAO can gives better fidelity when shading ambient lighting, especially for dynamic objects that typically don’t have any occlusion interaction between static Scene and dynamic Scene.
While in general SSAO helps a Scene’s ambient shading, it can cause too much occlusion. Having per object baked Ambient Occlusion from offline Digital Content Creation Software with additional ambient occlusion from light baking puts SSAO as the third layer of ambient occlusion.
Make sure to keep the final output in mind when setting up SSAO and try to find a balance with the other Ambient Occlusion solutions.
Sample showcasing the issue of adding too much AO causing open area to be very dark.
- Screen Space Reflection. Similar to SSAO, Screen Space Reflection use the current Scene view to approximate reflections via ray tracing. To get a believable results, it is almost always a good idea to enable this feature. It adds a highly accurate reflection that compliments the normal cubemap captured reflection. However, enabling this feature does restrict rendering to deferred rendering only and has a performance impact. Another downside of SSR is "screen space", anything not on the screen will not generate reflection hits and can cause a missing reflection such as the sweeping effect at the edges of the screen.
- Depth of Field. What most DCC understood from Depth of field effect is actually the lack of DoF. Blurry foreground and background images focused only at small point in space is what usually comes to mind when talking about DoF. While this effect can give the cinematic feel of a large sensor camera, it can also be used to change the scale perception of a Scene like how a tilt-shift camera lens gives a miniature effect.
The above example is a real-life photograph looking like a miniature by faking DOF.
- Motion blur Some argue that motion blur induces motion sickness or causes a distraction while others swears by it. Should you enable it? The answer depends on the desired effect and application. A subtle motion blur goes a long way in blending the transition of one frame to another. This is especially true, if there is a massive difference in Scene translation typically found in first person or 3rd person cameras. For example, a wide angle view where the player can swing their camera really fast from left to right will look jittery and gives a stop motion look without motion blur even if it is rendering at 60FPS.
The sample above is running motion blur at a Shutter angle of 180 degrees. (Full 360 shutter angle will give you a full frame duration trail, while anything less means less trail). With that in mind, if you are aiming for a stop motion look, then by all means disable motion blur.
- Bloom and emissive Bloom in real-life is an artifact of a lens where light beams aren’t focused properly, usually found on lower quality camera lenses or some special effects glow camera filter.
Two main things that are usually expected from using a bloom are a hazy soft image (as seen above, 0 threshold setup) or used to differentiate elements of high intensity or bright light (image below).
Overusing this features might backfire as seen at the sample where there are lots of high intensity pixels while the threshold of the intensity started to bloom very early (Threshold Gamma 1.0 means anything above value of 1.0 in current exposure will bloom intensely) Selecting the value of the threshold depends on the specific values of your emissive surfaces, the lighting setup for the Scene, and whether you have enabled eye adaptation.
- ToneMapper type A tonemapper is a way of processing a linear HDR buffer of input data and rendering it back out to the designated colour space for final output. This is similar to how a camera works. In Unity Post processing there are two types of tonemapper, Neutral and ACES (Academy colour Encoding System). More info for ACES can be found in Wiki. At first glance the difference between the two is in its default contrast of the tonemapper. However that isn’t the main difference between the two as you can adjust neutral to be similar in contrast to ACES (seen below that the two image is almost identical).
Above Neutral settings: Black In 0.02, White In 10, Black Out -0.04, White Out 10, White Level 5.3 and White Clip 10. The main difference needed to be taken into account is how the two tone mappers handle high intensity colour values such as coloured light or emissive effects (e.g. explosion effects or fire).
The above image showcase how ACES tonemapper normalizes high intensity colour differently than the Neutral tonemapper.
- Chromatic Aberration, Grain and Vignette These are a post process effect to simulate artifacts from real life camera systems. To prevent these being abused, it is a good idea to understand how each of these occurred in real cameras.
- Chromatic Aberration or CA effect is a dispersion of colour that appears on an image if the lens of a camera fails to focus all colour to the same convergent point. This is usually found in a poorly calibrated lens or lower quality lens. While this can sometimes add a sense of realism to a digital Scene, this can also mean your virtual camera is directed to convey a low quality lens.
- Grain seen in final image of a real photograph or cinema are usually the telltale sign of an insufficient quantity of useful light entering the sensor, such as dark Scene or a high iso camera sensor/film translating to noise. This effect can be used to simulate camera limitations added to a pure clean 3D rendered Scene to feel more believable. However having too much noise in a Scene can distract viewer with a false sense of motion and effect the contrast of the final rendered image.
- Vignette effect, similar to the CA effect, is an artifact where a lens could not give consistent light coverage from the center to the edge of the sensor/film of a camera. This can be used to give some sense of focus for a central point of a Scene, but can also be abused and make a Scene look like it was processed by an amature post editor.
The key takeaway from these post process fundamentals are for a content creator to effectively use the features with a sense of purpose rather than a "make it advance rendering" checkboxes as each additional effects added to the Scene cost some performance.
Post Process missing in this explanation are Eye Adaptation, colour Grading (other than tonemapper) and User Lut (Lookup Table). These post process effects warrants a deeper explanation. General information of these effects can be found here:
https://docs.unity3d.com/Manual/PostProcessing-EyeAdaptation.html
https://docs.unity3d.com/Manual/PostProcessing-ColorGrading.html
9. Dynamic lighting
Note that this guide was originally created for use with the Built-in Render Pipeline in Unity 2017.3. For information on adapting this guide for use with the Universal Render Pipeline (URP) and the High Definition Render Pipeline (HDRP), see Update: believable visuals in URP and HDRP.
Dealing with dynamically lit objects, especially large objects require more tricks than their static counterparts. Objects that are non statically lit in many cases are expected to change position, hence the need for dynamic lighting information. Dynamic objects have to work with these limitations in mind when predetermined lighting calculations aren’t an option. Here are some things to consider to improve the quality of dynamic object lighting:
- Light Probe Proxy Volume (LPPV). Surfaces of dynamic objects that aren’t lit by dynamic lighting typically use Light Probe data to fill in their lighting information (In a Scene where probe is not present Environment Lighting is used). Depending on lighting strategy used in the setup of the Scene, this can range from indirect lighting information down to shadowing and baked diffused probe lighting information. This Light Probe strategy usually works fine for small dynamic objects, however larger objects require a finer granularity of Light Probe lighting. This is where Light Probe Proxy Volumes comes in. Check Unity manual for LPPV guide. Using Light Probe Proxy Volumes allow a large dynamically lit object to use more than a single Light Probe resulting in higher lighting accuracy.
The example above showcases how the capsule with LPPV demonstrate higher accuracy of Light Probe sampling despite only using 2x2x2 Volume grid.
- Per object baked Ambient Occlusion Map (AO) Dynamic objects only receive lighting from Light probes or ambient lights. There’s a need to precalculate an occlusion for the object, especially if the object involves a concave interior such as the tram in the example.
On the example above the tram on the left without AO applied Light Probe lighting data without knowing how to differentiate the interior and the exterior surfaces. With the prebaked AO, this map serves as a guide to reduce the intensity of light and reflection from the exterior, giving a much more grounded look.
Per object Ambient Occlusion offline baking can even give further detailed occlusion by baking from higher detailed mesh to lower detailed mesh similar to how Normal map baking works.
NOTE: Per object AO doesn’t interact with other Dynamic object, for example if a dynamic object such as character entering the tram, it will be receiving Light Probe data from the scene and doesn’t necessarily match the occlusion of the tram interior.
- Local Reflection. Most dynamic objects don’t warrant their own reflection, however for objects that involve concave interiors, attaching a reflection probe to the object and allowing it to run in realtime can help reduce false reflection hits coming from the environment reflection probe.
Exaggerated material to showcase reflection issues.
- Fake Shadows or occlusion based on assumptions. If certain assumptions can be made for an object, there are tricks that can be used to improve visual quality. In this sample shown below, the tram is expected to be always on rail and in order to help its ground light occlusion in shaded area, a simple multiply transparent material plane is placed.
Similar tricks usually used in other games where under a character there’s a blob shadow projector instead of the character casting real shadows. In real time rendering, if you can find a tricks that works and are cheap in performance usually it can be used as a viable solution.
There are certainly more tips and tricks that can be done for improving visual rendering. The above list should give content creators confidence in thinking of solutions for different kinds of visual target requirements.
10. Sample Project File
Spotlight Tunnel Sample Scene was developed by Unity SF Spotlight team to help content creators do hands on learning and experimentation.
Spotlight Tunnel Sample project file can be found here.
Simply extract the project to the folder and open the project using Unity.
Spotlight Tunnel Project was made with Unity 2017.1.0f3
Opening this project in newer version of Unity will require lighting rebuild as there might be lighting data format incompatibility between versions.
All asset provided in this project may only be used in project developed with Unity Engine.