
Creating Custom Gizmos for Development - 2019.2
Tutorial
intermediate
+10XP
30m
(65)
Unity Technologies
In this tutorial, we’ll explore the many wonders of custom Gizmos. Most often experienced in the form of the scale, rotate, and translate tools in the Unity Editor, Gizmos are capable of much more, and are among the easiest, most versatile ways to customize the Unity Editor for your project. They can be used to augment existing capabilities — such as displaying the bounds of a Box Collider, even when its GameObject isn’t selected — or to create a wide variety of functionality.
Resources
Languages available:
1. Creating Custom Gizmos for Development
This tutorial has been verified using Unity 2019.4.10f1 LTS https://learn.unity.com/tutorial/creating-custom-gizmos-for-development-2019-3
In this tutorial, we’ll explore the many wonders of custom Gizmos. Most often experienced in the form of the scale, rotate, and translate tools in the Unity Editor, Gizmos are capable of much more and are among the easiest, most versatile ways to customize the Unity Editor for your project. They can be used to augment existing capabilities — such as displaying the bounds of a Box Collider, even when its GameObject isn’t selected — or to create a wide variety of functionality.
For this tutorial, you will need to download the custom Gizmo icons by selecting the file RelicIcons.zip in the Tutorial Materials tab and then unzipping the file to prepare the enclosed Relic icons folder.
2. Why Use Gizmos?
There are many reasons you might want to use Gizmos. Sample code for each of these examples is included later in the tutorial.
- Custom icons make a GameObject easy to identify, especially in a large game world, such as at the start and end of a level, player and enemy spawn points, or secret areas. Custom icons can also be used to quickly relay information, such as the health, or even the phase, of a level boss.
- Text readouts (in the form of handle labels with optional offsets) make information accessible without requiring you to select an object or take your eyes off the Scene view.
- Drawing shapes can be used to indicate areas of influence (such as low-gravity or water volume) or the bounds of a Collider. You can use cubes to indicate physics zones, Meshes to convey information quickly in three dimensions, or spheres to indicate the radius of an area of effect. 3D shapes can also be used to represent 2D Colliders.
3. Best Practices
To make sure you include only Gizmos in Editor code, use either the #if UNITY_EDITOR/#endif preprocessor or put the code into an Editor folder. This prevents it from being included in the build, where it will never be used.
4. Drawing Icons
Perhaps the most effective Gizmo for personalizing the Editor for your project is the custom icon. Custom icons must be stored as single files (as opposed to packed in a Sprite sheet) in the folder Assets/Gizmos, or in a subfolder of Assets/Gizmos. If you put your icons in a subfolder, as we have for our first example, be sure to use a leading \ when indicating the file path, as Unity interprets a single backslash as the first character of an escape code.
For this first scenario, we have a Relic class, where Relics are special, singular items scattered throughout the game world. Let’s suppose that these Relics are randomly scattered across the game world at the start of a quest for the player to find, and we want to make sure they’re being spawned in valid locations rather than bottomless pits or unreachable waterfalls.
1. Inside the Assets folder, create a folder called Gizmos. This folder will hold our custom Gizmo icons.
2. Inside the Gizmos folder, create a folder called Relics.
3. Inside Relics, place two or more images from the example files previously downloaded (Figure 01).
4. Back in Unity, create a new C# script called Relic.
5. Double-click to open Relic in the script editor.
6. We’ll now create our Relic class. For the sake of brevity, we’re only including code relevant to our custom Gizmo. It is very important that the icon names match the RelicType values exactly. The icon for Heartbreaker should be named Heartbreaker.png, for example. Inside the class definition, type:
public enum RelicType
{
    Heartbreaker,
    MaskedSpider,
    ScorpionTail,
    BladedPinchers
}

public RelicType relicType;
7. Our Gizmo code loads only the icon with the matching name and draws it at the location of our relic in the Scene view.
Continue with::
#if UNITY_EDITOR
    private void OnDrawGizmos()
    {
        string customName = "Relics\\" + relicType.ToString() + ".png";
        Gizmos.DrawIcon(transform.position, customName, true);
    }
#endif
8. Save changes and return to Unity.
9. Create an empty GameObject by selecting Create Empty from the GameObject drop-down.
10. Click Add Component in its Inspector and select Relic.
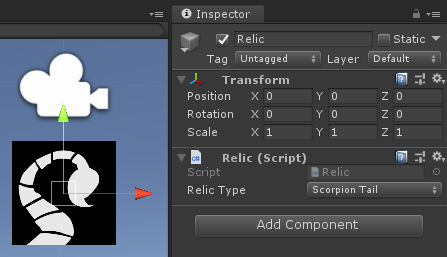
11. With Relic still selected, hit F while the mouse is over the Scene view. You should see the icon for the relic (Figure 02).
12. Try changing the relic type using the drop-down in the Inspector.
5. Using GizmoTypes with Editor Scripts
When we place our Gizmo code in a separate Editor script, rather than the OnDrawGizmos method in our component’s Script, we can use the power of Gizmo types. Aside from Pickable, Gizmo types specify the conditions under which a Gizmo should be drawn. Gizmo types can be combined using the bitwise logical OR operator |. There are six Gizmo types:
GizmoType.Active: Draws the Gizmo if the object to which it’s attached is currently shown in the Inspector.
GizmoType.InSelectionHierarchy: Draws the Gizmo if its object is selected, or if its object is a child of the currently selected object.
GizmoType.NonSelected: Draws the Gizmo if its object is not currently selected.
GizmoType.InSelectionHierarchy: Draws the Gizmo if its object is not selected and is not a child of the currently selected object.
GizmoType.Pickable: This type makes the Gizmo pickable in the Editor if it’s not already.
GizmoType.Selected: Draws the Gizmo if its object is currently selected.
6. Augmenting Default Gizmos
For our next example, let’s suppose we have a class called Trigger Zone. The contents of Trigger Zone aren’t important for this demonstration, but every GameObject that carries the Trigger Zone component must also have a Box Collider. By default, Box Colliders are drawn in the Scene view only when their object is active in the Inspector. We can create a custom Gizmo to draw the Box Collider even when the Trigger Zone’s object is not active.
1. Create a new C# script called TriggerZone. We don’t need to do anything with it for this example, but we need to attach it to a GameObject.
2. Create an empty GameObject named LootZone.
3. Add the TriggerZone component and a Box Collider.
4. In Assets, create a folder called Editor if there isn’t one already. (This folder can be anywhere inside Assets, but must be called Editor.)
5. Inside the Editor folder, create a new C# script called TriggerZoneGizmo.
6. Double-click TriggerZoneGizmo to open it in the script editor.
7. Remove the Start and Update methods.
8. After the last using statement, type:
using UnityEditor;9. To create our own DrawGizmo function, we need to specify the type, a function name, and its parameters. The parameters for a custom DrawGizmo function must include an instance of the class and the Gizmo type.
Because the Gizmo we’re about to draw is already drawn when the object is selected, we only need to draw the Gizmo when the object isn’t selected. Inside the class definition, type:
[DrawGizmo(GizmoType.NonSelected)]10. Directly after that line, type:
static void DrawTriggerZone(TriggerZone zone, GizmoType gizmoType)
    {
        BoxCollider collider = zone.gameObject.GetComponent<BoxCollider>();
        Gizmos.color = Color.green;
        Gizmos.DrawWireCube(zone.transform.position, collider.size);
    }
11. Save changes and return to Unity.
12. Select LootZone. The Box Collider is drawn, as expected.
13. Select something else in the Hierarchy view, taking focus off of LootZone. Notice how the Box Collider’s bounds are still drawn, even though its object isn’t selected.
14. It’s possible to have more than one Gizmo drawing method. For example, let’s say that when a TriggerZone object is selected, we want to draw a solid red cube instead. After the method from Steps 9-10 in the previous example, add:
[DrawGizmo(GizmoType.Selected)]
    static void DrawSelectedTriggerZone(TriggerZone zone, GizmoType gizmoType)
    {
        BoxCollider collider = zone.gameObject.GetComponent<BoxCollider>();
        Gizmos.color = Color.red;
        Gizmos.DrawCube(zone.transform.position, collider.size);
}7. Gizmo Recipes
With our custom Gizmo method outlined, let’s explore some more scenarios. We won’t detail the entire script each time, as most of the code is the same as our previous example. We will instead give the Gizmo type, any required code or data members for the base class, and the Gizmo drawing code. To always draw a Gizmo, you can either set the Gizmo type to GizmoType.Selected | GizmoType.NonSelected or just place the Gizmo drawing code inside the OnDrawGizmos method in the class definition.
Note that data access differs between Gizmo drawing code that’s part of a class in the form of the OnDrawGizmos method and Gizmo drawing code that’s part of a separate Editor script.
8. Area of Effect Radius Display
Let’s say we want to draw a WireSphere that’s the radius (float) of an area of effect (AoE) attack. If we’re using OnDrawGizmos, we can type:
Gizmos.DrawWireSphere(transform.position, damageRadius);Because the OnDrawGizmos method is part of the class, this works even if damageRadius is private. However, if we’re using a separate Editor script, there’s a bit of extra housekeeping. In this case, damageRadius needs to be public. Here’s how that script would look:
[DrawGizmo(GizmoType.Selected | GizmoType.NonSelected)]
    static void DrawDamageRadius(TriggerZone zone, GizmoType gizmoType)
    {
        Gizmos.color = Color.red;
        Gizmos.DrawWireSphere(zone.transform.position, zone.damageRadius);
}9. Enemy/Boss Health Display
For simplicity’s sake, the following code assumes you’re using the OnDrawGizmos method.
This Gizmo displays an enemy’s current and max HP as a fraction above their head in the Scene view. This allows the developer to see at a glance if an enemy is spawning with the correct amount of HP, taking damage correctly, etc., without having to find and select the enemy in the Hierarchy view.
Base class: Enemy (named enemy in the Gizmo drawing function)
Relevant data members: currentHP (float), maxHP (float)
Optional data member: skin (GUISkin)
Gizmo drawing code:
Handles.Label(enemy.transform.position + Vector3.up * .125f, "HP: " + enemy.currentHP.ToString() + "/" + enemy.maxHP.ToString());An optional third parameter is the GUIStyle, used to format and stylize the text display in a label. GUI Skins and Styles are outside the scope of this tutorial, but if you have a GUIStyle named “DebugDisplay” defined, add the skin data member and assign the GUISkin that contains “DebugDisplay.”
Here’s the Gizmo drawing code for that:
Handles.Label(enemy.transform.position + Vector3.up * .125f, "HP: " + enemy.currentHP.ToString() + "/" + enemy.maxHP.ToString(), enemy.skin.FindStyle("DebugDisplay"));Labels can be used for all sorts of debugging and information displays. Sometimes an image is more ideal.
10. Enemy Behavior State Indicator
This Gizmo displays a happy face (or whatever you prefer) if an enemy is idle/patrolling and an angry face if he’s chasing the player.
Relevant data members: chasing (bool)
Gizmo drawing code:
Gizmos.DrawIcon(enemy.transform.position, enemy.chasing ? "Chasing.png" : "Idle.png");11. Moving Platform Path Display
This Gizmo draws the path of a moving platform (named platform in the following code). If the platform is set to loop, the path is drawn as a closed polygon. At least two waypoints are required (as you need at least two points to draw a line), but there is no upper limit.
Relevant data members: waypoints (Transform[]), loop (bool)
Gizmo drawing code:
if (platform.waypoints.Length < 2)
    return;

Gizmos.color = Color.white;
for (int i=0; i < platform.waypoints.Length - 1; i++)
    Gizmos.DrawLine(platform.waypoints[i].position, platform.waypoints[i + 1].position);

if (platform.loop)
Gizmos.DrawLine(platform.waypoints[0].position, platform.waypoints[platform.waypoints.Length - 1].position);12. Conclusion
Gizmos have practically infinite applications. They make information available at a glance and, with some creativity, can become integral parts of the development process.