
Creating LODs in 3ds Max for Unity
Tutorial
intermediate
+10XP
25m
(22)
Unity Technologies
Level of Detail, also known as LOD, helps with scene rendering by reducing the topology, or lowering the polygon count, of a given object within a scene based on the distance from the camera. Objects can have multiple LODs; the number of LODs is determined by the complexity of the object and how nicely the object will render when moving away from or closer to the camera. In this tutorial, you wil learn to create LODs.
Languages available:
1. Creating LODs in 3ds Max for Unity
Level of Detail, also known as LOD, helps with Scene rendering by reducing the topology, or lowering the polygon count, of a given object within a scene based on the distance from the camera. Objects can have multiple LODs; the number of LODs is determined by the complexity of the object and how nicely the object will render when moving away from or closer to the camera. For most objects, one or two LODs would be sufficient, but when you’re working with hero assets (assets that the camera’s focused on), you may require additional LODs to prevent a “popping” of the asset when the distance to the camera changes.
2. Creating LODs
To begin, let's get an object in the scene. You may use any Mesh you wish, but for our purposes, we’ll be creating a teapot with three LODs.
1. With 3ds Max open, create a new scene.
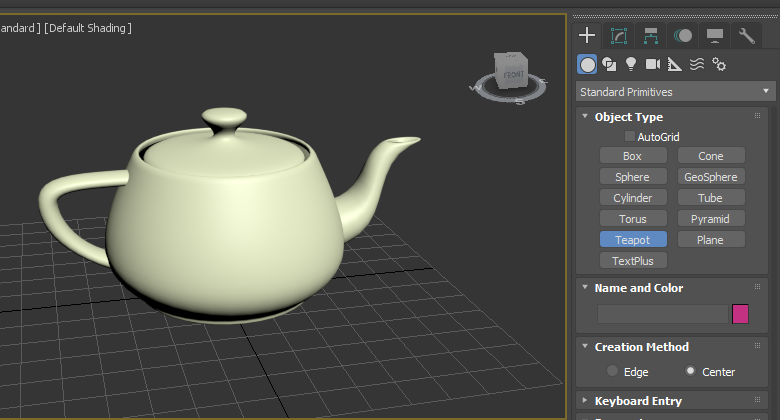
2. In the new scene, select the Teapot Object Type and create a teapot in the center of the Scene by clicking and dragging (Figure 01).
3. Change the Ssegments count to 10 (Figure 02).
4. Rename the teapot. Best practice is to use the naming convention of “LOD+#”. For our example, let’s name it “LOD0” (Figure 03).
The highest poly count for our teapot will be the LOD that’s closest to the camera. The naming convention is an industry standard — the LOD that’s closest to the camera is usually 0. As we create more LODs with a lower poly count, we’ll increment from 0.
In this example, we’re going to create the following LODs of the teapot object:
- LOD0: Highest poly count; this is when the object is close to the camera.
- LOD1: Mid-range poly count, when the object is midway between the background and foreground..
- LOD2: Lowest poly count, when the object is in the background.
Let’s make our last two LODs for the teapot
1. Select the teapot and clone it by pressing Ctrl+V on Windows, or Command+V on MacOS (Figure 04).
2. Name this teapot “LOD1” and make sure it is set to Copy.
3. Select the teapot and change the segments to 5. This will be the object when it's not the closest or farthest away from the camera (Figure 05).
4. Clone the teapot again and name this copy “LOD2”.
5. For the LOD2 teapot, change the segments to 1 (Figure 06).
With our teapots and their varying levels of complexity, let’s make sure they’re all recentered on the grid’s origin so they’re stacked. If LODs aren’t stacked, they will not work.
Next, let's connect all of our objects to create the LODs.
1. First, select all the Meshes. Select Group>Group. Name this group “Teapot_LOD”.
2. Go to the right of the toolbar window and the Utility tab. If the Level of Detail category doesn’t exist with Utilities, click the More button (Figure 07).
3. In the new window, select Level of Detail to add it to your Utilities Panel (Figure 08).
4. With your group selected, click Create New Set under Level of Detail Set. This will automatically add your group and all the Meshes to the LOD and assign them percentages. Percentages are essentially saying, when LOD0 is taking up 50 to 100 percent of the image, then it will show LOD0, which is the model with the most polygons (Figure 09).
5. To adjust the weights, select the LOD within the list and simply change the thresholds you wish to have. Change LOD0 from the range of 50% and 100% to 80% and 100%.
Note: The default percentage. You can change this to use pixels under Threshold Units just above the Thresholds category. Image Output Size doesn’t concern us as we can adjust the LOD thresholds within Unity.
Once the LOD set has been created, the object is ready to be exported. From here on, we will export the object for Unity. You can always adjust LODs within Unity for more fine-tuning. For now, we’re concerned only with setting up the LODs to export.
1. Go to File > Export > Game Exporter.
2. Set the proper paths, Up Axis and additional settings of your choice.
3. Click Export.
3. Conclusion
LODs help rendering performance and allow you to fine-tune detail based on an object’s distance from the camera. Knowing how to set up, use, and adjust LODs helps optimize your scenes and reduces the work that your renderer has to do.