Creating LWRP/URP Lights
Tutorial
intermediate
+10XP
15 mins
170
Unity Technologies

URP stands for “Universal Render Pipeline,” which aims to optimize real-time performance on performance-constrained platforms such as mobile devices or low-end consoles and PCs. It does this by making some tradeoffs in the lighting and shading sections of the pipeline. In this tutorial, you will learn to use URP to light scenes.
Languages available:
1. Creating URP Lights
This tutorial has been verified using Unity 2019 LTS and URP 7.3.1
URP stands for “Universal Render Pipeline,” which aims to optimize real-time performance on performance-constrained platforms such as mobile devices or low-end consoles and PCs. It does this by making some tradeoffs in the lighting and shading sections of the pipeline.
If you wish to target a wide range of mobile devices, virtual reality, or are developing a project that has a limited need for real-time lighting, then using the URP will be incredibly beneficial.
2. Creating a new project with URP
Let’s start a new project with URP.
1. Open Unity Hub and create a new project.
2. In the new window, select the Universal Render Pipeline Template (Figure 02).
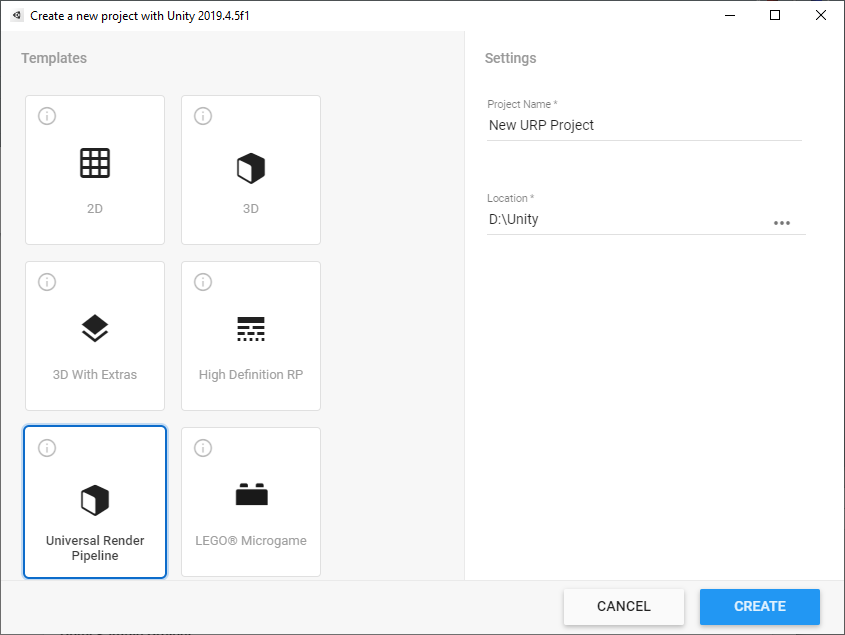
3. Name your project and set the location for the project.
4. Finally click Create.
Once that’s done, your new Unity Project with the URP will be ready to go.
3. Upgrading an existing project to use URP
To upgrade an existing project, you must first download the URP using the Unity Package Manager.
1. Go to the Window > Package Manager to open the Package Manager (Figure 03).
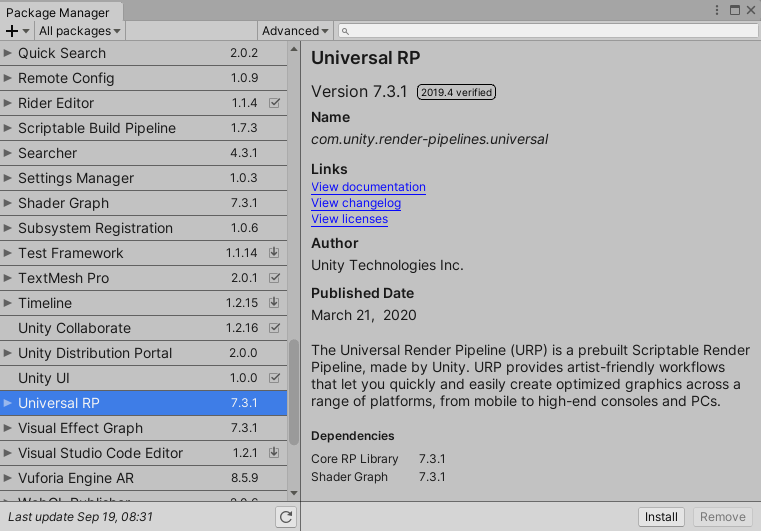
2. Click the All button on the left.
3. Find “Universal RP” in the list and select it.
4. Click install.
After the package has been installed from the Package Manager, you have to add the URP Asset to the Scriptable Render Pipeline Graphics settings field.
1. Open the Project settings window by clicking Edit > Project Settings.
2. Select Player settings on the left side of the new window.
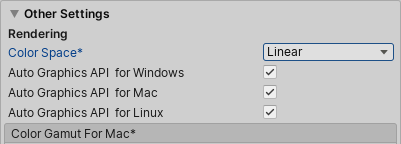
3. Set the project to Linear color space in Player Settings (Figure 04).
Note: The reason you want to choose Linear is so the colors supplied to Shaders within your Scene will brighten linearly. Gamma color space will quickly begin to turn white as values go up.
4. Create a pipeline Asset by selecting the Asset dropdown and Create > Rendering > Universal Render Pipeline > Pipeline Asset (Forward Renderer).
5. Open the Project settings window by clicking Edit > Project Settings.
6. Select Graphic settings on the left side of the new window.
7. In the Graphics Inspector, drag and drop the UniversalRenderPipelineAsset into the Scriptable Render Pipeline Settings field (Figure 05).

Now your existing project will use the URP.
4. The Lights
In the URP, lights are more restricted to keep them performance-oriented and really home in on the ability to target as many platforms as possible. There are a few restrictions you should keep in mind:
- Real-time indirect bounce shadowing is not supported for Spot and Point lights.
- Real-time shadows for Point lights are not supported.
With those things in mind, let’s create a Spotight.
1. From the GameObject dropdown, select Light > Spotlight. Alternatively, select an existing GameObject and click Add Component to add the Light component, setting its type to Spot (Figure 06).
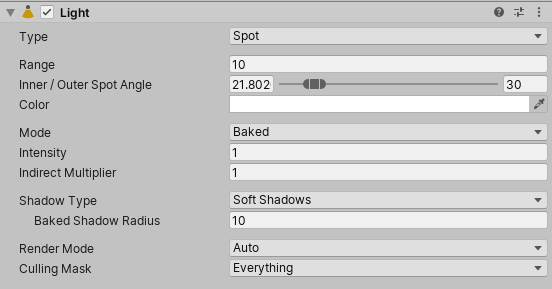
- Type: This shows the current type of light being used. Possible values are Spot, Directional, Point, and Area (baked only).
- Range: Determines how far the light emitted from the center of the object travels. This is for Point and Spot lights only.
- Inner / Outer Spot Angle: Determines the angle of the light. Inner percent determines where the attenuation between the inner cone and the outer cone starts. Higher values will cause the light at the edges of the Spot to fade out, while lower values will stop the light from fading at the edges.
- Color: Sets the color of the emitted light.
- Mode: This allows you to specify the Light Mode used to determine if and how a light is baked. The possible modes are Realtime, Mixed, and Baked.
- Realtime is used for lights that need to change their properties during run time.
- Mixed is used for lights that change their transform and visual properties during run time but with limitations.
- Baked is used to create local ambience and don’t change during run time.
- Intensity: This value sets the light’s brightness.
- Indirect Multiplier: This value is used to vary the intensity of indirect light. Indirect light is the light that bounces from one object to another. A value lower than 1 causes the light to dim with every bounce. Higher than 1 makes the light brighter with each bounce. Keeping it at 1 means the light remains the same with every bounce.
- Shadow Type: This setting determines whether the light casts No Shadows, Hard Shadows, or Soft Shadows.
- Baked Shadow Radius: This controls the amount of artificial softening applied to the edges of the shadows cast by the Point or Spot Lights.
- Render Mode: This setting specifies the rendering priority of the selected Light. The available settings are Auto, Important, Not Important.
- Auto determines the render mode.
- Important will always render the light at per-pixel quality. Use this for the most noticeable lights.
- Not Important will render lights with the faster method of vertex/object light mode.
- Culling Mask: Use this setting to selectively exclude groups of objects from being affected by the Light.
5. Directional Lights
The Directional Light has all the same settings as the Spot Light minus Range and Spot Angle. The Baked Shadow Radius turns into Baked Shadow Angle (Figure 07).
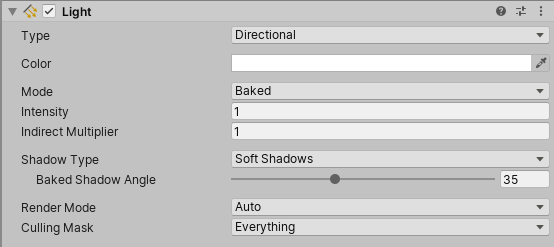
- Baked Shadow Angle: This controls the amount of artificial softening applied to the edges of the shadows cast by Directional Lights.
6. Point Lights
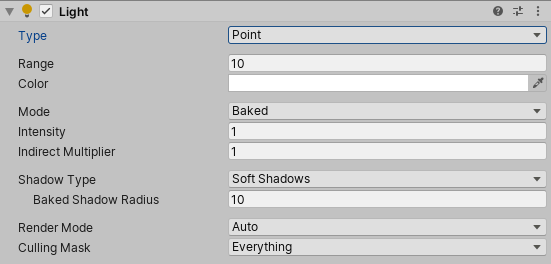
Point Lights have the same settings as Spot Lights, minus the Spot Angle (Figure 08).
7. Area Lights
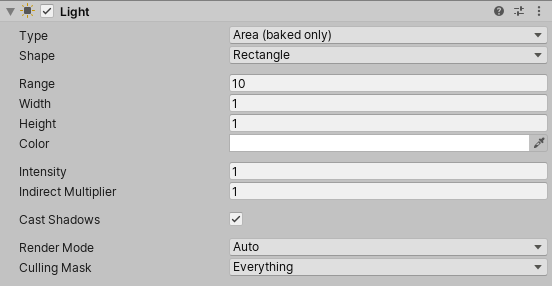
Much like the other lights, Area lights have similar properties as Spot and Point Lights, but with some additional settings that control the shape, size and effects of the Light (Figure 09).
- Shape: This determines whether the shape of the area light is a rectangle or disc.
- Range: This value is computed from width, height and intensity values.
- Width: Determines the width of the Area Light.
- Height: Determines the height of the Area Light.
- Cast Shadows: Toggle this to enable the light to cast shadows.
8. Conclusion
Lights in the URP are designed to be efficient but not impact the Scene performance. Even with URP’s built-in optimization settings, it’s ultimately up to you to make sure you aren’t overloading your project with lights and impeding performance.