
Creating Tracks and Sub-Tracks in Timeline
Tutorial
Beginner
+10XP
15 mins
(85)
Unity Technologies
The Timeline window offers many different ways to add to the Tracklist. The method you choose impacts GameObjects, Track binding, and components. In this tutorial, you'll explore various methods for adding tracks and sub-tracks to Timeline.
Languages available:
1. Creating Tracks and Sub-Tracks in Timeline
Verified with: 2019.4 and Timeline 1.2.17
In the Timeline window, there is a Tracklist that represents all the tracks and sub-tracks in your Scene for animation and audio needs. The Timeline window offers many different ways to add to the Tracklist. The method you choose impacts GameObjects, Track binding, and components.
2. Open the Timeline Window
To open the Timeline window if it’s not already open:
1. Click the Window dropdown on the main Editor window.
2. Click Sequence > Timeline.
3. A new window will open up; this is the Timeline Editor window. (Figure 01)
You’ll notice that you can’t add any tracks yet. You must create a timeline for the object to which you wish to add tracks. To do this:
1. Select an object in your Scene.
2. Click Create in the Timeline window. (Figure 02)
3. Creating a Track
There are a couple of ways to add a track to the Timeline window. The simplest method is to click the Add button and select the type of track you wish to add.
You can also add a track by right-clicking in an empty area in the Timeline window and selecting the type of track you wish to add. (Figure 03)
The Timeline Editor window also supports dragging a GameObject into the Track list.
1. Click and drag the GameObject from the Hierarchy window.
2. Drag the GameObject into an empty area in the Track list.
3. Select the type of track to add from the context menu. (Figure 04)
4. Creating Sub-Tracks
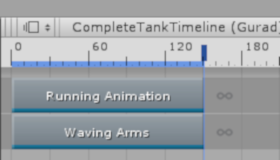
Sub-Tracks, commonly referred to as Override Tracks, are used to override or mask out certain animations with others, such as overriding a running torso with one that’s waving its arms. (Figure 05)
To create a Sub-Track:
1. Select the track to which you want to add a Sub-Track.
2. Right click and select Add Override Track.
3. Add the Animation Clip to the new Override Track.
The Sub-Track is linked to the object in the main track. This will completely override the animation in the main track. You will use an Avatar Mask to combine the two animations.
5. Conclusion
With the knowledge of how to add tracks and Sub-Tracks, you should be able to begin experimenting with and exploring all that you can do with the Timeline Editor window. Try to combine animations or set up small cutscenes of a simple object animating across the camera.