
Custom Render Passes with URP
Tutorial
intermediate
+10XP
15m
(191)
Unity Technologies
In this tutorial, you will learn how to use custom render passes to render a toon outline post processing effect on selected objects
Resources
Languages available:
1. Custom render passes with URP
This tutorial has been verified using Unity 2019.4.14f1 LTS and Universal RP 7.3.1
The Universal Render Pipeline (URP) is a subset of Unity’s new Scriptable Render Pipeline, first introduced in Unity 2019.3. It replaces the Lightweight Render Pipeline (LWRP) from Unity 2018.3. Like LWRP, the URP enables developers to extend Unity’s graphics pipeline with customized effects using custom render passes. Unlike ordinary shaders and effects, these passes are camera independent and can persist throughout the entire project without the need to set it up for each Scene.
Note: Like the LWRP, the URP is not compatible with Unity’s standard renderer, or HDRP.
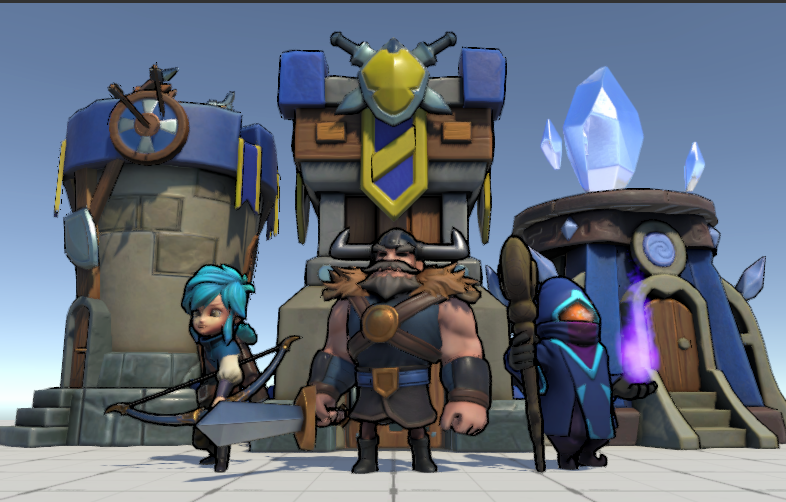
In this tutorial, we will be creating a toon outline on our characters and the environment in our Scene, as illustrated in the image below (Figure 01). This tutorial relies on a couple custom Shaders and Materials to create the effect. They can be downloaded and placed into your project’s Assets directory via Universal Render Pipeline Examples.
2. Pipeline Setup
To begin, we must first set up our project to use the URP.
1. Import the URP package by navigating to Window > Package Manager and searching for Universal RP (Figure 02).
With our package installed, let’s create a new URP Asset.
2. Right-click on the Assets folder and navigate to Create > Rendering > Universal Render Pipeline > Pipeline Asset. A new Forward Renderer will automatically be created alongside the URP. Rename it “Outline Renderer”. It will be responsible for implementing the toon outline effect.
Now we must tell our project to use the Asset and Renderer we created.
3. Navigate to Edit > Project Settings > Graphics. Under Scriptable Render Pipeline Settings, select the URP Asset (Figure 03).
You may notice that this step doesn’t affect your project. This is because the Forward Renderer has not made any changes to the Scene. We’ll change that in just a bit.
3. Introducing the Toon Outline Shader and Material
The Toon Outline Shader you imported at the beginning consists of two parts: the actual Shader that handles the rendering operations needed to produce the outline and a Material that will activate the Shader. The Shader (“ToonBasicOutline”) can be found in Assets > Shaders and the Material can be found in Assets > Material (Figure 04).
The Shader works by inverting the normals of a Mesh (an operation that subsequently makes it no longer affected by lights), extruding them beyond the Mesh by some offset, then colorizing them by a user-defined RGB color.
When applied to objects on a Layer Mask, these extruded normals will appear as outlines around the GameObjects within that Mask.
4. Layer Masks and post processing with render passes
Unity renders a Scene in multiple passes, or steps. Each step produces a single image, for example: one for Albedo (color information), Ambient Occlusion, and normals. These images are then composited to craft the final image on the screen. Separating each draw call into multiple passes offers more control over the final look of an image. The toon outline effect is a post-processing effect, meaning it will be rendered on top of the entire screen once the Scene has been drawn.
We can assign GameObjects to different Layers to explicitly define which objects will be affected by this post-processing effect (effectively creating a Mask).
4. Select the GameObjects you want to render with the toon outline Material, click the drop-down next to Layer, then select Add Layer.
5. In the Inspector, create a new Layer Mask called “Character” (Figure 05).
6. To extend our custom Forward Renderer with a new render pass, click it and navigate to the Inspector.
7. Click the +, and select Render Objects. This will create a new render pass. Let’s rename it “Toon Outline” (Figure 06).
8. As we want this render pass to affect only objects in the Character Layer, set the Layer Mask to Character.
Next, we’ll create a Material override to define how we want to render objects on the Character Layer.
9. Click the drop-down next to Overrides and drag the toon outline Material we imported to the Material slot (Figure 07).
With this render pass set up, the GameObjects in your Scene (in this instance, the characters and the background props), should render with a thin toon outline (Figure 08).
5. Conclusion
Through the use of Layer Masks, we can define how to render a specific set of objects using custom render passes in the URP. We also have the option of using Shader Graph to power the Materials used in each render pass instead of relying on traditional HLSL scripts in ShaderLab.
Toon outline post-processing effects can also be accomplished via a new renderer feature called a Blit, a way of compositing multiple render passes into a single image. The Blit Renderer is available in the package linked in the introduction to this workflow. This method relies on the Sobel edge detection and Posterizing Shaders (which are included alongside the package) to create the toon outline Material.