Customizing New Input Actions
Tutorial
Beginner
+0XP
15 mins
Unity Technologies
When starting out with the Input System Package, you are able to easily use a default game-ready Input Action asset. In this tutorial, however, you will learn how to create and customize a new Input Action asset. This tutorial will instruct you how to set up and link specific buttons, joysticks, or keyboard bindings on your game controller device to be recognized by the Input System.
Languages available:
1. Overview
When starting out with the Input System Package, you are able to easily use a default game-ready Input Action asset. In this tutorial, however, you will learn how to create and customize a new Input Action asset. This tutorial will instruct you how to set up and link specific buttons, joysticks, or keyboard bindings on your game controller device to be recognized by the Input System.
2. Customizing New Input Actions
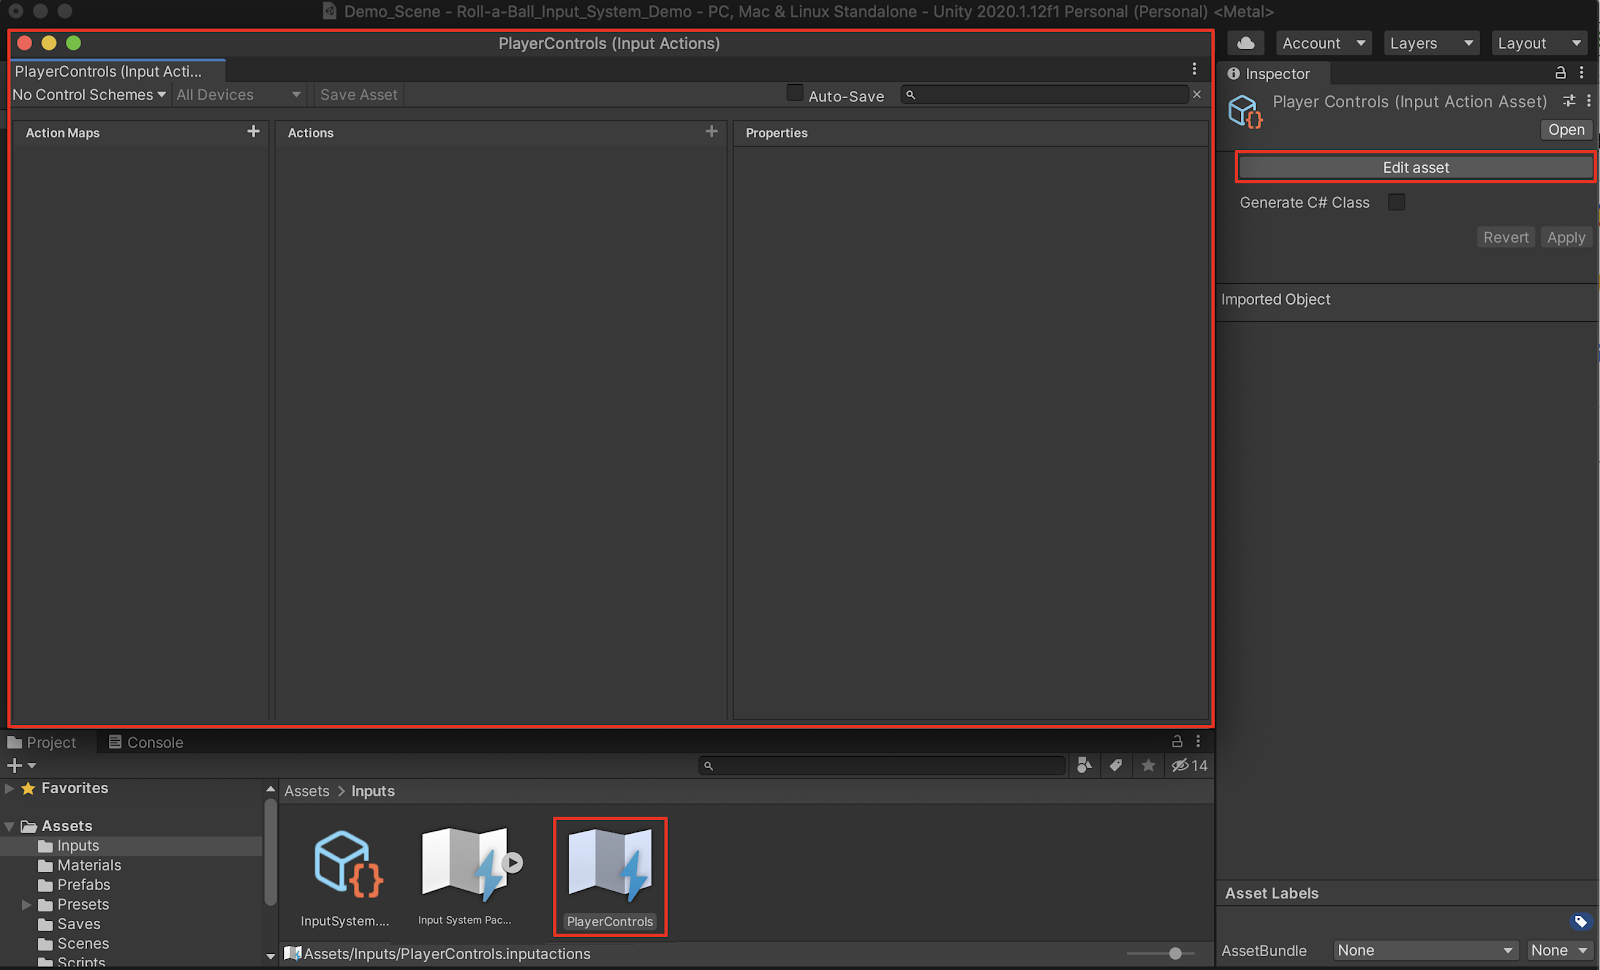
1. Inside your Inputs folder in the Project window, create a new Input Actions asset by selecting the + button at the top left of the Project window, scroll down to the bottom of the drop-down menu, and then select Input Actions. Alternatively, right-click inside the Project window, and select: Create > Input Actions. Rename the newly created Input Actions asset to “PlayerControls”.
2. Select the newly created Input Actions asset in the Project window, and then select the Edit asset button in the Inspector, to open up the Input Actions window.
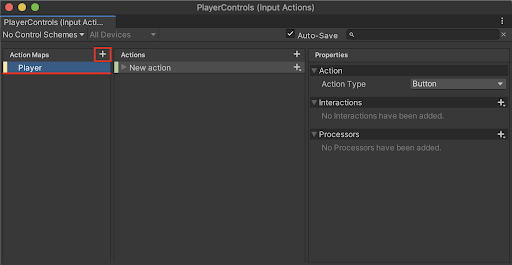
3. On the top left side of the Input Actions window, select the + button next to Action Maps, to create a new Action Map. Action Maps are used to categorize and group together actions. Rename the new action map “Player”.
You will need to bind various game controller buttons to your Input Actions. A button input might trigger any number of game events such as jumping, shooting, or selecting, to name a few. Over time, you may build up a system of buttons to perform different events.
4. In the middle column of the Input Actions window, rename the New Action by right-clicking on the New Action, and selecting Rename from the drop-down menu. Rename the New Action to the generic name: “Buttons”.
5. Select the triangle to the left of the Buttons action to expand its contents, and then select the line below, labeled <No Binding>. Select the empty field next to the Binding Path in the right column of the Input Actions window, and then select the type of device you are using. Choose Gamepad to bind a game controller button.
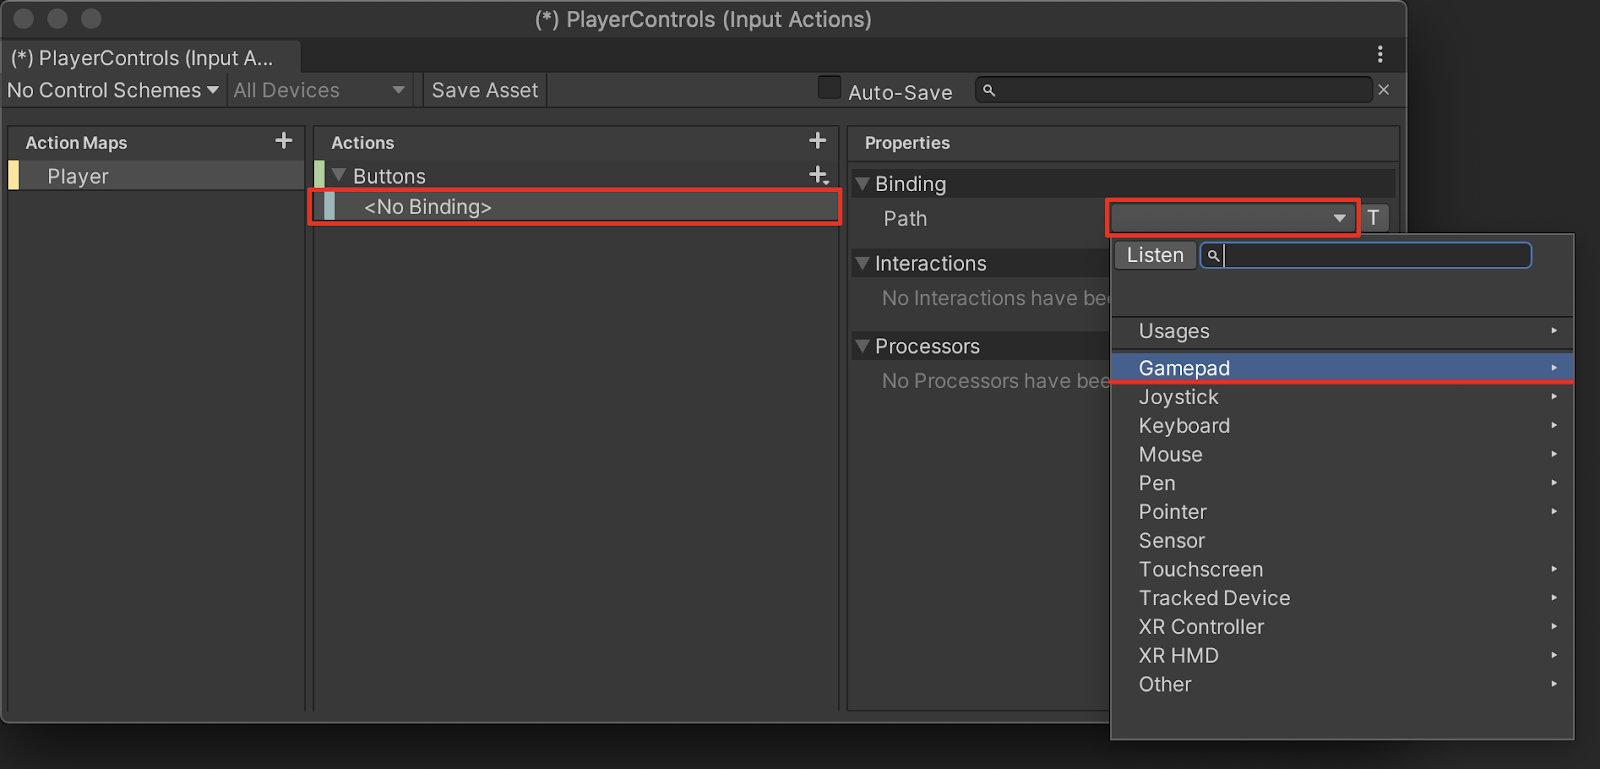
6. Within the Gamepad section of the Binding Path drop-down menu, a list of corresponding game controller inputs are shown. Select the Button East option.
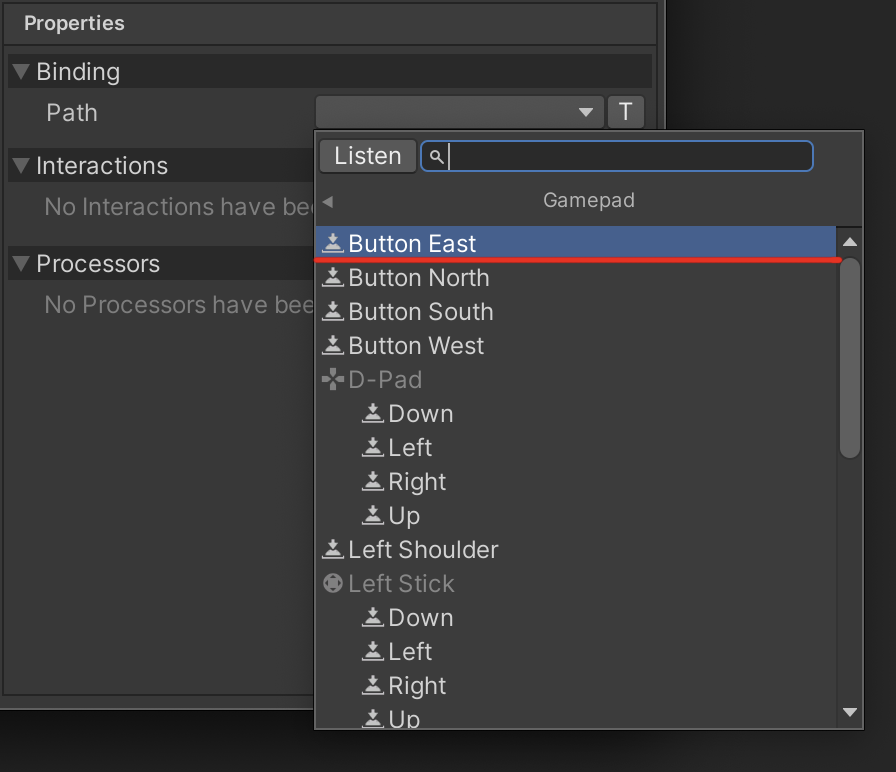
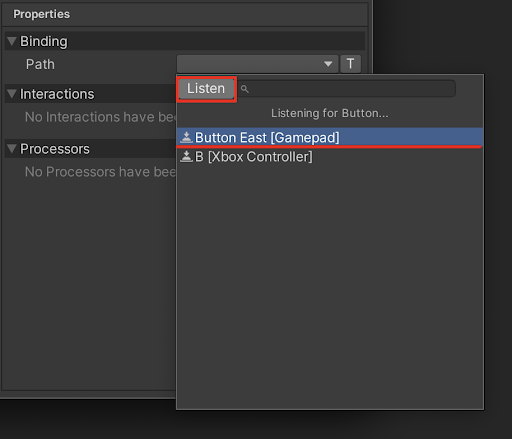
7. To detect the specific game controller button automatically, select the Listen button, and then physically press the B button on your game controller. The corresponding button will display in the menu. Select the corresponding option labeled Button East [Gamepad] in the Listen window.
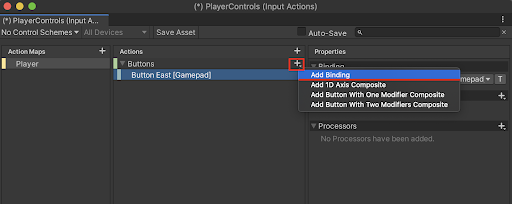
8. To bind another button from your device, select the + button in the center column next to the Buttons Action, and select Add Binding from the drop-down menu.
9. Repeat steps 5 through 7 to bind the X button to the corresponding Button West [Gamepad] option.
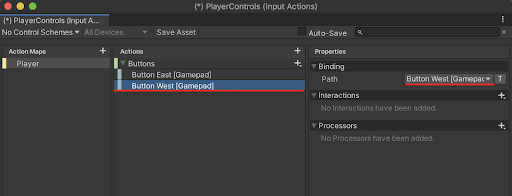
Your Button Actions are now bound to the X and B buttons on the game controller. Next, you will need to bind the thumb-stick movements to your Input Actions. Thumb-stick inputs typically control game movements along multiple axes.
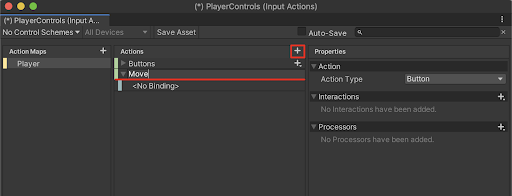
10. In the middle column of the Input Actions window, select the upper + button to add another Action. Rename the New Action to “Move.”
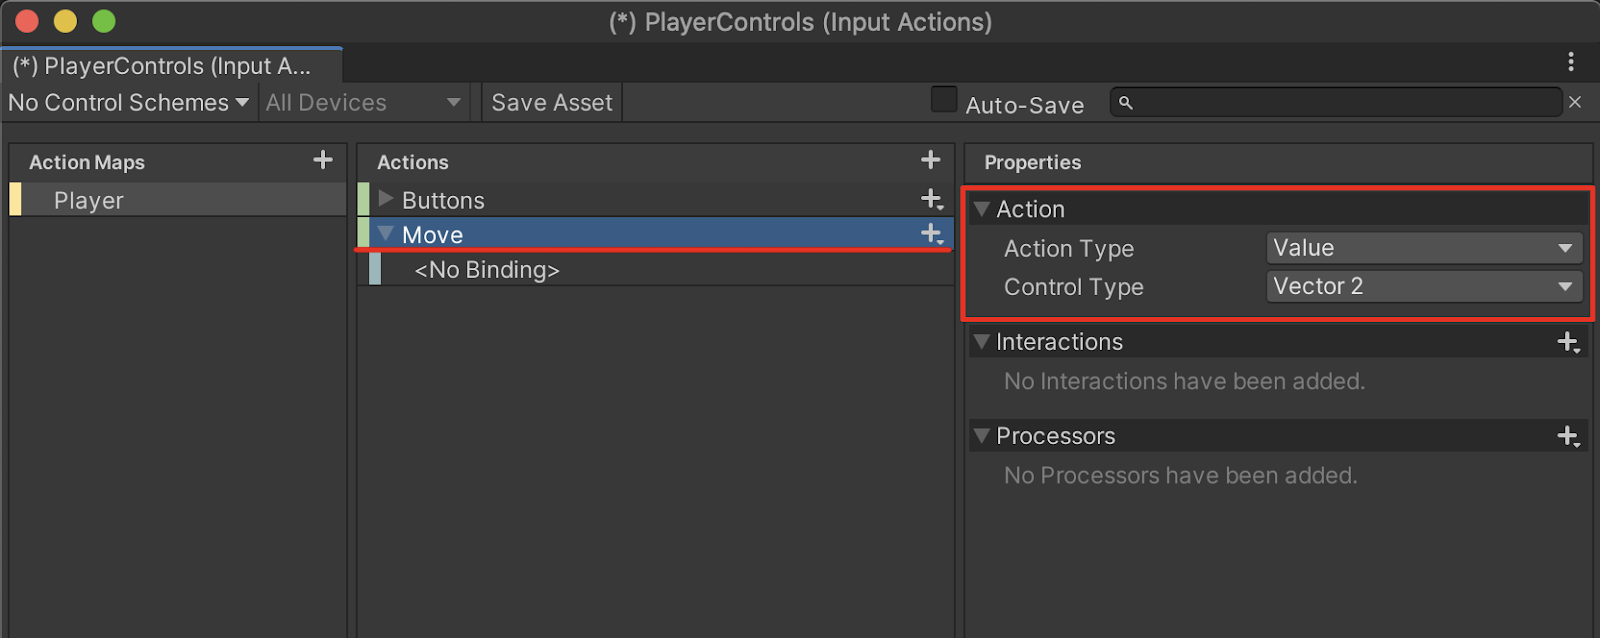
11. You will now configure the game controller to enable thumb-stick movements to correspond with movement along multiple axes. Ensure that the newly created Move Action is selected. On the right column of the Input Actions window, change the Action and Control Types. First select the Action Type field labeled Button, and then select Value from the drop-down menu. Set the Control Type in the field below to Vector 2.
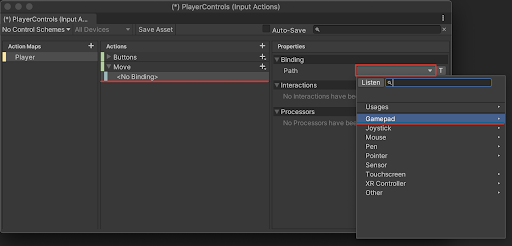
12. Select the line below the Move Action labeled <No Binding>. Select the empty field next to the Binding Path in the right column of the Input Actions window, and select the type of device you are using. Choose Gamepad to bind your game controller thumb-stick.
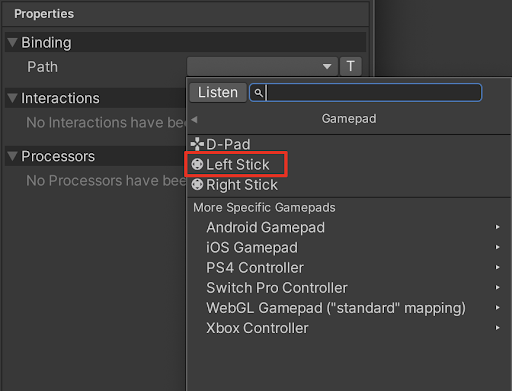
13. Within the Gamepad section of the Binding Path drop-down menu, a list of corresponding game controller inputs are shown. Select the Left Stick option.
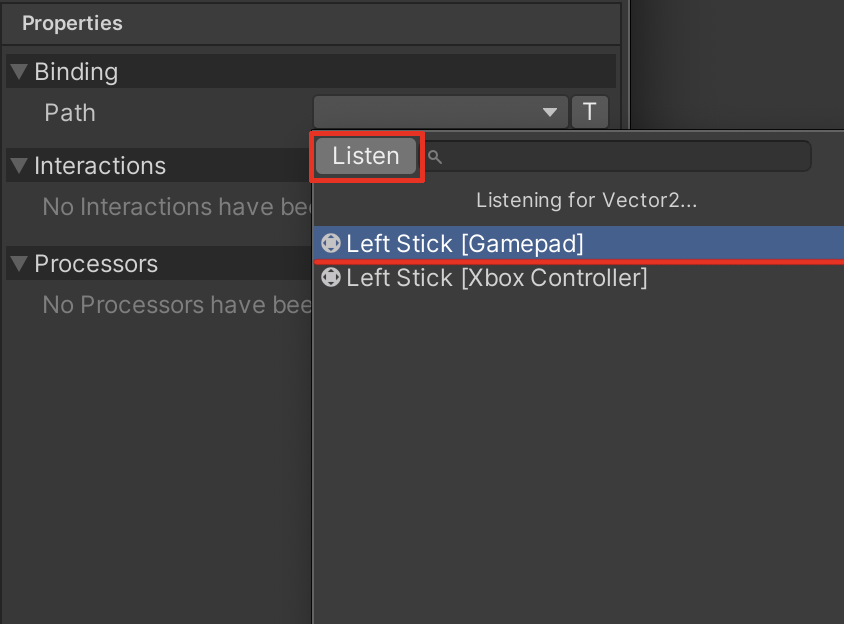
14. Again, to detect the specific game controller thumb-stick automatically, select the Listen button, and physically move the left thumb-stick on your game controller. The thumb-stick you move on the game controller will display in the menu. Select the corresponding option labeled Left Stick [Gamepad] in the Listen window.
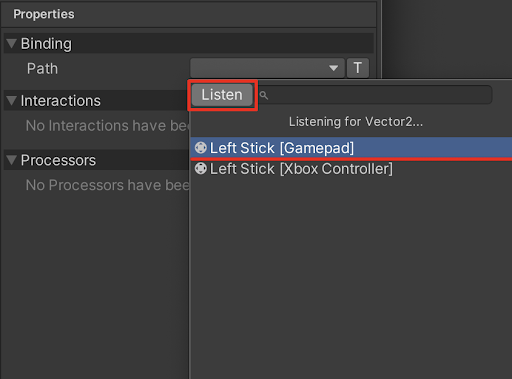
Your Move Action is now bound to the Left Stick of the game controller.
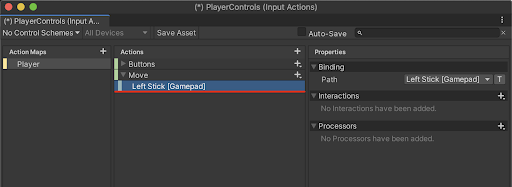
You are now ready to save your Input Action asset.
15. Save your changes by selecting the Save Asset button in the Input Actions window. Optionally, select the checkbox next to Auto-Save to save your Input Actions automatically.
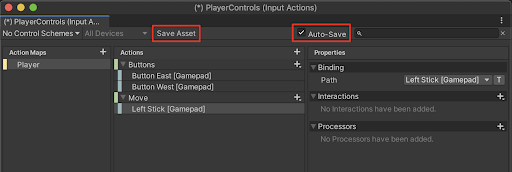
16. Close the Input Actions Window.
In order to control the player’s movements with your new custom Input Actions, you must first connect the Player Input to the new Input Action. You will do this by changing the Action field in the Player Input component.
17. Select your player in the Hierarchy window. Within the Player Input component in the Inspector, select the object loader circle button to the right of the Actions field. Select PlayerControls from the Select InputActionAsset popup window to switch to the custom Input Action asset. Alternatively, select the asset itself in the project window, and drag it into the Actions field.
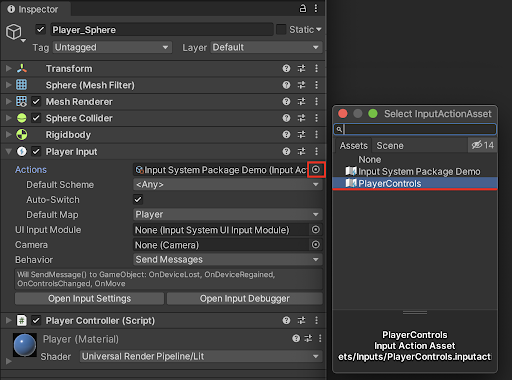
18. Test your player’s movement by entering Play Mode and moving the game controller’s left thumb-stick. You should be able to see the player’s movement correspond to the new Input Action asset.
3. Adding Keyboard Bindings to the Custom Input Action
You will need to bind keyboard inputs to your Input Actions. The keyboard inputs are set up much in the same way as binding button and thumb-stick inputs. English region-based keyboard inputs typically include the WASD or arrow keys to control game movements, as well as any other key on the keyboard to trigger game events. For this example, we will add keyboard inputs to the existing Move Action, to enable the WASD keys to also control movement.
1. To bind keys from your keyboard, select the + button in the center column next to the Move Action, and select Add 2D Vector Composite from the drop-down menu.

A new 2D Vector Composite has been added to the Move Action, with the Up, Down, Left, and Right directions awaiting binding.
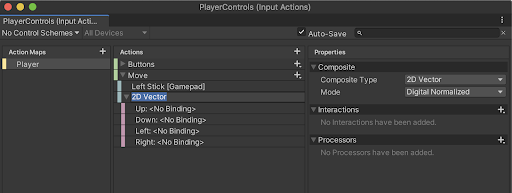
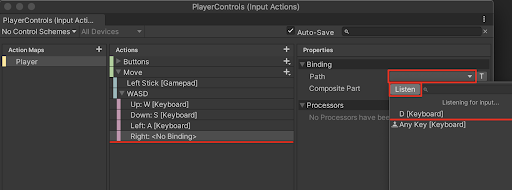
2. Rename the 2D Vector to “WASD” or your regional equivalent. Next, add bindings to the 4 directions. For each direction, select the empty field next to the Binding Path in the right column of the Input Actions window, select the Listen button, type a key on your keyboard, and then select the detected key from the selection.
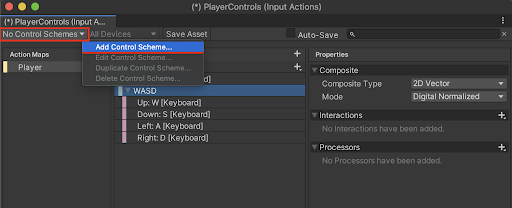
To organize and keep track of different device inputs, Control Schemes are used. Set up a Control Scheme for both keyboard and gamepad inputs.
3. In order to set up a Control Scheme, select the field labeled No Control Schemes in the top left of the Input Actions window, and then select Add Control Scheme from the drop-down menu.
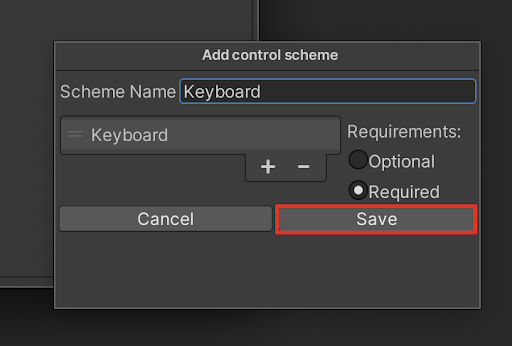
4. Type in “Keyboard” in the Scheme Name field, select the + button, and then select Keyboard from the Add Control Scheme window.
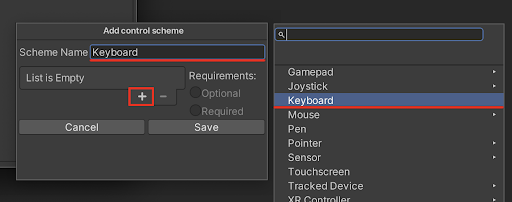
5. Save the Control Scheme by selecting the Save button.
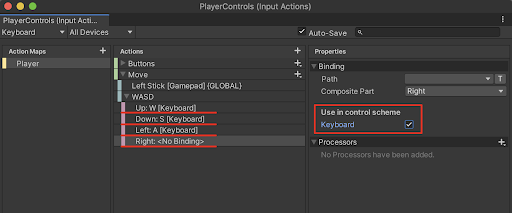
6. Select each W, A, S, and D key bindings in the 2D Vector Composite, and add a check to the Keyboard checkbox for use in the Control Scheme.
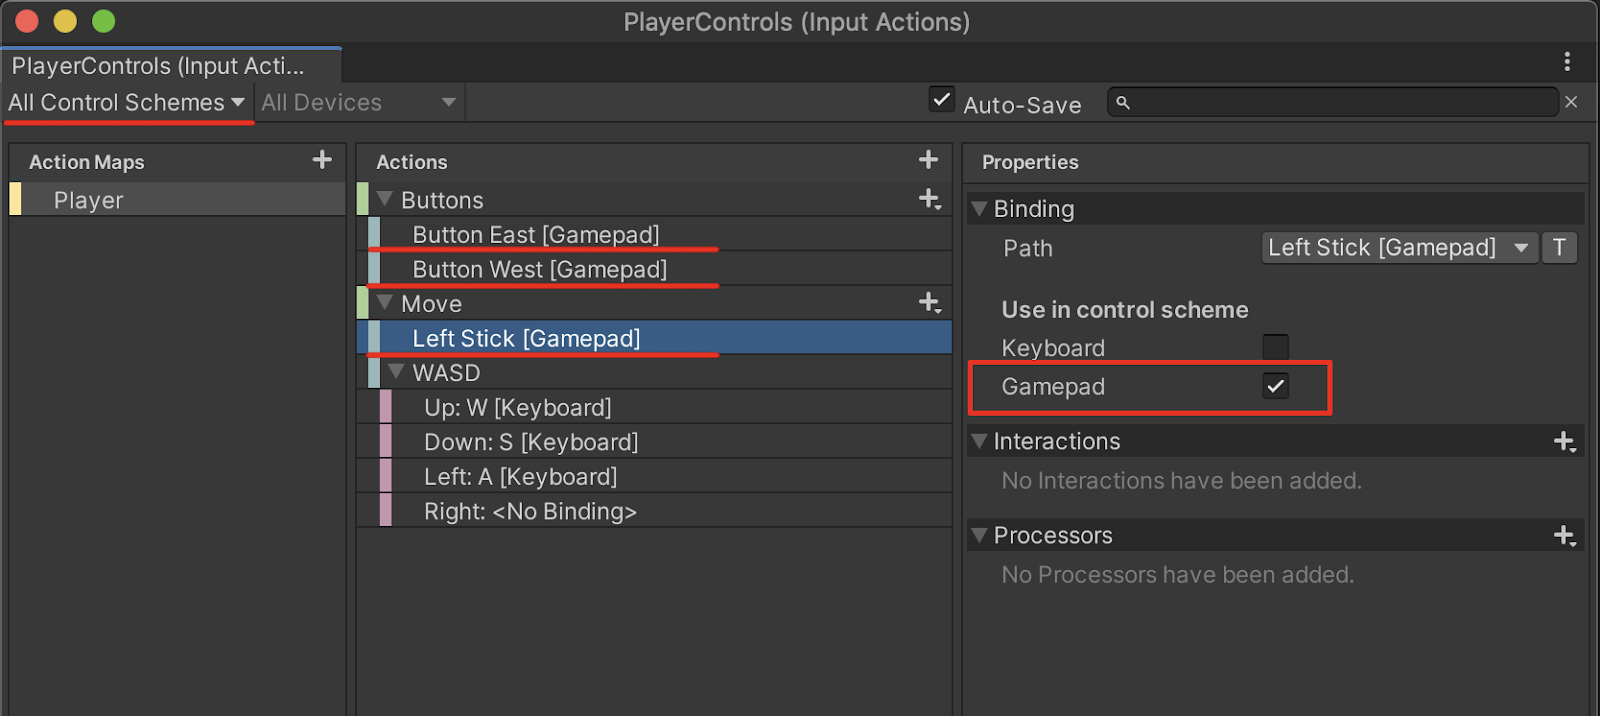
7. Add a new Control Scheme for the game controller device in the Input Actions window by repeating the process shown in steps 3 through 6. Add a new Control Scheme named “Gamepad”, and select the Left Stick binding, Button East, and Button West to the Gamepad Control Scheme. Ensure that the All Control Schemes menu is selected from the top left drop-down menu.
4. Next Steps
You are now able to create new custom inputs to your projects. You are able to configure them to work with any number of device inputs. Additionally, you can download some of the example input assets from the package manager window, to explore and delve more deeply into configuring custom inputs for different applications.