
Customizing URP Asset Settings
Tutorial
intermediate
+10XP
30 mins
(108)
Unity Technologies
In this tutorial we will be exploring the Universal Render Pipeline asset and its settings. We will create three pipeline assets that we can use in our project depending on what device or quality level we are targeting. You’ll want to first download the provided URP Demo Starter Project from the Tutorial Materials tab of this tutorial and open it in Unity.
Resources
Languages available:
1. Customizing URP Asset Settings
This tutorial was verified using Unity 2019.4.12f1 LTS and Universal RP 7.3.1
In this tutorial, we will be exploring the Universal Render Pipeline Asset and its settings. We will create three pipeline Assets that we can use in our project depending on what device or quality level we are targeting.
You’ll want to first download the provided URP Demo Starter Project from the Project Materials tab of this tutorial and open it in Unity.
Once the project has been opened, find the URPDemo_Starter Scene located in Assets\_CompletedDemos\CockpitView.
Now we want to add the URP to our project. Click Window > Package Manager, and in the top left of that window, select All packages.
Scroll down the list and select Universal RP, then click the Install button in the lower right. This will install the Universal Render Pipeline to your project and also give your project access to Shadergraph, which allows you to create your own Material graphs for the URP.
We now need to create a URP Asset that will tell our render pipeline what features and quality settings we want to use in our project. In the Project view, right-click the Assets folder and choose Create > Rendering > Universal Renderer Pipeline > Pipeline Asset (Forward Renderer) and name this new Asset URP_High.
In the Project view, you will see that two new Assets have been created — a URP_High Asset, which is a collection of all our settings, and a URP_High_Renderer, which is the renderer itself. Select the URP_High Asset. In the Inspector view, you will see several sections of settings that you can alter to customize the renderer.
2. Universal Render Pipeline Asset Settings
General
In this section, we have our renderer list that contains our URP_High_Renderer. You also can enable Depth Texture or Opaque Texture if you need the camera to output that information for your custom Shaders. For the purposes of this tutorial, we will be leaving these disabled.
The last option, Terrain Holes, and is enabled by default. You would disable this option if you are not using a terrain or if your terrain does not have holes in it. Disabling Terrain Holes will decrease your build time. Since we are not using a terrain in this tutorial, you can disable this option. Your General settings should look like this:
Quality
This section contains our render quality settings and is where you should start if you need to optimize your rendering.
The first setting is HDR, which we want to enable because this is our high-quality Asset and will let us use a wide range of lighting or post-processing effects (like Bloom). You should disable this setting if you are targeting lower-end devices or just need better performance.
The next setting is Anti Aliasing, which is used to smooth out the edges of objects to avoid a jagged, stair-stepped look or flickering. It’s set to Disabled by default, but we will set it to 8x for this Asset. If you are noticing any frame drops or rendering slowdown, you would want to turn down this option or turn it off completely.
The last option is Render Scale. You can use this to scale your target resolution. This does not affect the resolution of your target device. You would use this slider to decrease render quality to improve performance or upscale the game rendering to improve quality. Since we are working on our high-quality Asset, change this slider from 1 to 2. Your Quality settings should look like this:
Lighting
In this section, we will be changing settings that affect the light in our Scene. The first setting is the Main Light. This is the main directional light in our Scene that is usually set as the Sun Source in our Lighting Settings. If no Sun Source is specified, this will consider the brightest Directional Light in our Scene as our main light source. This setting has two options, Per Pixel, which is the default, and Disabled, which will cause URP to not render a main light. Keep this set to Per Pixel.
Main Light has several sub-settings:
- Cast Shadows: Turn this off if you have baked your lighting and do not need shadows. We will keep it on for this tutorial.
- Shadow Resolution: This will set the level of resolution used by the shadows. The higher you set this, the more accurate and sharp your shadows will be, but the performance cost will be higher. Set this to 4096 since this is for our high-quality Asset.
- Additional Lights: You only need to set this to Per Pixel if you have more than one light in your Scene. We will want to add some lights so we can see what this setting does. Right-click in your Hierarchy and add four Point Lights around the two Dropships so we can see the light on the Dropships.
The sub-settings for Additional Lights are:
- Per Object Limit: This tells the renderer how many of the non-Main Lights are allowed to affect a GameObject in the Scene. We will set this setting to four because we created four additional lights.
- Cast Shadows: This setting will tell the renderer if it should render shadows for these additional lights. We will leave this off for this tutorial.
- Shadow Resolution: This will be grayed out since we did not turn on Cast Shadows, but you can use it like the Shadow Resolution option for the Main Light.
Your Lighting settings should look like this:
Shadows
The Shadow settings let us go more in depth on how we want our shadows to look and behave. These settings will impact performance, so you can optimize them if you’re having performance issues. The Shadow settings are:
- Distance: This will tell the renderer how far in front of the camera objects can cast shadows. If the camera is farther from the object in units than this setting, it will not render the shadows. This can consume a lot of memory, so for this Scene, we can set it to 50.
- Cascades: More cascades mean more-detailed shadows near the camera. We will set this to Four Cascades, but if you need to increase performance, you can lower this to Two Cascades or even No Cascades.
- Depth Bias and Normal Bias: We will leave these settings at 1. Alter these settings only if you’re noticing banding or shadow artifacts on your objects.
- Soft Shadows: This setting will smooth the filtering on your shadows to help avoid pixelation. We will turn this on, but keep in mind that it will run a filter when rendering and can slow down performance.
Your Shadow settings should look like this:
Post-Processing
This section will let you change some global post-processing settings. The Post-Processing settings are:
- Feature Set: This setting will let you choose between using the Integrated set or the Post Processing V2. The Post Processing V2 will become deprecated in the future, so keep this setting on Integrated.
- Grading Mode: This is where you can select the color grading that the project uses. You have two options: High Dynamic Range or Low Dynamic Range. Use High Dynamic Range if you need the color grading to be applied before tonemapping and be high precision. The Low Dynamic Range will apply the color grading after the tonemapping and uses a more limited color range. Since we’re not using this project for architectural visualization or motion picture production, you can leave this setting on Low Dynamic Range.
- LUT Size: This will set the size of the look-up Textures used in the color grading. The higher this value is set, the more precise the color grading will be — but this will increase memory use and impact performance. You can leave this at 32.
Your Post-processing settings should look like this:
Advanced
Our final section is the Advanced section. This is where you will find less common settings to really fine-tune your renderer. The Advanced settings are:
- SRP Batcher: This will batch different Materials that share the same Shader. This is a good option to select because it will speed up CPU rendering without affecting GPU performance.
- Dynamic Batching: This will batch small dynamic objects that use the same Material. If you’re targeting a platform that does not support GPU instancing, you should enable this option. We are creating this project to run on desktops, so we will leave this disabled.
- Mixed Lighting: If you have lights that have their Mode set to Mixed, you should enable this setting. A mixed light combines dynamic shadows with baked lighting. We will leave this enabled, but if you’re creating a project that does not use mixed lighting, you can disable this setting.
- Debug Level will let you choose the debugging information the render pipeline will generate. You can choose between Disabled, which turns this option off or Profiling, which will allow you to view the generated information tags in the FrameDebugger. We will leave this set to Disabled.
- Shader Variant Log will generate information about Shader Variants and Shader Stripping. You can leave this set to Disabled. The other choices are Only Universal, which will log information on all URP shaders, or All, which will log information for all Shaders in the build.
Your Advanced settings should look like this:
3. Creating URP Assets with Different Settings
Now that we have set up our high quality Asset, we want to create two more Assets by right-clicking the Assets folder and choosing Create > Rendering > Universal Renderer Pipeline > Pipeline Asset (Forward Renderer). Name these Assets URP_Med and URP_Low.
The URP_Low Asset will be our renderer for use with our least-powerful platform or mobile device and the URP_Med Asset will be a balance between performance and quality.
Set your URP_Med settings to match the following screenshot:
Set your URP_Low settings to match the following screenshot:
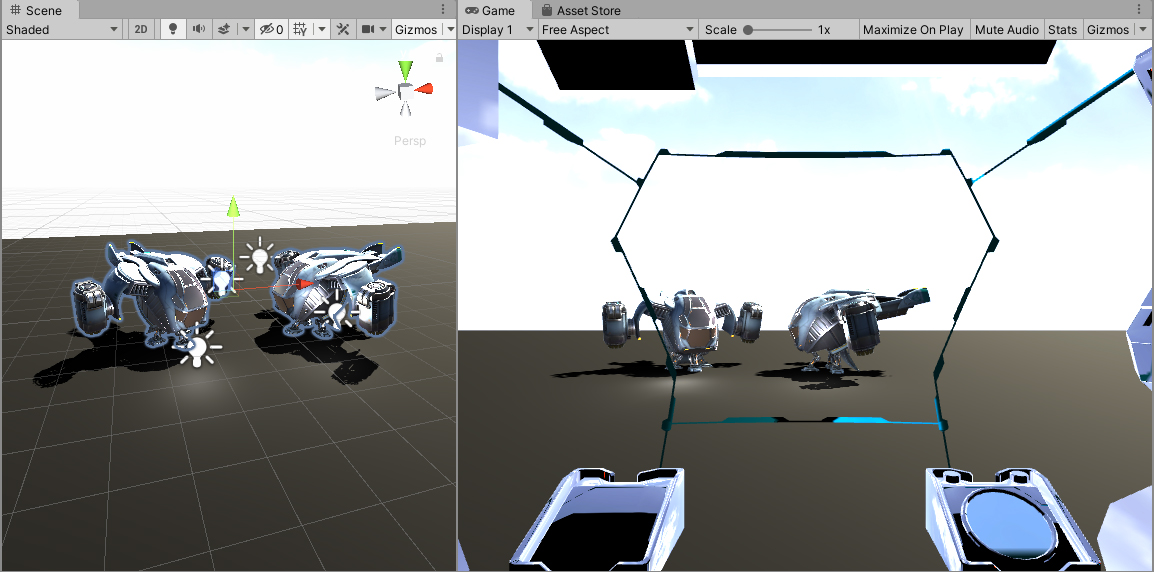
In your Scene view, focus on Dropship1 and Dropship 2 by selecting both objects in the Hierarchy, pressing F on your keyboard and zooming in. This will give us a good view to observe how our different render pipeline Assets affect the quality of our Scene.
We can now tell our project which renderer to use. Open Project Settings by going to Edit > Project Settings.
Click Graphics on the left side of the window. At the top, you’ll see the Scriptable Render Pipeline Settings field. Assign the URP_High Asset here.
You will notice that everything in your Scene view and your Game view is pink. This is because the Materials and Shaders are not compatible with URP.
This is to be expected when you are converting an existing project to a new render pipeline. The Materials and Shaders that are in the Scene are not compatible with the URP. We can easily fix this by going to Edit > Render Pipeline > Universal Render Pipeline > Upgrade Project Materials to UniversalRP Materials and then selecting Proceed in the Material Upgrader window that pops up.
Take a look in the Scene view and the Game view and take note of the shadows, light reflection on the Dropships, and the smooth anti-aliasing, as shown in the screenshot below.
Go back to the Project Settings and assign URP_Med to the Scriptable Render Pipeline Settings field.
Notice there are fewer Point Lights reflecting off the Dropships. The shadows are a little more blocky and there is some aliasing on the Dropships.
Now assign the URP_Low Asset to the Scriptable Render Pipeline Settings field inside of the Graphics tab in Project Settings.
We turned down the settings on this pipeline further than you would in production to make the differences noticeable. The Render Scale is noticeably lower, you can see aliasing on all objects, and the shadows are of considerably lower quality, but this version of the Scene will be more performant.
If you turn on Stats in the Game view and play the Scene, you can change the pipeline Asset and see how it would affect performance:
4. Conclusion
Congratulations! You have set up your first pipeline Assets with the Universal Render Pipeline and seen how making a few changes to the pipeline settings can affect visual quality and runtime performance.