
Editing with ProBuilder
Tutorial
Beginner
+10XP
60 mins
(863)
Unity Technologies
Your new Scene already has a square of ground that Ellen can run around on. Now let's take a closer look at it.
Languages available:
1. Greyboxing
- Navigate to the Hierarchy window.
- Select the GameObject named Plane.
This Plane is created with ProBuilder, a tool that enables you to create and edit 3D objects in Unity. The ProBuilder window is open because there is a ProBuilder Mesh in the Scene.
If it’s not open, you can open it from the top menu:
- Go to Tools > ProBuilder > ProBuilder Window.
Greyboxing
Greyboxing is the traditional technique of blocking out the level with simple shapes to see if the level design supports the gameplay before creating the final art assets for the level.
Greyboxing is a technique that game developers use to prototype level designs. Instead of pulling in all of your art Assets, you block the level out using simple shapes. In game development, this happens in the early stages of level design, while you’re still trying out ideas. Greyboxing also allows you to start outlining and planning your levels before the artwork is finished.
ProBuilder is a great tool for Greyboxing, so let’s use it to create a new shape in our Scene:
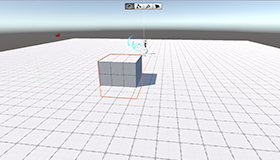
- Click on Tools > ProBuilder > Editors > Open Shape Editor Menu Item.
This opens the Shape Tool window and creates a Cube in our Scene.
The Shape Selector dropdown allows you to select which shape you want to add.
For now, let’s create a Cube, which is the default shape:
- Select Cube.
- Set the Dimensions to 3,3,3.
- Select Build Cube.
You should now have a cube in the middle of the Scene. The Plane is a little higher than the center of the cube, so the two GameObjects intersect.
You can move the Cube with the Move Tool. Click on any of the arrows in the Scene view to move it where you like.
ProBuilder contains many tools and techniques for changing the shape of any object you create. To learn more about creating 3D models inside of Unity using ProBuilder, check out the ProBuilder101 tutorial and the documentation.
For now, let’s remove this cube:
- Select Cube in the Hierarchy window.
- Press the Delete (Cmd + Backspace on macOS) key on your keyboard.
Next, let’s move on to editing and painting the ground Plane.
2. Making an Acid Pool
Polybrush
The ground is made of a ProBuilder Plane. These are usually flat, but by using PolyBrush we can create an uneven surface and paint textures to make this Mesh resemble the ground. We’ll be making a dip in the ground where we can add in a pool of Acid as a hazard for the player character.
Mesh: A mesh consists of triangles arranged in 3D space to create the impression of a solid object. A triangle is defined by its three corner points or vertices.
Note: PolyBrush is currently in Beta, so you may experience some bugs using this tool.
We can make this Plane a bit larger for the level we will be building by scaling it:
- In the Hierarchy window, select the Plane.
- Navigate to the Inspector window.
- Set the Scale of the X axis to 2.
- Keep the Scale of the Y axis at 1.
- Set the Scale of the Z axis to 2.
Let’s open the PolyBrush window and start editing.
- Go to Tools > PolyBrush > PolyBush Window
Note: PolyBrush is currently in Beta, so the layout might be slightly different to the screenshot above.
With the Plane selected:
- In the PolyBrush Window, click the Push/Pull icon.
- Select the Plane and then hover over it in the Scene view.
- The Push/Pull Gizmo appears wherever you move your mouse.
- Left-click to raise the ground by pulling vertices up.
- Hold Ctrl + left-click to lower the ground by pushing vertices down.
Now you know the basics, create a small dip on your Plane using Ctrl + left click to start forming a pool. This doesn’t need to be too deep.
- Click the Push/Pull icon again when you are done editing to deselect the tool.
You should have something similar to the following.
For more information on PolyBrush and how to use it, visit the Tutorials and Documentation
For now, let’s continue to make our first hazard.
3. Adding Acid
To find the Acid, we need to navigate to the Project window. This is where all the Prefabs and tools are stored:
- Go to Assets > 3D GamekitLite > Prefabs > Interactables.
- Left-click and drag the Acid Prefab into the Hierarchy window.
The Acid will appear somewhere in your Scene. In Unity, you can locate a GameObject quickly by Frame Selecting.
- In the Hierarchy window, select the Acid.
- Hover your mouse in the Scene view.
- Press F on the Keyboard.
This will find and frame the Acid in the Scene view.
The Acid is currently too small, so let’s scale it up a little:
- With the Acid selected, press R on the Keyboard for the Scale tool.
- Click and drag on the white box in the middle to make the Acid larger.
The Acid is also in the wrong position. Use the Move Tool (select the Acid and press W) to place the Acid just below the Plane, making it peek through slightly where you have made your pool.
You can continue to position and scale the Acid until you have the results you want.
Tip:
The acid only needs to be just bigger than the space of your pool.
Press Play and test your Scene to check your bubbling Acid pool.
Note: When making a new Scene via the Kit Tools toolbar menu, it will add a default DeathVolume area that is very large in size to allow you sufficient editing space. Be careful when lowering the terrain below this, because Ellen will die on entry.