Explore the Unity Editor
Tutorial
foundational
+10XP
45 mins
20801
Unity Technologies
In this tutorial, you will:
- Explore the windows in the Unity Editor.
- Understand the role of Scenes in organizing your projects.
- Navigate in a Scene to change your view.
- Enhance Unity’s functionality with Packages using the Package Manager.
Materials
Languages available:
1. Overview
Before you get started with your Microgame, let’s take a moment to explore the Unity Editor: its interface, how to navigate it, and some tips to help you get started creating.
2. Before you begin
You’ll have the Microgame open for this tutorial, but you won’t begin the in-Editor tutorials until you’re finished. For now, close the welcome dialog and Tutorials window — don’t worry, we’ll guide you through opening these up again afterwards!
To close the windows:
1. Exit the dialog window by selecting the X icon in the top left corner.
2. Go to the Tutorial window at the far right of the interface. Select More options (⋮) at the top right, then Close Tab.

3. Select Ok to close the reminder prompt window.
3. Unity Editor: First impressions
How did you feel when the Unity Editor first loaded? In this video, our established creators share how they felt when they opened the Editor for the first time.
Download Transcripts
Although it can be intimidating at first, getting comfortable with the Unity Editor is the first step to developing your confidence and achieving your goals with Unity!
4. Introduction to the Unity Editor
The default Unity Editor layout is organized with the most important windows you’ll need positioned to help you complete basic activities. Let’s start by reviewing them:
Unity Editor interface
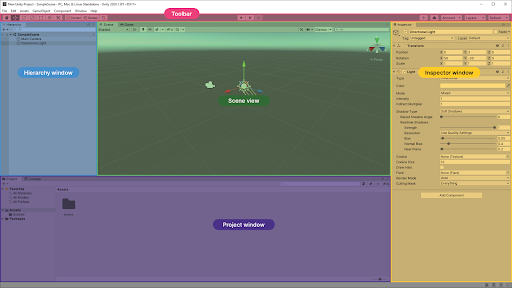
There are five key areas of the basic Editor interface.
Scene view and Game view
In the center of the default Unity Editor layout is the Scene view. This is your interactive window into the world you are creating. You’ll use the Scene view to manipulate objects and view them from various angles.
In the default layout, the Game view also appears in this area; you’ll use the Game view to playtest your game.
Hierarchy window
The Hierarchy is where you can organize all the things in your game world (and the world itself). These things are called GameObjects.
If you add a GameObject to your project in Scene view, it will be listed in the Hierarchy. If you delete a GameObject from the Scene, it will no longer be listed.
Project window
The Project window is where you can find all the files (assets) available for use in your project, whether you use them or not.
The Project window works like a file explorer, organized in folders. You can drag assets directly from the Project window into the Scene view to add them to the Scene.
Note the difference between the Project and Hierarchy windows: the Hierarchy contains all the GameObjects in the current Scene, and the Project window contains all the assets available to your entire project.
Inspector window
The Inspector is where you’ll find and configure detailed information about GameObjects.
When you select a GameObject in Scene view or in the Hierarchy, you’ll see its components in the Inspector. Components describe the properties and behaviors of GameObjects.
Toolbar
The Toolbar is always at the top of the Unity Editor interface. Use the toolbar buttons to select and adjust GameObjects, change your point of view in the Scene, and start and stop Play Mode.
Editor layouts
Use the Layout menu in the Toolbar to change the arrangement of the windows in the Editor. There are several layouts provided, and you can save your own layouts.
The best layout for the Editor depends on what you are doing and your own personal preferences. For example:
- If you’re spending a lot of time configuring components, you might want to dock the Inspector next to the Hierarchy.
- If you’re doing a lot of environment design, you might want to make the Scene view as large as possible.
- If you’re editing the user interface, you’ll want to make sure the Game view is visible.
We recommend you use the default layout while completing this course.
5. Using Scenes in your project
Projects in Unity Editor are organized into scenes. Scenes are containers for everything in the experience you are creating.
One way to think about scenes is as discrete experiences. For example, each level in a game could be a separate scene, and the game’s main menu could be another.
A Unity project can have one scene or more than a hundred, depending on its scope and complexity. There aren’t strict rules about exactly how you should organize a Unity project into scenes, except that a project in Unity must have at least one scene.
Review the scenes in the Microgame
Let’s review the scenes in your Microgame project:
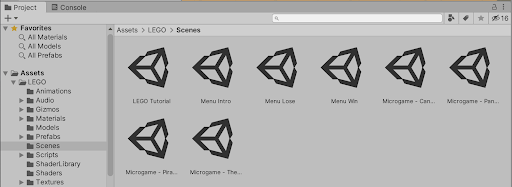
1. In the Project window, go to Assets > [name of your Microgame] > Scenes. This folder contains all the Scenes in the project.
2. Review the names of the scenes in the folder.
In the LEGO® Microgame, there are eight scenes:
- One scene for the in-Editor tutorial experience
- Three menu scenes
Four example Microgame scenes
Later in this Pathway, when you complete Introduction to 3D and Introduction to 2D, you’ll create your own scenes from scratch.
6. Navigating the Scene
When working in Unity Editor, navigating in the Scene view is very important. One way to think about navigating in this window is like operating a drone camera — it lets you examine your GameObjects from any angle or distance.
With practice, you can learn to navigate with ease. There are also more general settings you can use to configure the Scene view.
Let’s quickly review the basics:
- Pan: Select the Hand tool in the Toolbar, and click and drag in the Scene view to move your view.
- Zoom: Holding Alt (Windows) or Option (macOS), right-click and drag in the Scene view to zoom.
- Orbit: Holding Alt (Windows) or Option (macOS), left-click and drag to orbit around the current pivot point. Note: this option is not available in 2D mode.
- Focus (Frame Select): When a GameObject is selected, select F with your cursor in the Scene view to focus your view on that GameObject. Note: If your cursor is not in the Scene view, Frame Select will not work.
Flythrough mode
You can also use Flythrough mode to navigate in the Scene view by flying around in first person, which is common in many games. To do this:
- Click and hold the right mouse button.
- Use WASD to move the view left/right/forward/backward.
- Use Q and E to move the view up and down.
- Select and hold Shift to move faster.
Note: Flythrough mode is not available in 2D mode. Instead, holding the right mouse button down while moving the cursor pans around the Scene view.
For further guidance, you can review a complete overview in the Unity Manual.
7. Introduction to packages
Packages contain various enhanced Unity Editor features that help you create the experiences you want. There are some built-in packages that are installed by default, and you can also add packages to create a custom Editor setup based on your exact needs. Features are “packaged” apart from the Unity Editor to reduce the initial download size and time required to install a Unity version.
There is one package that might be useful to you later in this course, and we’ll show you how to install it.
Review the Package Manager
You will use the Package Manager window to install, remove, and update packages that add functionality to the Unity Editor.
To open the Package Manager:
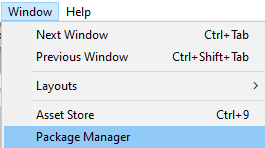
1. In the top menu, go to Window > Package Manager.
2. By default, the window will show the Unity Registry, listing all the available packages you can use to enhance Unity Editor. There are quite a lot of packages!
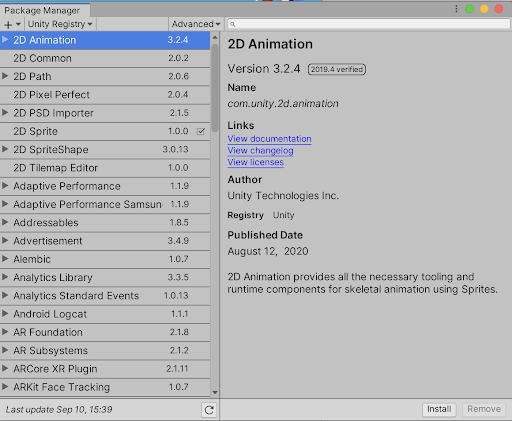
Should you ever need specific information about a particular package, you can find each package’s documentation in the Unity Manual.
Beyond the functionality provided by the core Editor and packages, as you gain experience, you might need more custom tools to achieve your goals. This is possible through both third-party plugin integrations and by creating your own in-Editor tools. Keep this in mind as you become more experienced — your possibilities are limitless!
Packages in your project
Let’s review the specific packages in your Microgame project.
3. In the left-hand corner of the window, select the package scope drop-down menu and choose In Project.
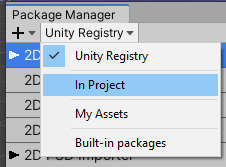
These are the additional packages that the team which created the Microgame used to craft the player experience that you customized.
4. Let’s double-check that you have a package to help you to share your work with others later in this course. Scroll the list of in-project packages and check if you have the WebGL Publisher package. If you do, skip the next step.
5. If you do not have the WebGL Publisher package as indicated by a checkmark, return to the Unity Registry and select it. Then select the Install button to add it to the Unity Editor.
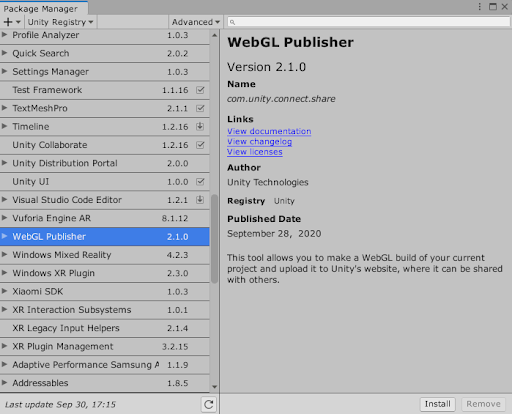
6. When installation is complete, close the Package Manager window.
Assets in the Package Manager
Another useful feature of the Package Manager is the My Assets section, which catalogs assets you have imported from other sources — including the Unity Asset Store, which you will visit later in this course.
In the left-hand corner of the window, select the package scope drop-down menu and choose My Assets.
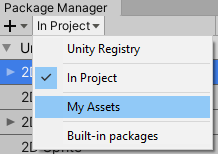
You will see a list of assets used in the Microgame, plus any assets you might have imported already. Later, you will use this window to bring new assets into Unity to use in your own projects.
8. Unity Editor tips and tricks
In this video, Unity creators share some of their best tips and tricks to help you develop your confidence in the Editor.
Download Transcripts
9. Summary
In this tutorial, you explored some of the basics of Unity Editor. Now you’re ready to have a go at completing your chosen Microgame!