
Get started with Shader Graph
Tutorial
Beginner
+10XP
30 mins
322
Unity Technologies
Now that you know the basics of shading, you have the knowledge to go even further — to create your own shader. With Shader Graph, you can easily apply your knowledge to create new and exciting effects.
By the end of this tutorial, you'll be able to:
- Explain Shader Graph and its uses
- Create a new shader in Shader Graph
- Navigate in the Shader Graph editor window
- Connect commonly used Shader Graph nodes to create desired effects
- Make a shader with configurable material properties
- Make a material from a custom Shader Graph shader
Resources
Languages available:
1. Overview
There are many interesting effects you can create with shaders and materials, and you are not limited to the shaders that Unity provides. Shaders are scripts that you can manipulate if you know the coding language. Although learning that language is outside the scope of these tutorials, there is a tool that makes coding shaders easier: Shader Graph.
Shader Graph allows you to create specialized shaders without the need to write code. In particular, you can combine textures and make them move in a fragment shader or even change the positions of vertices in a vertex shader. Professional technical artists create custom shaders to implement specialized artistic styles and to create complex substances like flowing lava, storm clouds, and vegetation. The possibilities are nearly endless!
In this tutorial, you will create a new shader with visual effects you could never achieve with the URP/Lit Shader you have been using. Like a professional technical artist, you’ll be developing this custom shader so that other artists (including yourself) can create materials with it.
By the time you’re done, you’ll have interesting new materials for your artistic composition, and you’ll have new ideas for more custom shaders.
2. Open Shader Graph
Shader Graph, as its name implies, helps you to build shaders using flowchart-like graphs. As you create your graph, you can see the shader’s default material in real time, which allows you to experiment easily.
Take a look at a prototype of the shader you will be building. There are two on display in the gallery, on the plinths across from Ellen. To examine the Shader Graphs for these shaders:
1. In the Project window, navigate to the Assets > CreativeCore_Shaders > ShaderGraphs folder. Inside this folder you will see four assets: two materials and two shaders created with Shader Graph.
2. Double-click the Example_Shimmer shader graph asset to open it. The Shader Graph window will open and you will see the graph.
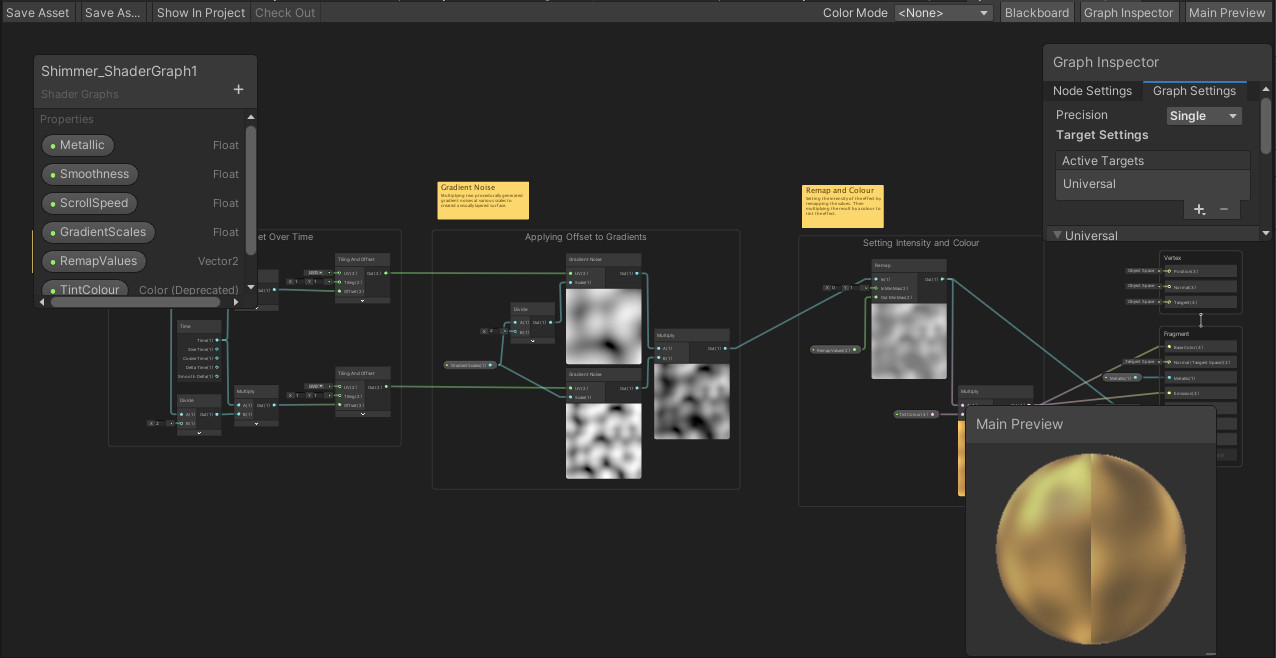
The Shader Graph window
If you like, you can open the completed Shader Graph shader, shown above, and refer to it as you go. You’ll start your own shader from a new blank Shader Graph window:
1. In the Assets > CreativeCore_Shaders > ShaderGraphs folder in the Project window, right-click and select Create > Shader Graph > URP > Lit Shader Graph. This will create a new URP shader in the folder.
2. Name the new shader “Shimmer_ShaderGraph” or anything you like.
3. Double-click your shader to open it in a new Shader Graph window.
When you examine the Shader Graph window, you’ll see these features that you will use when creating your shader:
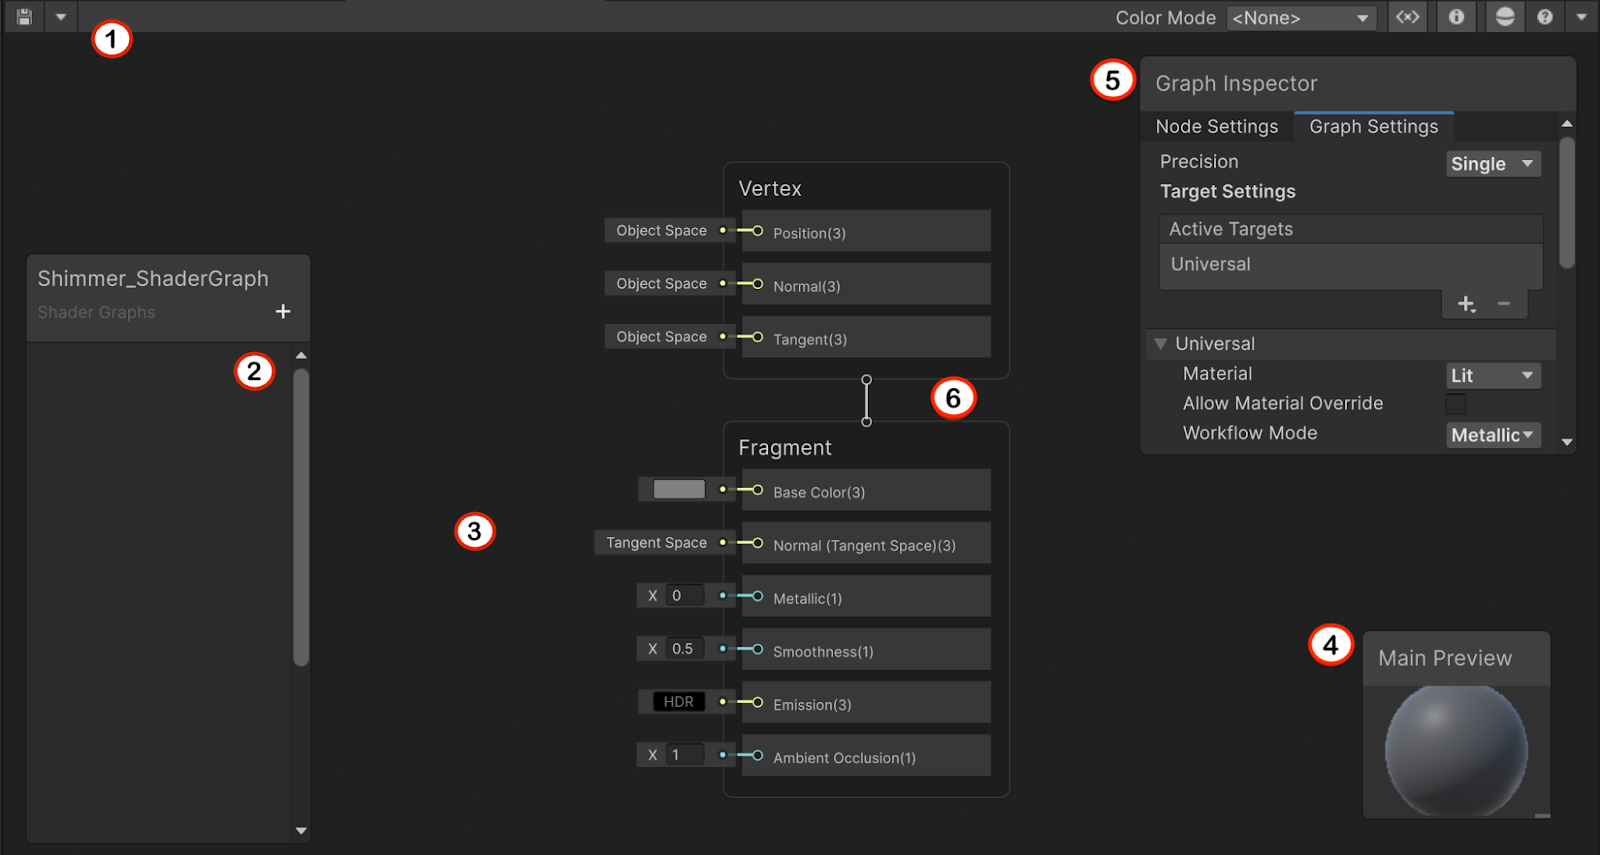
- The Shader Graph toolbar (1) is where you will save your shader asset.
- The Blackboard (2) contains the properties that will be available to artists who use this shader to create materials. Here you can define property types as well as their names, attributes, and default values.
- Your workspace (3) is where you will create the node graph of your shader.
- The Main Preview window (4) will give you a real-time update of what your shader looks like and how it behaves.
- The Graph Inspector window (5) will show you the current settings, properties, and values of any node you have selected.
- The Master Stack (6) is the end point of a Shader Graph that defines the final surface appearance of a shader. It lists the major shader properties of a Vertex and a Fragment shader and provides you with the end nodes where you will plug in the necessary values.
Practice moving around in the graph:
- Pan: Middle-click and drag, or hold Alt (Windows) or Option (macOS) and click and drag.
- Zoom: Rotate the wheel or use your trackpad zoom.
- Focus and zoom in: Select an element and press the F key.
- Fit to window: Press the A key.
For complete documentation on the Shader Graph user interface, consult the Shader Graph Window documentation in the Unity Manual.
3. Add a procedural map
The goal of this tutorial is to create a custom shader with a glowing, transparent, shimmering effect. You can follow these steps to re-create the shader in the gallery — or feel free to experiment as you go!
The basic shimmer is made with a procedural noise map. Procedural means that the texture is created by some formula or algorithm, not from an image or other physical source. Shader Graph provides a few procedural noise maps to choose from. Each one generates a cloud-like map with lighter and darker areas in a seemingly random pattern.
To add your first node:
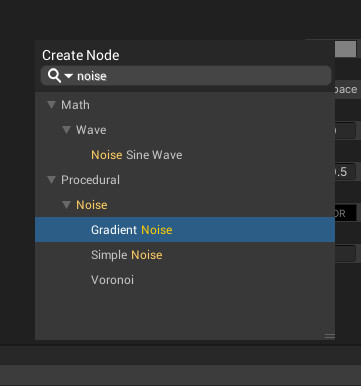
1. Select the Shader Graph workspace and press the Spacebar to open the Create Node menu. (You can also right-click and select Create Node.)
2. Use the search input at the top to enter “Gradient Noise”.
3. The Gradient Noise node will appear in the results. Double-click to select it.
4. Create motion over time
The procedural texture of the Gradient Noise map provides the variation we want in a shimmer effect. But how will we make it move? As you might recall, the Offset property of a tileable texture changes its position on a given surface. In this shader, you’ll make the Offset value change continuously so that the Gradient Noise map moves.
Just as Tiling and Offset appeared together in the URP/Lit Shader, Tiling and Offset are combined into one node in Shader Graph.
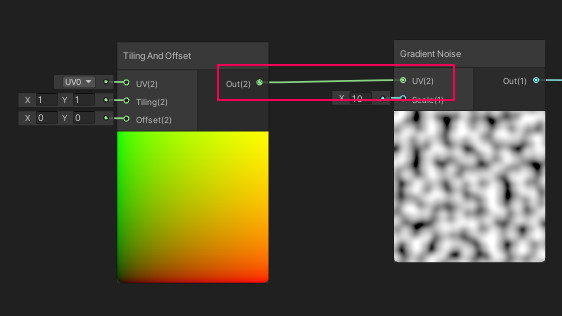
1. In the workspace, press the Spacebar or use the context menu (right-click in the workspace on most devices) to create a new Tiling and Offset node. This node will allow you to adjust the scale and position of the noise map.
2. Drag the output of the Tiling and Offset node to the UV input of the Gradient Noise node. Now, the values you enter in Tiling and Offset will affect the Gradient Noise.
3. Change the Offset values on the Tiling and Offset node to see how Offset repositions the pattern. Our next goal is to make the pattern move continuously to create that shimmering effect.
4. Create a Time node. This node allows you to change a value over time.
5. In this case, you are changing the Offset value to simulate a scrolling effect on the shader. Drag the Time output of the Time node to the Offset input on the Tiling and Offset node.
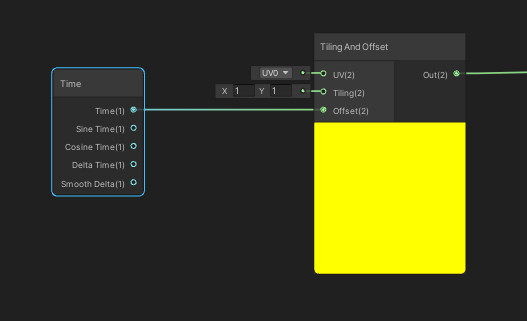
The noise texture is now animated!
6. To see how the default material will look, connect the output of the Gradient Noise node to the Base Color in the Master Stack. It’s not exactly a shimmer yet, but you’re on the way!
Important: Save your shader by selecting the Save icon at the top of the toolbar. Save often!
5. Add input material properties
This shader will be more useful to the artists who use it (including yourself), if it allows them to control the speed of the shimmer movement. You can accomplish this with input nodes that set the material properties, allowing the artist to alter the look of the shader with materials.
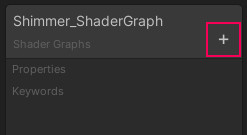
Input nodes are created in the Blackboard, which has the same title as your shader.
1. Select the plus (+) button on the Blackboard and select Float to create a new float (floating-point value) input node. Name it “ScrollSpeed”. With this input node, an artist can adjust the speed by entering a floating-point number in a material.
2. Drag the input node from the Blackboard onto the workspace.
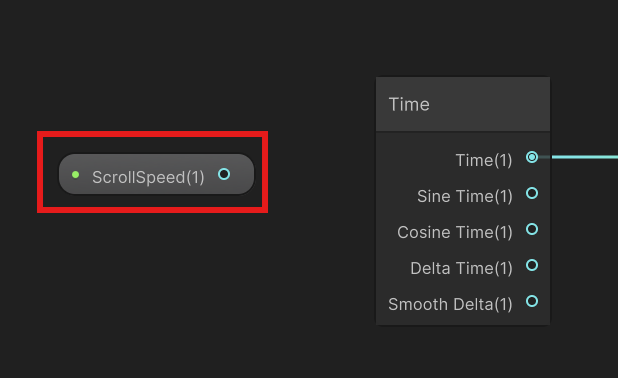
3. There is no input slot on the Time node, so you need a different way to combine the Time and ScrollSpeed values. For this, create a Multiply node. This node is an easy way to combine two values. It takes two values, multiplies them, and outputs the result.
Tip: Here’s another way to bring up the Create Node menu: drag from the output of the ScrollSpeed (or any) node and let go in an empty spot on the workspace. The Create Node menu appears, and when you select a node, it is automatically connected to the output you started with.
4. Disconnect the Time and Tiling and Offset nodes by selecting the connector and deleting it.
5. Connect the outputs of the Time and ScrollSpeed nodes into the Multiply node inputs.
6. Connect the Multiply output to the Offset input.
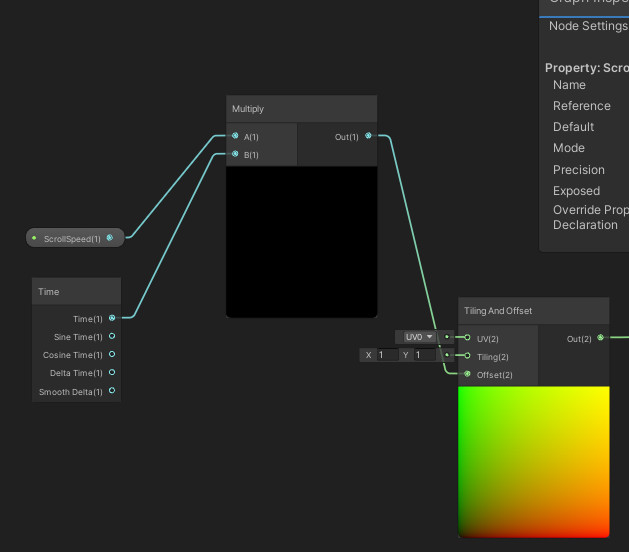
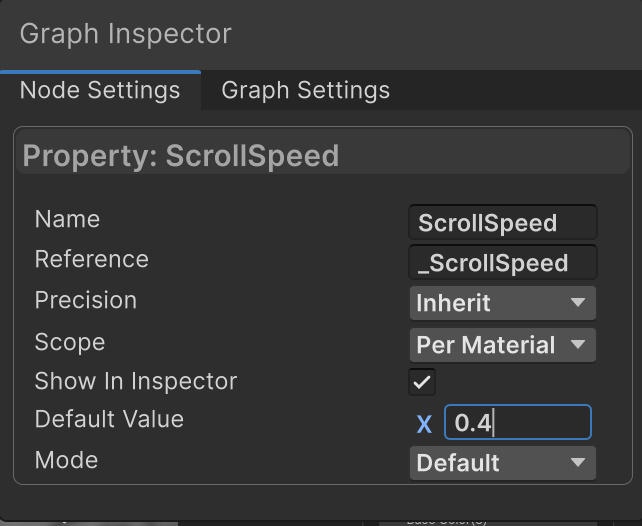
The scrolling of the noise map has stopped! That’s because the ScrollSpeed default value is 0. For artists who use this shader, this default value should be greater than 0 so this doesn’t happen to them. It also might be nicer to change this to a slower speed anyway.
7. To change the default value, select the ScrollSpeed node and in the Graph Inspector enter a new default value. Experiment to find a value that will make a good shimmer.
6. Combine maps
The shader now has moving noise, but it could be more shimmery. You can create a more interesting effect by combining this map with a different noise map that moves at a different speed. To do that, you will duplicate what you’ve done so far, change the duplicate a bit, and combine the two maps into one.
Like adding motion to a texture, combining maps is another effect you can only create in a custom shader!
1. Select the Gradient Noise, Multiply, and Tiling and Offset nodes you created earlier (don’t select Time or ScrollSpeed). You can draw a box that touches them, or use Ctrl (Windows) or Cmd (mac) as you select them.
2. Right-click and select Duplicate to make a copy of the selected nodes. The duplicate Multiply node will still be connected to the same input nodes, which is useful.
Instead of speeding up the motion of this new map, you can slow it down by decreasing the input ScrollSpeed. For example, if the speed of the second map is always half that of the first one, the two maps will create an ever-changing pattern.
3. To accomplish this, insert a new Divide node between the Time node and the duplicate Multiply node.
4. Connect the output from the Time node to the input A of the Divide node, and connect the output of the Divide node to the input B of the Multiply node.
5. Set the value of the Divide node to 2 using the B input to divide the ScrollSpeed by two.
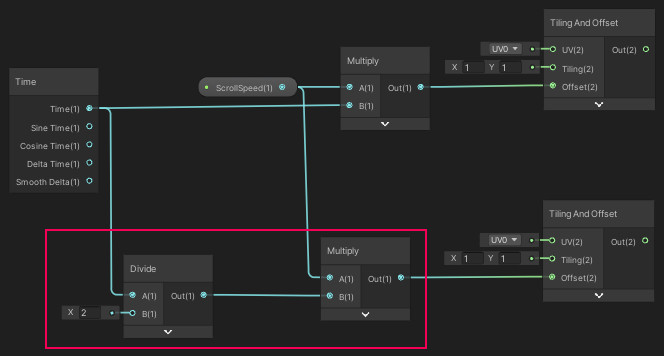
6. You now have two different Gradient Noise nodes, moving at different speeds. Each of these is a grayscale map with values from 0 to 1. To combine them, you can use a Multiply node to get a new map with values between 0 and 1. Add and connect a new Multiply node to the right of the Gradient Noise nodes, and output the result to the Base Color of the Master Stack.
It’s getting interesting!
7. Group nodes to stay organized
You now have quite a few nodes in your graph. What you have done so far is just one part. Before you continue, you can group nodes together to keep them organized so that it is easier to add even more nodes.
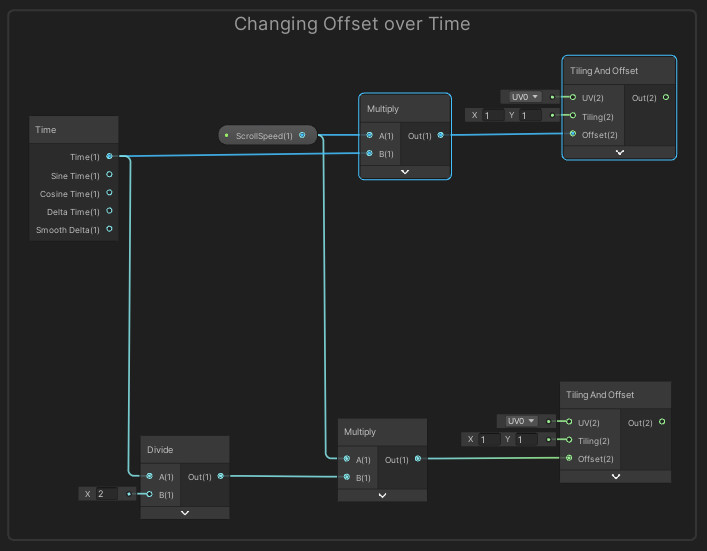
The nodes you’ve assembled so far create motion in the textures by changing the offset over time. You can group these and label them to help you keep track of what your nodes are doing:
1. Select all the nodes that generate the Offset settings. This should be everything to the left of, but not including, the Gradient Noise nodes, as shown in the image below.
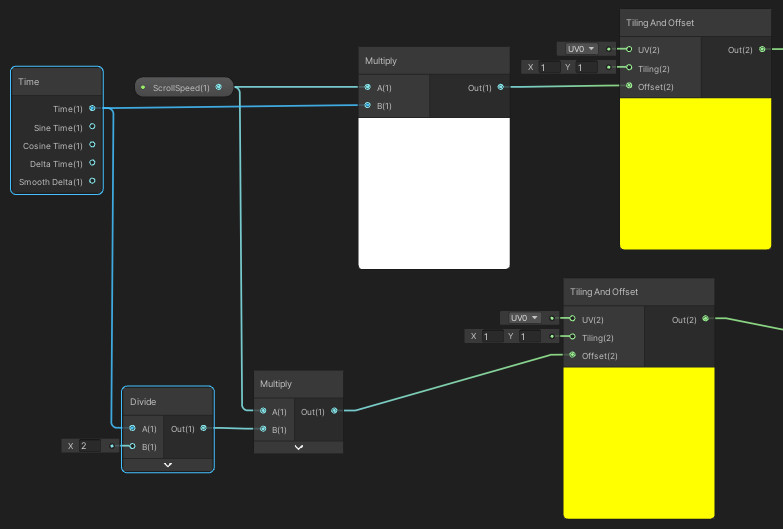
2. With all these nodes selected, right-click on any node (not on the workspace background) and select Group Selection. You can also press Ctrl/Cmd+G. Name the group “Changing Offset over Time”.
3. You can also collapse the thumbnails of the various nodes and move them around until you are happy.
8. Allow texture scaling in the materials
For the artists who will make materials from this shader, it would be useful to allow them to change the scale of the textures. For example, on large objects the Shimmer shader’s output, as it is now, might look too small and grainy. You can add an input node, like the one you added for ScrollSpeed, to make the textures scalable.
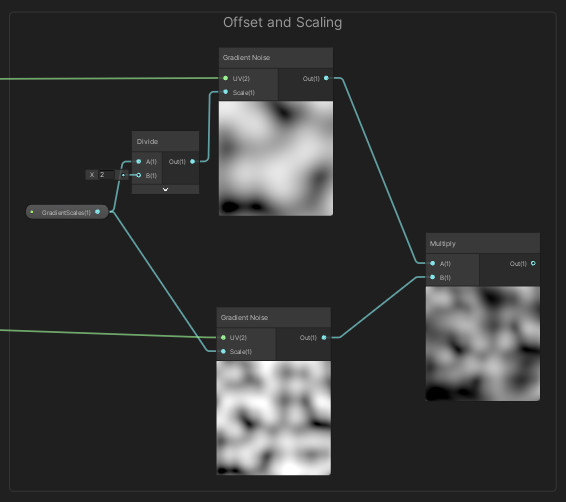
While you are adjusting the scale, it might be interesting to make the scale of the two combined textures different — in fact, it would add to the shimmery effect. In the same way that you divided the ScrollSpeed of one of the maps by 2, you can also divide the scale of one of the maps by 2.
You have already performed these basic tasks — try adding the nodes you need on your own with these few guidelines:
- Name a new Float input node “GradientScales”.
- Note the current Scale input values of the Gradient Noise maps. The default value is 10. You can use this default in your input node or experiment with one you like better. Compare this to the Example_Shimmer shader.
- In the Example_Shimmer graph, the map with the faster motion has the larger texture due to its smaller Scale value (this scale works like the Tiling property: it is a number of tiles per unit). Feel free to experiment with this, too!
- When you are ready, group these nodes, including the Gradient Noise nodes, and name the group “Offset and Scaling”.
Your final result should look similar to the image below.
9. Adjust contrast
So far the shader is becoming more shimmery, but it is all grayscale, with a lot of black, a lot of white, and not much gray in between. The next two nodes will allow artists to adjust the contrast and color of the texture.
To adjust contrast, you will add a Remap node that will scale the values from a range of 0-1 to a more narrow range. By narrowing the range, there will be less difference between the lightest and darkest areas.
1. Begin by adding a Vector2 input node to the Blackboard. A Vector2 is simply a set of two values. Name this input node “RemapValues”, drag it into the workspace, and set Y to 1.
2. Add a new Remap node to the workspace.
3. Connect the output of the grayscale map in the Offset and Scaling group to the In input of the Remap node. These are the input values to remap.
4. Connect the RemapValues input node to the Out Min Max input of the Remap node. This specifies the minimum and maximum output values, which artists will be able to adjust.
5. Make sure the In Min Max values are set to 0 and 1 respectively to match the actual range of the input values. The RemapValues node will then condense the range of values from 0-1 to the range specified in the material or the default values in RemapValues.
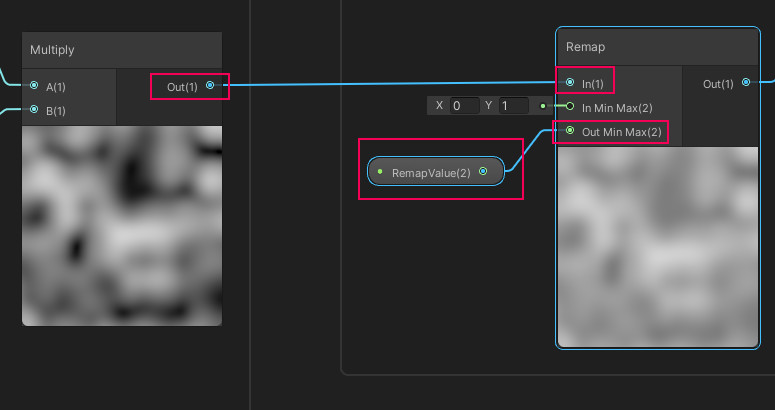
6. Experiment with a default range of values for the RemapValues Vector2 using the Graph Inspector.
7. Connect the output of the Remap node to the Base Color input in the Master Stack to view the result in the Main Preview.
Compare your result with the Example_Shimmer shader and feel free to fiddle with the default values, and even the node connections, to get a shimmery result that you like. There is one more important property: color.
10. Adjust color and transparency
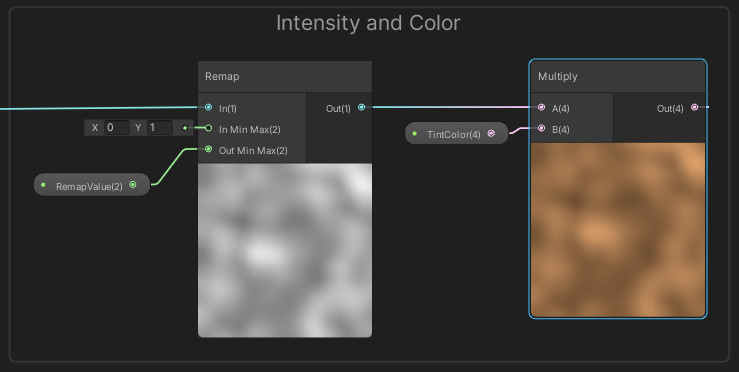
On your own, add an input node with the type Color, named TintColor. Add a Multiply node to multiply this color by the current output. Set the default values of TintColor to a color you like, and look at the Example_Shimmer shader for inspiration.
Group these nodes in a group titled “Intensity and Color”, and the result will look similar to the image below.
To make this color really pop, make it a high dynamic range (HDR) color:
1. Select the TintColor input node and view its default properties in the Graph Inspector.
2. Change the Mode from Default to HDR.
3. Open the color picker for the default color. It now has the same Intensity options as the HDR color picker you have seen when setting an Emission map.
4. Connect the output of the new Multiply node to the Base Color input in the Master Stack so you can see the result so far.
The color still doesn’t pop, does it? You can make the bright areas even brighter with the Emission map, which will make light areas glow, adding to the shimmering effect.
5. Make another connection from the Multiply node to the Emission input in the Master Stack. Now this is an emissive shader!
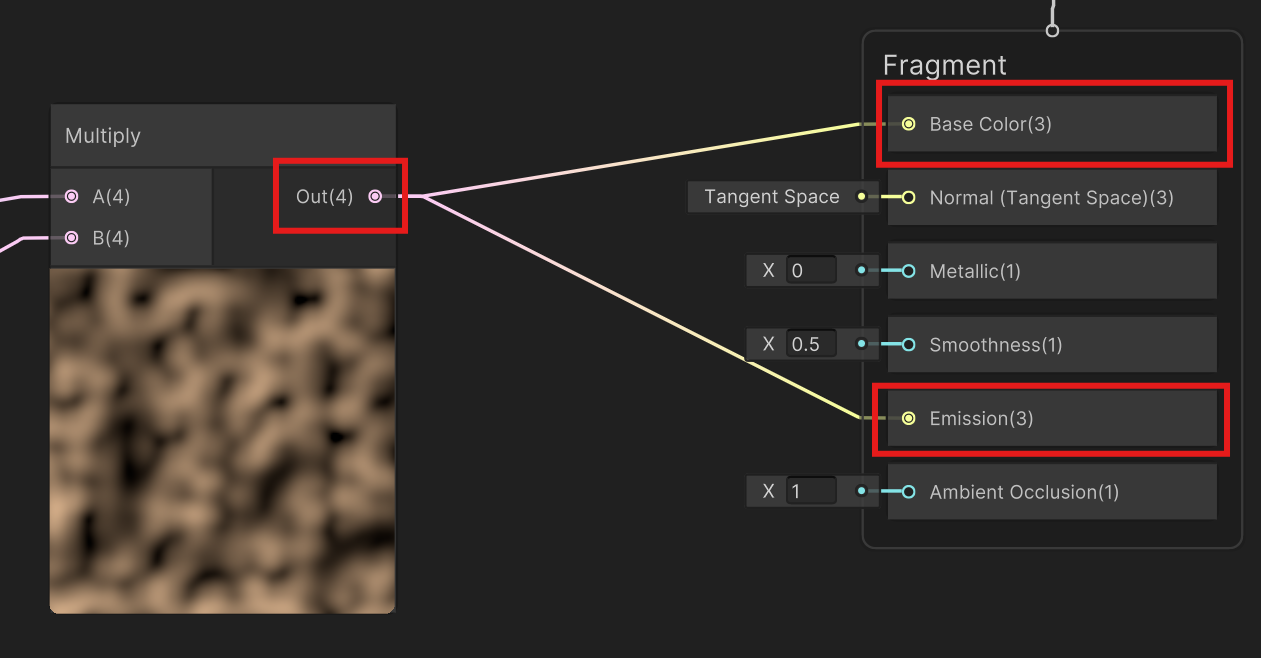
There is one more trick: you can make the shader transparent where the color is lighter to create a more shimmer effect that is more striking than if you were to have the same transparency across the whole object.
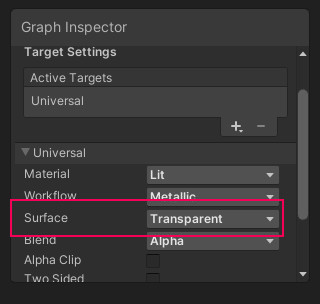
6. In the Graph Inspector, on the Graph Settings tab, change the Surface type of this shader to Transparent. This is the same setting you saw in the materials for the URP/Lit Shader.
7. Changing the Surface type enables the Alpha input on the Master Stack. Connect the grayscale noise output from the Remap node (not the tinted one from the Multiply node!) to the Alpha input.
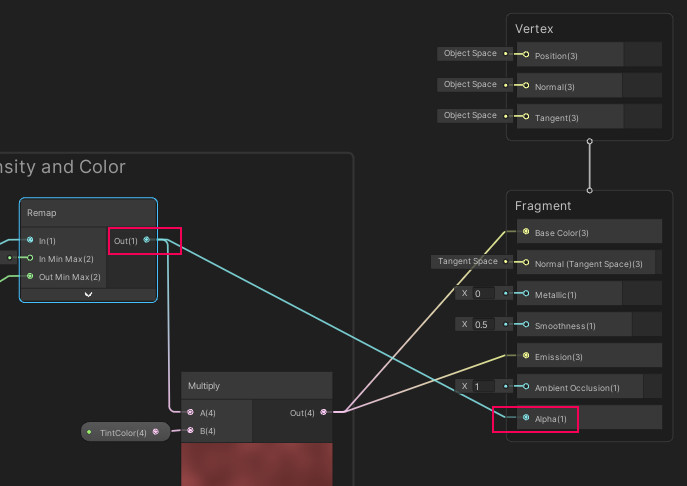
Now you have a glowing, shimmering shader! There are just a few more adjustments to make that will give artists more control over the look of their materials with this shader.
11. Finalize the shader
Take a look at the Master Stack’s Fragment shader inputs. There are a few more that you haven’t used yet. You could leave these the way they are and keep them set at their default values for every material made with this shader — or you could allow artists to adjust them.
It’s your choice, but here are some things you can try to make this shader more useful:
1. Add an input node (Float) for Metallic and connect it to the Metallic input on the Master Stack.
2. Add an input node (Float) for Smoothness and connect it to the Smoothness input on the Master Stack.
Important: Save your shader by selecting the Save icon.
12. Create a test material
That’s it, you’ve created a shimmer shader! The only thing left to do is to create a material from this shader that can be applied to an object.
Create a test material now and apply it to an object on your workbench in the Shaders and Materials Gallery:
1. In the Assets > CreativeCore_Shaders > Materials folder, right-click and select Create > Material. Give this new material a name like “Shimmer”.
2. With the new material selected, go to the Inspector window to change the shader. It will be listed in the Shader Graphs submenu.
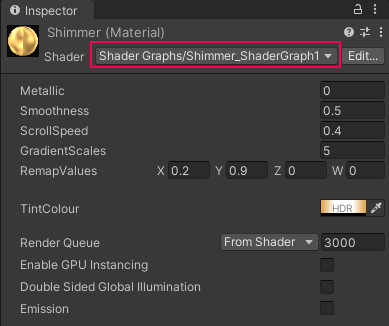
3. Apply the material to an object on your workbench.
4. Change any of the material properties you like!
13. Explore Shader Graph
Shader Graph can open up many opportunities for you to create shaders and materials. You can start by creating a suite of materials with your first shader, customizing the shader even more, or even starting a new shader based on what you have learned!
Here are some things you can easily try based on what you’ve learned:
- Create a shader that allows the material artist to enter a 2D texture file. Hint: add a Texture2D input node and a Sample Texture 2D node to manage the channels of the texture file.
- Experiment with Artistic and Procedural nodes. Dither, Blend, Voronoi, and Polygon can be fun! To view documentation about any particular node, add it to your workspace and use the context menu (right-click) to select Open Documentation.
- Examine the additional Shader Graph shader provided with the Shaders and Materials Gallery project: Dissolve_Shader. Observe how it uses the Sine, Add, Subtract, and Branch nodes. Read the Sticky Notes in the Shader Graph workspace for that shader.
- Examine a shader in one of the guided projects for the Creative Core mission, the beachside town project. Check out the water shader in that project and learn how to create water effects.
There are several additional resources on Shader Graph to enhance your learning:
- Shader Graph documentation in the Unity Manual.
- Make a Flag Wave with Shadergraph: A Unity Learn project that will introduce you to vertex shaders and the process of vertex displacement.
- Shader Graph shaders available in the Unity Asset Store (free assets): Examine and learn from shaders by other creators.
14. Next steps
You now possess quite a few skills for creating shaders and materials. You have not only mastered the URP/Lit Shader, but also you’ve created your own shader by applying the concepts you’ve learned about light and 3D rendering.
You probably have quite a few new ideas of shaders and materials to create for your own projects! It’s time to work on those ideas and complete your artistic composition for the Shaders and Materials Gallery.