
HDRP Decal Projector
Tutorial
intermediate
+10XP
10m
(96)
Unity Technologies
One component of HDRP is the Decal Projector. This casts an image onto objects in a Scene. In this tutorial, you will learn how to use the decal projector to project an image onto objects in a Scene.
Languages available:
1. HDRP Decal Projector
This tutorial has been verified using Unity 2019 LTS
Unity’s High Definition Render Pipeline (HDRP) is a Scriptable Render Pipeline (SRP) that targets high-end graphics platforms. HDRP uses physically based lighting techniques, linear lighting, and HDR lighting, allowing you to produce projects with real-time, high-fidelity rendering.
The HDRP includes a Decal Projector that allows you to project Materials onto objects in a Scene (Figure 01).
As long as they use the same Material, multiple instances of the same decal can be added to a Scene without affecting performance.
Here, you’ll add a Decal Projector to your Scene, then create a new HDRP decal Material with a Texture file added to the Base Map property. The image Texture file is used by the Decal for projecting onto objects.
2. Getting Started
You can either upgrade an existing project to HDRP by adding the High Definition RP plug-in with the Package Manager (Figure 02), or you can create a new project in the Unity Hub and choose the High Definition RP project template (Figure 03).
Note: When updating an existing Scene to the High Definition Render Pipeline, make sure you update all of your current Materials to HDRP Materials. Do this by choosing Edit > Render Pipeline > Update Project Materials to High Definition Materials.
3. Adding the Decal Projector
1. Add the Decal Projector to your Scene by selecting GameObject > Rendering > Decal Projector (Figure 04).
The Decal Projector will be assigned the default HDRP decal Material.
4. Create a New HDRP Decal Material
1. To create a decal Material, select Assets > Create > Material. Alternatively, right-click in the Project window to access the Create menu (Figure 05).
2. Name the new Material.
3. Make sure the new Material is selected in the Project window. In the Inspector, use the drop-down menu to change the Shader type to HDRP/Decal (Figure 06). Make sure you choose the HDRP/Decal Shader, not the legacy Decal Shader.
4. Select the Base Map assign button to choose a Texture file to project
(Figure 07).
The Base Map is the Material property that identifies a Texture for the decal and defines the decal’s base color. Make sure the Affect BaseColor option is enabled so the decal shows on all of the object’s Materials.
5. Assign the HDRP Decal Material to the Decal Projector GameObject
1. In the Hierarchy, select the Decal Projector GameObject.
2. In the Decal Projector Component’s Material property, select the Assign button to the right of the property.
3. Find the newly created HDRP Decal Material and double-click to select it in the Select Material window (Figure 08).
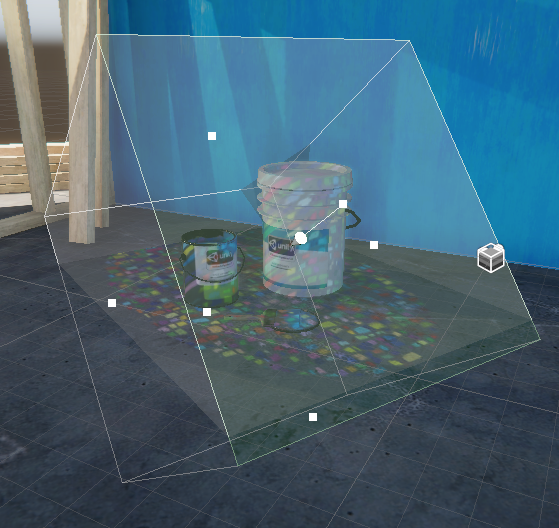
6. Position, Aim, and Scale the Decal Projector
The Decal Projector Gizmo is a Bounding Box that defines the size of the Projector. The Projector casts the decal on any object inside the Bounding Box.
To change the size of the box, select and drag the handles on the box’s faces. The Gizmo has an arrow that indicates the direction the projector is facing.
1. To manipulate the HDRP Decal Projector Bounding Box, click the Gizmos button at the top of the Scene view.
2. Use the Move and Rotate tools to position the Bounding Box over objects in the Scene (Figure 09).
3. To scale the size of the projected decal, change the X, Y, and Z Size values in the Decal Projector Component (Figure 10).
4. To scale the projected decal, select the Modify Decal Volume button. This will reveal display handles on the faces of the Bounding Box (Figure 11). Select and drag the handles to change the size of the box (Figure 12).
5. You can repeat the decal inside the Bounding Box by using the Modify Decal Size option.
6. Click Modify Decal Size to display handles on the face of the Bounding Box (Figure 13).
7. Click and drag the handles to change the size of the box. The decal will not scale to the size of the box, but will be duplicated inside of it (Figure 14).
7. Conclusion
By following these steps, you can apply a HDRP decal across objects in a Scene. Use this component to add more detail and realism in your Unity project.