How to publish to Android
Tutorial
intermediate
+10XP
15 mins
Unity Technologies
Publishing for Android is a lot like publishing a build for Windows, Mac OS, and Linux. In certain cases, there are no required changes at all. For example, in a mobile game that uses finger gestures to interact with game elements, this can be accomplished with the same code as its desktop counterpart. Mobile touch input is beyond the scope of this workflow, so it’s assumed that the game is complete and ready for distribution.
Languages available:
1. Preparing Unity
Before Unity can build for Android, you need to install the Android Build Support modules from the Unity Hub.
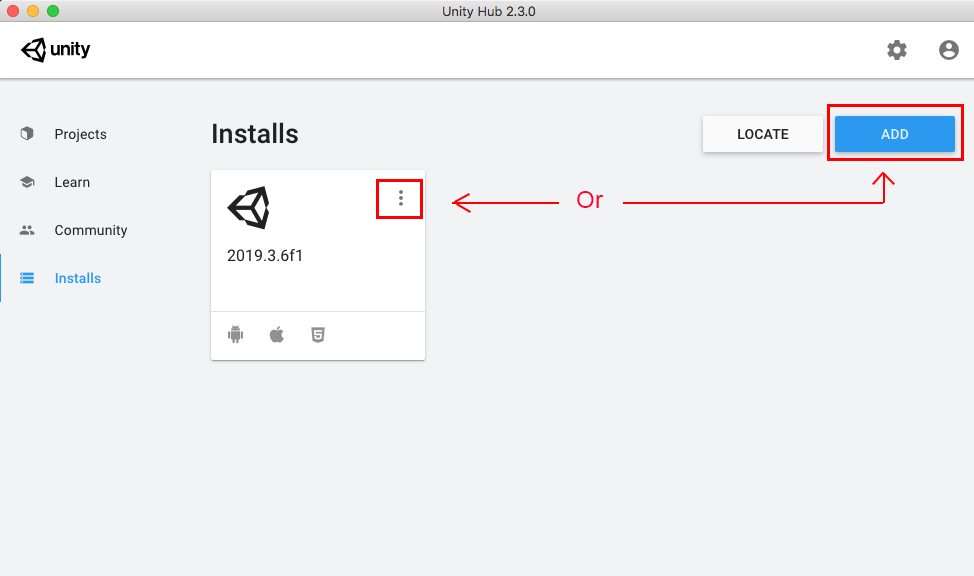
1. In the Unity Hub, choose either the current version (or with a new install,) select the Add button, to install additional modules (Figure 01).
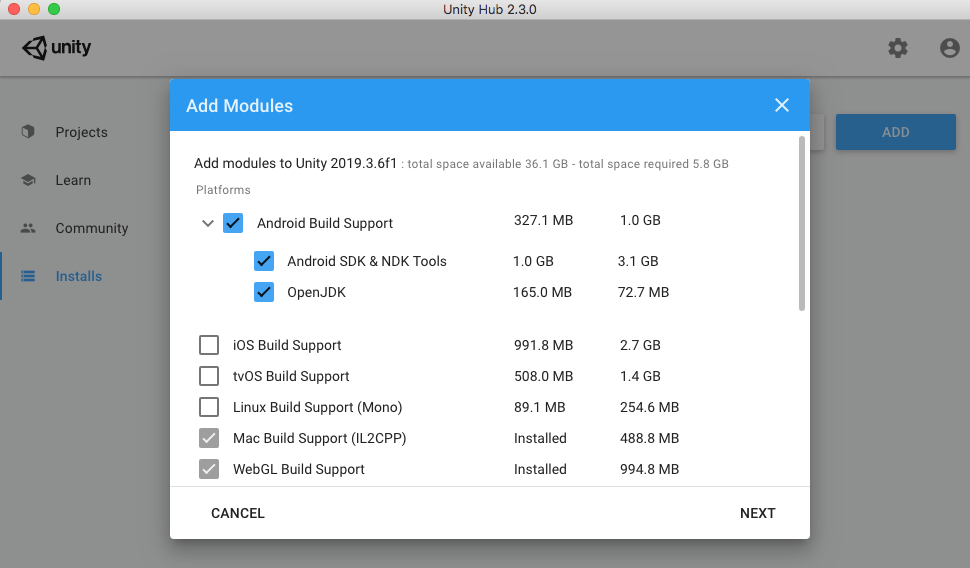
2. Select Android Build Support, also selecting a checkmark to include both Android SDK & NDK Tools, and OpenJDK (Figure 02). After installation, you may need to perform a restart.
2. Preparing your project
For this introduction, we will cover the basic steps necessary to prepare your project for publishing to the Google Play store. Rather than exporting to a final build of an .exe file, (Windows) or an .app file, (macOS), Android binaries use the file-type called an Android App Bundle, using the extension of an .aab file. When Unity builds an application for Android, the output package exports to an .aab file, for ease of uploading and hosting to the Google Play store environment.
Technical Steps:
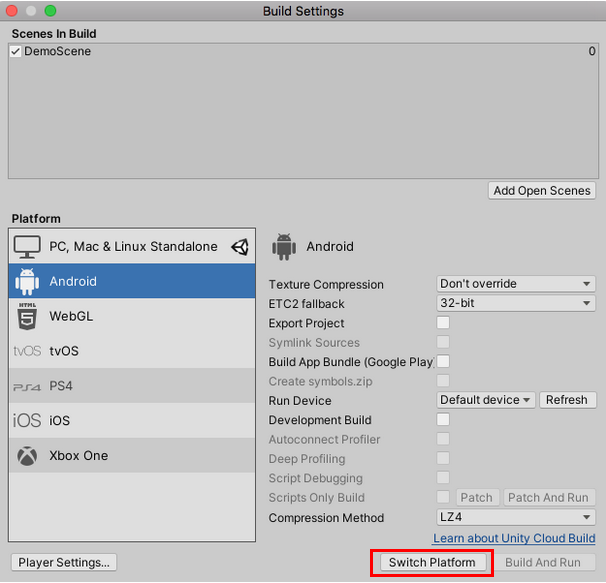
1. In the Unity Editor, from the File dropdown, select Build Settings. In the Platforms window, select Android, and select the Switch Platform button, if Android has not already been selected (Figure 03).
2. At the lower left corner of the Build Settings window, select the Player Settings button.
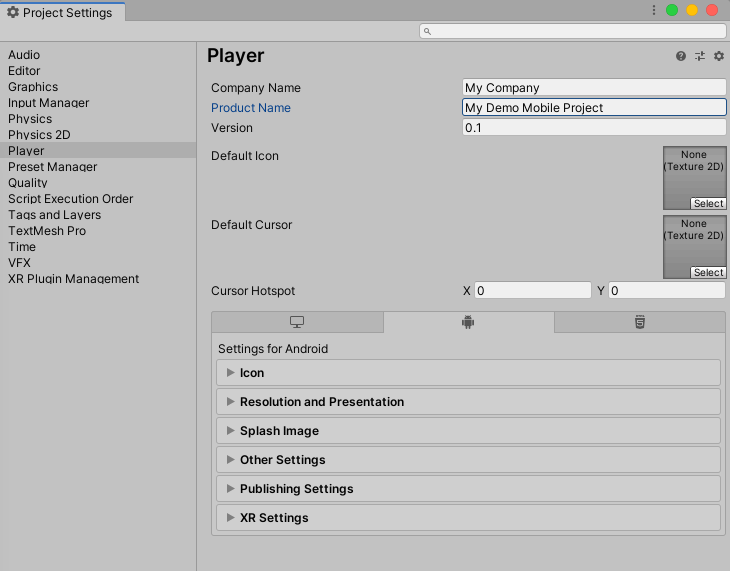
3. In the top of the Inspector, fill out your company and product names. For the final distribution, it is recommended that you create an icon for your game to replace the default Unity launcher icon. Depending on the nature of your game, you may also wish to override the default mouse cursor. By default, the cursor hotspot is at position (0,0), in the upper left corner of the cursor image (Figure 04).
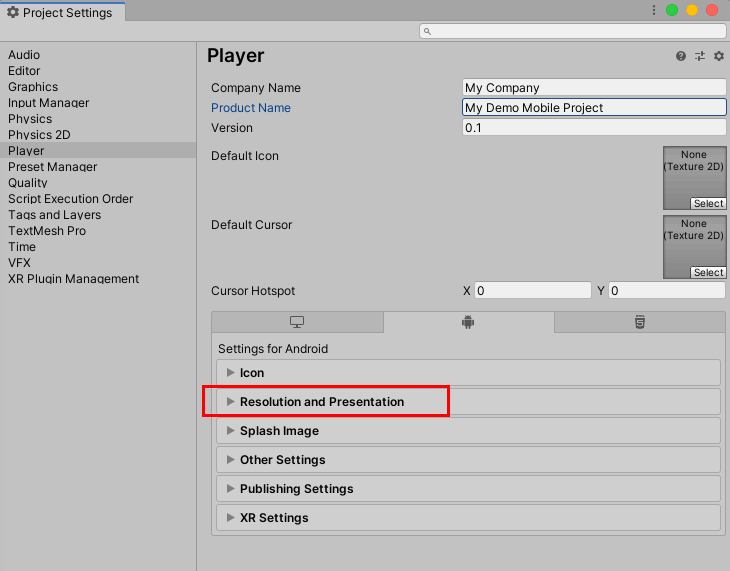
4. In the bottom half of the Project Settings window, select Resolution and Presentation (Figure 05).
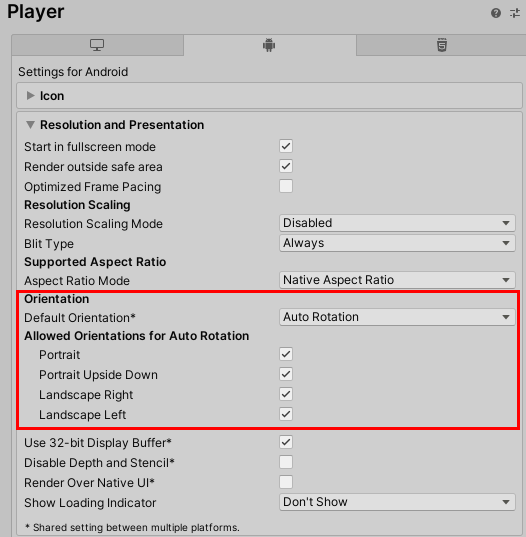
5. Set your game’s default and allowed orientations (Figure 06). For most purposes, “Default Orientation” is best set to Auto Rotation. Most apps and games are designed to run either in landscape or portrait mode, rather than both.
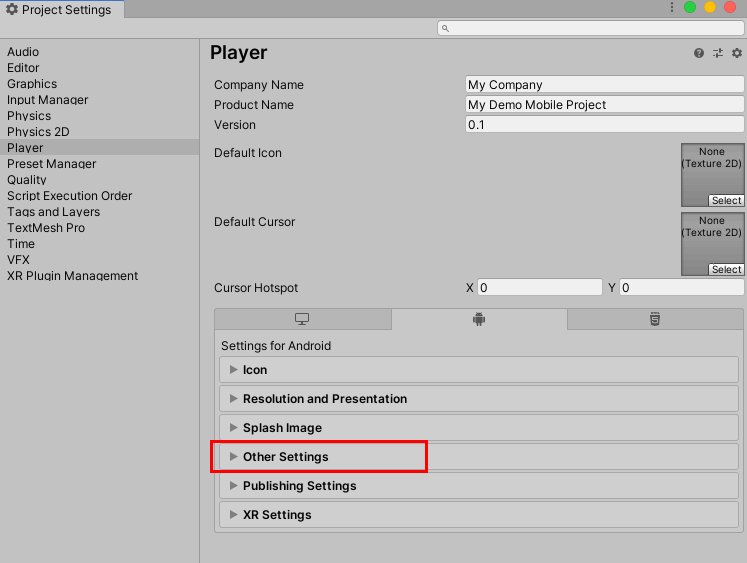
6. Select Resolution and Presentation at the top of this section to close it, then select Other Settings (Figure 07).
7. In Other Settings, for this introduction, we are only concerned with the Package Name for our mobile project. The Package Name is also known as the Application ID or bundle identifier. The bundle identifier must be unique, and cannot be reassigned to another project once the game or app has been published. Name your project (Figure 08).
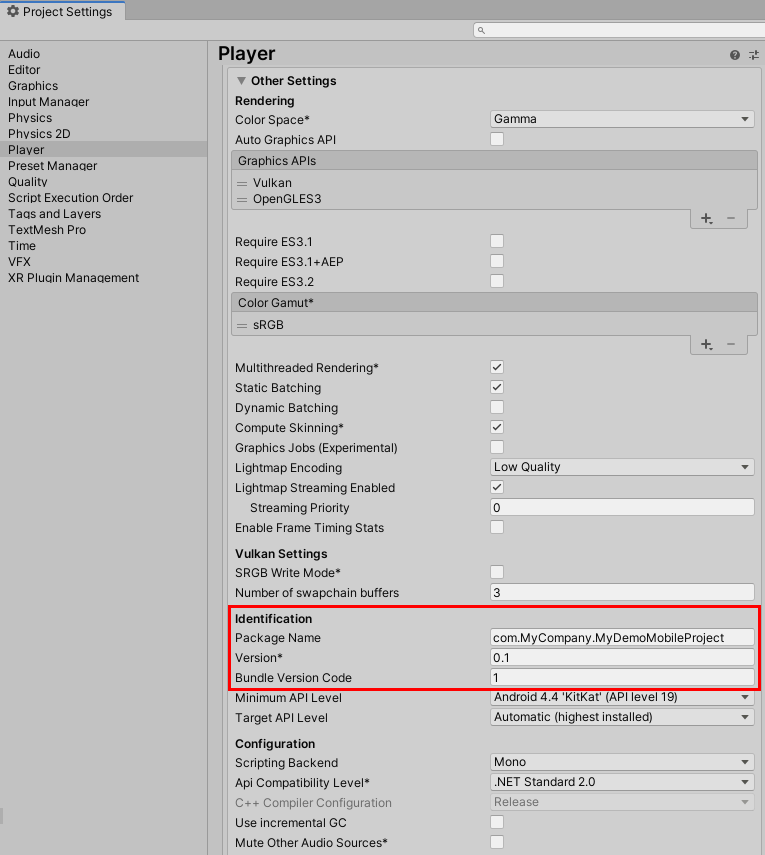
8. Select the Other Settings section, to close this section.
9. Next, before an Android app can be distributed on the app stores, it must be signed with a unique key. Select Publishing Settings to open that section (Figure 09).
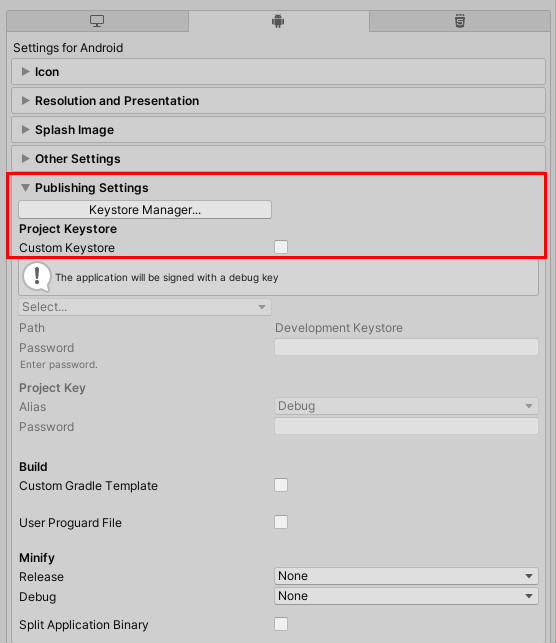
10. A Keystore Manager is exactly what it sounds like: To create and organize keys for one or more applications. If you’ve previously created a Keystore and want to publish your application using the custom Keystore, select to enable the Custom Keystore checkbox, under the Project Keystore option. You will then be prompted to browse for your existing key location folder. Otherwise, select the Keystore Manager Button, to create a new Keystore (Figure 09).
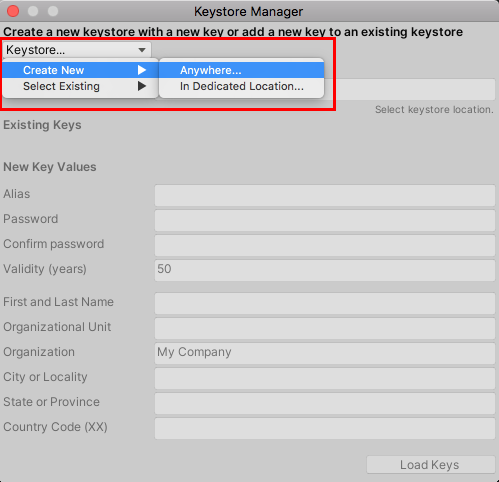
11. In the Keystore Manager window, select the Keystore dropdown, and then select Create New > Anywhere, (or In Dedicated Location) (Figure 10), and Navigate to the location of the new folder. It’s a good idea to keep the Keystore separate from your projects where it will be both secure and easy to find. If you want to use an existing Keystore location, select from the dropdown: Keystore > Select Existing. If creating a new Keystore, give it a name and then Save. Otherwise, select the existing Keystore and select Open. For security purposes, the password is not stored with the Keystore. If you lose the password, you’ll need to publish a new application with a new bundle identifier.
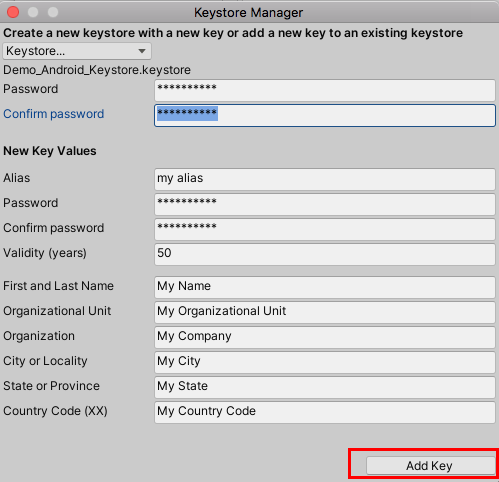
12. Next, we’ll create the key in our Keystore for our Android application. In the Keystore Manager window, fill out the required information fields, confirming the password, and select the Add Key Button (Figure 11). Be sure to store your Keystore and passwords in a safe place.
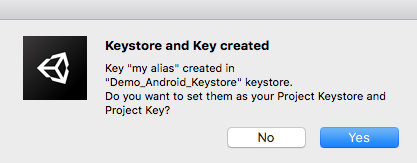
13. Confirm by selecting the Yes button, to assign the new key to your project’s Keystore Manager’s settings (Figure 12).
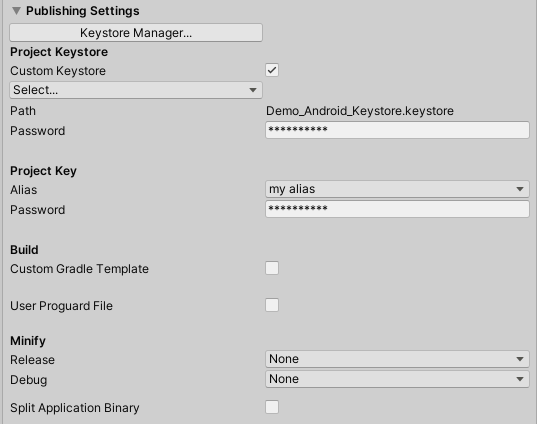
14. The Publishing Settings section of the Project Settings window are now updated to reflect the changes to your project’s new Keystore (Figure 13).
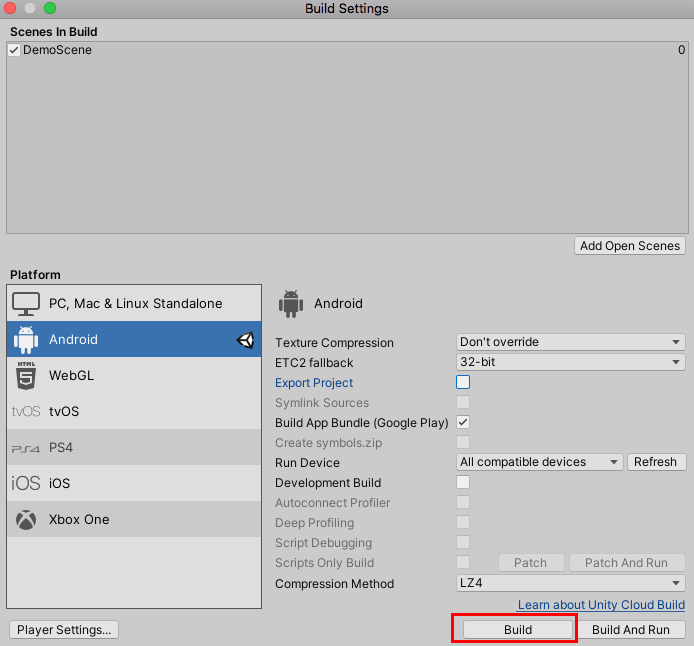
15. You are now ready to create the .apk file for distribution. You may close out of the Project Settings window. In the Unity Editor, from the FIle dropdown, select Build Settings. Select Android in Platforms if it is not already highlighted, and select the Build button (Figure 14).
16. Choose a name and location for your .aab file and select Save.
3. Next Steps
Your Android application is now ready for distribution. Uploading your .aab file to the Google Play Store app marketplace, and setting up the store page, is beyond the scope of this workflow. Please consult the help resources for those sites for assistance with that process.