
Implementing Feathered Planes for Plane Detection in AR Foundation
Tutorial
intermediate
+0XP
15 mins
(57)
Unity Technologies
In this tutorial, we’ll implement feathered planes for plane detection in AR Foundation. Feathered planes fade out at the edges, giving your Scene a more polished appearance. This is achieved via a combination of custom Shader/Material and a new AR Plane Mesh Visualizer script that builds on the one included in AR Foundation.
Languages available:
1. Implementing Feathered Planes for Plane Detection in AR Foundation
This tutorial has been verified using Unity 2019.4 LTS, AR Foundation 2.1.10 and ARCore XR Plugin 2.1.12
In this tutorial, we’ll implement feathered planes for plane detection in AR Foundation. Feathered planes fade out at the edges, giving your Scene a more polished appearance. This is achieved via a combination of custom Shader/Material and a new AR Plane Mesh Visualizer script that builds on the one included in AR Foundation.
2. Setting up the Project
1. Open the Package Manager by going to Window > Package Manager (Figure 01).
2. In the Package Manager, make sure you are in the Unity Registry section and then install AR Foundation. This will also install the AR Subsystems package (Figure 02).
3. Now install either the ARCore XR Plugin (for Android) or the ARKit XR Plugin (for iOS). For this tutorial, we will be using ARCore.
3. Creating the Feathered Plane Shader
1. In the Project view, right-click and select Create > Shader > Unlit Shader. Name it FeatheredPlaneShader and open it in the Script Editor (Figure 03).
2. Our Shader will need the ability to set a tint for the plane Texture and a color for the plane. Inside Properties, add:
_TexTintColor("Texture Tint Color", Color) = (1,1,1,1)
_PlaneColor("Plane Color", Color) = (1,1,1,1)
3. Our Shader needs to handle transparency a bit differently than the default unlit Shader. In Subshader, set the RenderType tag to Transparent, and add a queue tag with the same value:
Tags { "RenderType"="Transparent" "Queue"="Transparent" }4. After LOD 100, add:
Blend SrcAlpha OneMinusSrcAlpha
 ZWrite Off
5. We won’t need fog, so remove these two lines inside CGPROGRAM:
 // make fog work
   #pragma multi_compile_fog
6. Our Shader will use the second UV slot to hold information about where to begin feathering. Inside the struct appdata, add:
float3 uv2 : TEXCOORD1; 7. Inside the v2f struct definition, replace the line:
UNITY_FOG_COORDS(1)
with:
float3 uv2 : TEXCOORD1;8. In order to access the properties we’ve added to the Shader, including a property that will be set by the script later in this tutorial, add the following to the data members after the line float4 _MainTex_ST;:
    fixed4 _TexTintColor;
    fixed4 _PlaneColor;
    float _ShortestUVMapping;
9. Remove the following line from the vertex function (vert):
UNITY_TRANSFER_FOG(o,o.vertex);Instead, we’ll pass the extra UV containing the feathering information. In place of the removed line, add:
o.uv2 = v.uv2;10. Inside our fragment function (frag), we’ll modify the first line to use the tint as well as the Texture. Change it to:
fixed4 col = tex2D(_MainTex, i.uv) * _TexTintColor;Remove:
// apply fog
 UNITY_APPLY_FOG(i.fogCoord, col);
11. We want to interpolate between the tinted Texture and the chosen plane color based on the opacity of col. Add the following line immediately after the line from the previous step:
col = lerp( _PlaneColor, col, col.a);12. Finally, we want to modulate the opacity of col using the information stored in the extra UV and the ShortestUVMapping variable, which will be covered in more detail later in this tutorial. After the line from Step 12, add:
col.a *= 1-smoothstep(1, _ShortestUVMapping, i.uv2.x);13. Without comments, the code should look like this:
Shader "Unlit/FeatheredPlaneShader"
{
   Properties
   {
       _MainTex ("Texture", 2D) = "white" {}
       _TexTintColor("Texture Tint Color", Color) = (1,1,1,1)
       _PlaneColor("Plane Color", Color) = (1,1,1,1)
   }
   SubShader
   {
Tags { "RenderType"="Transparent" "Queue"="Transparent" }
LOD 100
Blend SrcAlpha OneMinusSrcAlpha
ZWrite Off
       Pass
       {
           CGPROGRAM
           #pragma vertex vert
           #pragma fragment frag
           #include "UnityCG.cginc"
           struct appdata
           {
               float4 vertex : POSITION;
               float2 uv : TEXCOORD0;
                float3 uv2 : TEXCOORD1;
           };
           struct v2f
           {
               float2 uv : TEXCOORD0;
               float3 uv2 : TEXCOORD1;
               float4 vertex : SV_POSITION;
           };
           sampler2D _MainTex;
           float4 _MainTex_ST;
           fixed4 _TexTintColor;
           fixed4 _PlaneColor;
           float _ShortestUVMapping;
           v2f vert (appdata v)
           {
               v2f o;
               o.vertex = UnityObjectToClipPos(v.vertex);
               o.uv = TRANSFORM_TEX(v.uv, _MainTex);
               o.uv2 = v.uv2;
               return o;
           }
           fixed4 frag (v2f i) : SV_Target
           {
               fixed4 col = tex2D(_MainTex, i.uv);
               col = lerp(_PlaneColor, col, col.a);
               col.a *= 1 - smoothstep(1, _ShortestUVMapping, i.uv2.x);
               return col;
           }
           ENDCG
       }
   }
}
14. Save changes and return to the Unity Editor.
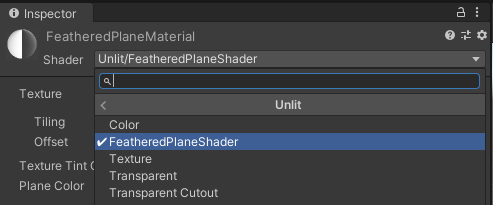
15. In the Project view, right-click and select Create > Material. Name it FeatheredPlaneMaterial. Set it to use our Shader by selecting Unlit/FeatheredPlaneShader from the Shader drop-down (Figure 04).
4. Creating the AR Feathered Plane Mesh Visualizer Script
The Feathered Plane Mesh Visualizer builds on, but does not directly extend, the default AR Plane Mesh Visualizer. It’s attached to the Plane Prefab, which also must contain the AR Plane, AR Mesh Visualizer, and MeshRenderer components. It monitors changes in the boundary of the AR Plane, and correspondingly sets properties in the MeshRenderer's Material so that the edges of the generated AR Plane Mesh are feathered. The width of this feathering is adjustable in the Inspector.
The AR Feathered Plane Mesh Visualizer uses the following data members:
- s_FeatheringUVs: List of Vector3s that contain information about where feathering begins. This list is generated when the AR Plane boundary changes and is passed to the Material.
- m_PlaneMeshVisualizer: Stores a reference to the required ARPlaneMeshVisualizer script, which creates and controls the Plane Mesh we're feathering.
- s_Vertices: List of boundary vertices. This is populated by the ARPlaneMeshVisualizer script’s Mesh and updated when the ARPlane boundary changes.
- m_Plane: Stores a reference to the ARPlane component, which holds information about the plane we're visualizing. When the boundaries of this plane change, the boundaryChanged event is fired (outside of this script).
- m_FeatheredPlaneMaterial: This is the Material whose properties are updated by the ARFeatheredPlaneMeshVisualizer whenever the boundary changes.
- m_FeatheringWidth: This controls the width of the feathering, adjustable via the featheringWidth field.
1. Inside the Project view, right-click and select Create > C# Script. Name it ARFeatheredPlaneMeshVisualizer and open it in the Script Editor.
2. Add the AR Foundation namespace:
using UnityEngine.XR.ARFoundation;3. Because our script requires the ARPlaneMeshVisualizer, MeshRenderer, and ARPlane components to be on the same GameObject to which it’s attached, add the following line just before the class definition:
[RequireComponent(typeof(ARPlaneMeshVisualizer), typeof(MeshRenderer), typeof(ARPlane))]4. Inside the class definition, add the following data members:
static List<Vector3> s_FeatheringUVs = new List<Vector3>();
   static List<Vector3> s_Vertices = new List<Vector3>();
   ARPlaneMeshVisualizer m_PlaneMeshVisualizer;
   ARPlane m_Plane;
   Material m_FeatheredPlaneMaterial;
   [SerializeField]
   float m_FeatheringWidth = 0.2f;
   public float featheringWidth
   {
       get { return m_FeatheringWidth; }
       set { m_FeatheringWidth = value; }
   }
5. The first thing our script needs to do is store references to the required components. Change Start to Awake, and to it add:
m_PlaneMeshVisualizer = GetComponent<ARPlaneMeshVisualizer>();
      m_FeatheredPlaneMaterial = GetComponent<MeshRenderer>().material;
       m_Plane = GetComponent<ARPlane>();
6. In order to know when to update visualization, we will subscribe the event handler method, ARPlane_boundaryUpdated, to the boundaryChanged event when the ARFeatheredPlaneMeshVisualizer’s GameObject is enabled. To prevent orphaned events, we unsubscribe when the GameObject is disabled. Add:
void OnEnable()
   {
       m_Plane.boundaryChanged += ARPlane_boundaryUpdated;
   }
   void OnDisable()
   {
       m_Plane.boundaryChanged -= ARPlane_boundaryUpdated;
   }
7. Next, we define ARPlane_boundaryUpdated.
void ARPlane_boundaryUpdated(ARPlaneBoundaryChangedEventArgs eventArgs)
   {
       GenerateBoundaryUVs(m_PlaneMeshVisualizer.mesh);
   }
8. Finally, we define GenerateBoundaryUVs, the star of the ARFeatheredPlaneMeshVisualizer show. This method retrieves the list of vertices from m_PlaneMeshVisualizer, which stores them in s_Vertices. It assumes that the last vertex is at the plane’s center. It then iterates through the vertices, setting the mapping value for a corresponding feathering UV based on the distance of the vertex from the plane’s center and the desired feathering width. With each iteration, it checks to see if this mapping value is the shortest and, if so, stores it. In either case, it stores the calculated UV mapping in s_FeatheringUVs. After looping through all vertices, it sets the shortest UV mapping property in the Material, creates and adds a feathering UV set at the center, sets the second UV channel to use s_FeatheringUVs and uploads the Mesh data.
9. Add the GenerateBoundaryUVs method:
void GenerateBoundaryUVs(Mesh mesh)
   {
       int vertexCount = mesh.vertexCount;
       s_FeatheringUVs.Clear();
       if (s_FeatheringUVs.Capacity < vertexCount) { s_FeatheringUVs.Capacity =vertexCount; }
       mesh.GetVertices(s_Vertices);
       Vector3 centerInPlaneSpace = s_Vertices[s_Vertices.Count - 1];
       Vector3 uv = new Vector3(0, 0, 0);
       float shortestUVMapping = float.MaxValue;
       for (int i = 0; i < vertexCount - 1; i++)
       {
           float vertexDist = Vector3.Distance(s_Vertices[i], centerInPlaneSpace);
           float uvMapping = vertexDist / Mathf.Max(vertexDist - featheringWidth, 0.001f);
           uv.x = uvMapping;
           if (shortestUVMapping > uvMapping) { shortestUVMapping = uvMapping; }
           s_FeatheringUVs.Add(uv);
       }
       m_FeatheredPlaneMaterial.SetFloat("_ShortestUVMapping", shortestUVMapping);
       uv.Set(0, 0, 0);
       s_FeatheringUVs.Add(uv);
       mesh.SetUVs(1, s_FeatheringUVs);
       mesh.UploadMeshData(false);
   }
10. Save changes and return to the Unity Editor.
11. Load or create a Scene with an AR Session and AR Session Origin, with the AR Session Origin having an attached AR Plane Manager component. Set the AR Plane Manager’s Plane Prefab to the new Prefab.
12. Create or load a Prefab based on the AR Default Plane (or one that satisfies the requirements). If you need more help with this step, please refer to the Configuring Plane Detection for AR Foundation tutorial.
13. Change the Material for the MeshRenderer to the one created earlier in this tutorial. Add the AR Feathered Plane Mesh Visualizer component and save the Prefab (Figure 05).
14. Assign this new Prefab to the Plane Prefab variable in the AR Plane Manager script on the AR Session Origin object (Figure 06).
15. Save the Scene and build the project. Make sure to have the ARCore XR Foundation package installed if building for Android. If you need more help with this step, please refer to the Configuring Plane Detection for AR Foundation tutorial.
16. Launch the app on your device. Move the device around to capture information about your environment. Notice how the feathered edges allow your detected planes to exist more naturally in the environment.
5. Conclusion
Feathered planes give a more professional appearance to your AR project, allowing a smoother transition between the virtual and physical worlds.