
Import CAD Models with the PiXYZ Unity Plugin
Tutorial
Beginner
+10XP
30m
(44)
Unity Technologies
In this tutorial we’ll introduce the PiXYZ Plugin for Unity, a tool used for importing CAD models into your Unity projects. You will learn how to:
- Setup your Unity Project with PiXYZ
- Import a CAD model using PiXYZ Plugi
- Import the downloaded CAD file into Unity, and optimize the file.
Languages available:
1. Why PiXYZ?
Engineers use CAD data to maintain accuracy and quality of their BIM models. As such, importing this data into a 3D engine becomes an essential step in the 3D rendering workflow, in order to maintain data accuracy.
However, using CAD data in real-time 3D engines has traditionally been a very difficult process. Not only do certain issues arise around importing (broken UV maps, unconnected CAD patches, and readable file formats) CAD files tend to be very data-dense as well. As such, we’re forced to simplify the model in order to render it in realtime.
PiXYZ streamlines this process, by providing the tools for Unity to import, optimize, visualize and publish CAD projects.
PiXYZ delivers a solution that makes creating real-time interactive and virtual experiences based on CAD data faster and easier than ever before.
In this tutorial we’ll introduce the PiXYZ Plugin for Unity, a tool used for importing CAD models into your Unity projects.
PiXYZ Plugin adds a menu option in the Unity editor that allows you to directly import CAD models into your project. The Plugin provides a set of dialog controls to scale, orient, repair (stitch), and tessellate your CAD model, and includes options to map UVs, control how design hierarchy is imported, and generate LODs.
In addition, the Plugin has a secret superpower – the ability to directly import CAD data into a Windows at runtime! Using the Plugin, you can publish a runtime executable from your project, and the end user can trigger the import of new CAD data.
This is especially valuable when working with constantly-changing CAD data, providing immediate update without the need to rebuild a project or create asset bundles.
What you will learn:
The key learning goal is to equip you with the ability to bring models into Unity using the PiXYZ Plugin. This means that by the end of this turorial you’ll be able to import a CAD model with the PiXYZ Plugin (v2018.1.2).
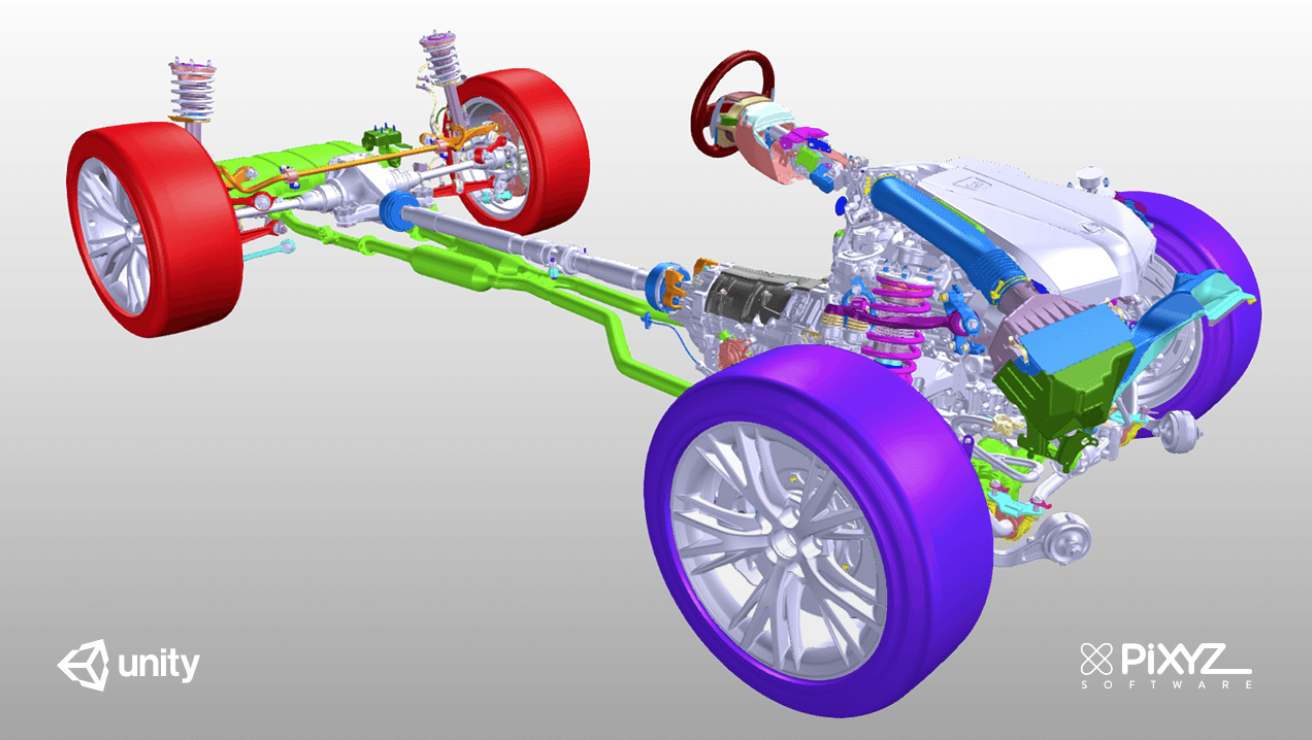
In the tutorial, you’ll import a CAD brake model into Unity and learn how to manage the import of a .CATIA model using the PiXYZ Plugin.
2. CAD data with Unity and PiXYZ
Time to learn the essentials needed to unlock your CAD data with Unity and PiXYZ. Use the PiXYZ tools to simplify and import CAD models into your Unity project.
PiXYZ Studio and PiXYZ Unity Plugin, allow the use of complicated engineering model formats in Unity, previously almost impossible to use. In the case of Automotives, that means full car CAD files of types such as .STEP, .JT, and .CATIA model files.
3. 1. Set up your Unity Project with PiXYZ Plugin
1. Download PiXYZ-DEMO-BRAKES-v2017 from the PiXYZ website so you can use the plugin to tesselate and then decimate your CAD model.
Activate a 7 day trial and configure the License manager
What is PiXYZ Software?
PiXYZ Software, namely Studio and Plugin for Unity, enables engineering models and accompanying data to be used in Unity real-time VR and AR.
The software moves through CAD nurb data, tessellating the object to make it readable in Unity, and then decimates the model for optimization.
It’s worth noting that PiXYZ products share is a high performance core that combines fast processing speed, the ability to handle massive assemblies, and the ability to use data from virtually any common design system. Whether you’re working with a complete automotive powertrain assembly in NX, a large architectural curtain wall in CATIA, or manufacturing equipment in Inventor, Unity with PiXYZ integrates seamlessly into your workflow.
For more information on the acceptable file types check the PiXYZ website.
For more information on PiXYZ vocabulary, review the Glossary.
What is PiXYZ Plugin?
PiXYZ Plugin for Unity is a plugin for Unity3D that allows to import and tessellate CAD files for your realtime applications, enabling the transformation of CAD data from industry-leading solutions (CATIA, NX, SolidWorks…) into lightweight, optimized meshes.
- The Product Tree (or hierarchy) preservation
- High quality tessellation through optimized presets
- Data correction to optimize the consistency of the 3D model
- Intuitive usage in Unity3D
- Runtime import compatibility for your Windows AR/VR/realtime applications
Unity3D can natively read .fbx, .dae, .3ds, .dxf and .obj files. And can import, through conversion, 3DS Max, Maya, Blender, Cinema4D, Modo, Lightwave and Cheetah23d files (more details here).
However native CAD files like CATIA (CATProduct, CATPart, 3DXML), SIEMENS/NX (JT, PLMXML), CREO, SolidWorks, IGES, STEP,… files cannot be easily imported in Unity3D.
What is tessellation?
Tessellation refers to the process of converting 3D shape data to polygonal data. Polygonal data is smaller, and easier to analyze for the 3D engine.
CAD models inherited from CAD software (CATIA, NX, SolidWorks, Alias, STEP…) are not tessellated. They contain exact parametric/mathematical surfaces (BREP, Nurbs… etc).
A CAD body (closed volume) or CAD surface (open shell surface) is composed of CAD faces (or patches).
To be displayed in a 3D application, these CAD faces need to be translated into meshes. A mesh is composed of multiple connected polygons, or triangles (1 polygon = 2 coplanar triangles), forming a mesh surface that is understandable by a GPU, to be rendered in a 3D application.
In the case of CAD, PiXYZ converts nurb data into polygonal mesh when importing a model. When creating a polygonal mesh out of a CAD model, PiXYZ PLUGIN uses several parameters to create a surface mesh:
Max SAG: The maximum distance between the geometry and the tessellation (also called "Chord error"). This parameter ensures that the mesh is similar enough to the original analytical surface (exact geometry).
A low value means that a very fine mesh is created. The distance values are expressed in millimeters.
Max Angle: The maximum allowed angle between normals of two adjacent polygons (on the same face). This provides more precision on small radius fillets.
Adjust the "Max angle" parameter to keep enough polygons in high curvature areas whose radius is lower than the "Max Sag" value: fillets and chamfers for example.
Max length: Used to control the length of a polygon (edge).
For a rendering usage, it is often not recommended to use the "Max Length" parameter. It increases the polygons count without significant improvement on the visual aspect. But in case of very long objects (a plane body, a train cabin…), this setting can avoid lighting artifacts caused by too long polygons.
What is decimation?
To optimize a tessellated model, PiXYZ Decimation algorithm is used to reduce the mesh polygon density by inteligently deleting vertices. It allows precise control, preventing smoothing artifacts and topological irregularities.
The algorithm uses a combination of the 3 following parameters to obtain the lightest model (in terms of polygon count) possible whilst keeping acceptable quality:
Surfacic tolerance: The maximum distance between vertices of the original model and resulting simplified surfaces.
Lineic tolerance: The maximum distance between lineic vertices of the original model and resulting simplified lines.
The "Lineic tolerance" is meant to preserve the boundaries of the original surface (where the edges are “sharp”).
Normal tolerance: The maximum angle between original normals and those interpolated on the simplified surface.
The "Normal tolerance" setting preserves the quality of how the light reacts on a surface/mesh. Combined with the "Surfacic tolerance" setting, it will act as a quality controller, keeping polygons where the surface curvature is important and preserving the visual quality of the model.
Step by Step
1. Navigate to the PiXYZ website and download the file titled [SAMPLE]-PiXYZ-DEMO-BRAKES-v2018
2. Visit the PiXYZ and download the plugin and activate a 7-day trial (for compatibility with Unity, download the appropriate version with matching years)
3. Import PiXYZ Plugin for Unity from the Assets > Import Package > Custom Package
4. Select the recently downloaded PiXYZ Unity Package in the Explorer and click on the Open button on PiXYZ4Unity-2018.1.2.6
5. You’ll need to properly setup your License Manager. Navigate to the PiXYZ dropdown menu (top of screen), and select “PiXYZ License Manager.” Login using the Online tab and entering your username / password. After you’ve done that you’ll get a list of your licenses to choose from. Choose your license trial version (which you’ll need to request from the PiXYZ website), and click Install.
4. 2. Import CAD Using PiXYZ Plugin
Use PiXYZ>Import CAD, select the unzipped file, select PiXYZ-Demo-Brakes.CATProduct (the brake model that you’ve downloaded), and adjust the scale of the model to .001. Once imported, navigate to the Game Window and check the Stats window to review the Tri Count and Verts metrics.
What is the Stats window?
In the Unity Editor, the Game View has a Stats button in the top right corner. The Stats overlay shows real-time rendering statistics, which are useful for optimizing performance.
Key indicators found in this window are:
Frames per Second (FPS) - amount of time taken to process and render one game frame
Batches - “batching” is where the engine attempts to combine the rendering of multiple objects into a chunk of memory in order to reduce CPU overhead due to resources switching. This is directly impacted by the number of Occurrences you leave in your model in PiXYZ Studio.
Tris - the number of triangles and vertices drawn
The Stats window is like an instrument panel in car. You have the speedometer, fuel level, check engine light, rpms etc. that inform you on the state of your vehicle. FPS, Batches, Tris inform you on the state of your Unity project. As you’ll learn sometimes only a single complicated object can be enough to throw off the state of your project.
What is Scale?
The scale of the imported model refers to the size of the Unity model relative to the actual size of the model. When importing a model, you set the Scale to help the object appropriately fit your scene.
What is Right-handed?
Use this setting to mirror model from a right-handed coordinate system to a left-handed one.
What is Z-up?
Use this setting to rotate a model from a coordinate system that has the y-axis pointing up to one that has the z-axis pointing up (Unity’s default coordinate system is Y-up)
What is Mesh Quality & LODs (Level of Detail)?
The Mesh Quality refers to the complexity of your object’s mesh, as it is converted from nurb data to poly data upon import. The higher the quality, the higher the level of detail of your object’s mesh.
However, as your scenes in Unity become larger and more complicated, your application’s performance declines. One of the optimization techniques used to manage this performance decline is the use of meshes with different levels of detail, dependent upon their distance to the camera. In essence, the closer your camera gets to these objects, the higher the quality.
Once the "Add LOD level" checkbox is enabled, the Group box is renamed "LODs Mesh quality". From that point, the user can add multiple LODs and define a Mesh Quality preset for each added LOD.
A first LOD (called LOD0) is automatically added, keeping the previously-defined Mesh Quality preset.
Adjust the visibility percentage for the current LOD and the culling. The percentage value represents the maximum visible proportion of a part/model when the camera is moving forward/backward before switching to the following LOD available, until disappearing (culling percentage).
In PiXYZ PLUGIN for Unity, the way a LOD is created is different from a native CAD model (exact geometry) to a tessellated model (mesh geometry). To simplify:
With a CAD model: LOD0 is created by PiXYZ through a tessellation, and next levels are reduced versions of LOD0 (decimation).
With a Mesh model: LOD levels are created by optimizing (decimating) the original mesh file, or LOD0. In this particular case of meshes, it is often better to use the Very High preset for LOD0, so that other LODs will be created from a sufficiently-defined mesh.
To learn more, visit Unity’s documentation about Level of Detail Groups.
What is Create UV?
Unity will automatically generate UVs for your model upon import. PiXYZ allows you to import the UV maps generated earlier in the workflow (by another software). However, you will need to generate UVs again if you would like to add or modify your object’s materials.
Caution: PiXYZ will override the existing UV set, do not use this setting if you wish to preserve the UVs embedded in the imported model (tessellated model).
What is Orient Faces Consistently?
Use this setting for PiXYZ to perform a unification of all triangles/faces orientation.
Caution: Do not use this setting if the imported model is a mesh (tessellated geometry) and is already correctly oriented.
What is Create Prefab?
By default, the plugin imports the CAD model (made of its hierarchy and GameObjects) directly in the scene. Use this setting to also create a Prefab out of the CAD model (also automatically imported it in the scene).
How do we access and use MetaData in our workflow?
The PiXYZ PLUGIN for Unity has the ability to import Metadata from CAD software, such as types, manufacturers, physical properties, ownership, timestamps, and more.
To import a CAD model with its metadata, you must enable Metadata in the import menu.
When a model is imported with the plugin with the Metadata option, nodes holding metadata information will be transposed in Unity with GameObjects with a Metadata component attached. This means that we can identify individual objects, and in turn perform actions on these objects based on their respective metadata.
Importing metadata unlocks another level of control over your CAD models, enabling you to perform actions over specific objects at once.
Common uses of metadata include disabling and enabling objects at particular times, changing a large group of objects’ materials or textures, adding Rigidbodies, and other component modifications at scale.
Note: Not all GameObjects imported with PiXYZ PLUGIN for Unity contain Metadata. Only nodes that have metadata in the original CAD file.
Step by Step
1. Use PiXYZ>Import CAD and then select the wheel model that you’ve downloaded
2. When prompted select the PiXYZ-DEMO-BRAKES.CATProduct. Then click Import.
3. For the best results with the PiXYZ plugin use the following settings. Each is visited in a dropdown below.
The model has been imported and processed following desired input settings, the resulting asset is immediately available in the hierarchy and visible in the scene view. The model Product Structure (or hierarchy) has been preserved from the original CAD file, each part within the hierarchy is a Game object
If you checked the "Create Prefab" setting, the model is also available in the Project assets as a prefab object
Explore: PiXYZ Toolbox
The Toolbox is an easy-to-access tool that enables the user to optimize and modify the object once it is imported.
A few features available:
- Add a child, collider, script, light, or rigidbody to the selected object
- Debug Log specific information, such as GameObject, Materials, and Mesh information.
- Filter objects by layer, material, name, position, property, or tag.
- Find (Get) objects in the hierarchy
- Modify the object by creating UV, optimize through decimation, flip normals (in the case of inaccurate data), merge objects, among others.
- And change certain object information by setting objects as static, enabled, as certain layers and materials, names, tags, among others.
You can access the Toolbox by right clicking on the object in the Scene Window, right clicking on a selected object in the Hierarchy, or selecting the Toolbox on the top nav bar.
Key Takeaways
You have now successfully imported a CAD object into the scene. Congratulations!
By completing this tutorial, you’re now able to:
1. Download and configure the PiXYZ plugin for Unity.
2. Import a CAD model for use in the project.