Importing 360 Video
Tutorial
Beginner
+10XP
10 mins
99
Unity Technologies

In this tutorial, you will learn how to import and set up a 360 video to be used as a Skybox.
Languages available:
1. Importing 360 Video
This tutorial has been verified using Unity 2019.4.12f1 LTS
360 and 180 videos are powerful tools used for a variety of project types. We can build interactive props, storylines, or goals, simulate locomotion, make branched narratives and alternative endings, layer in UI (such as menus and widgets) to make the video interactive, and visualize different environments with 360 surroundings. Most importantly, however, we can easily include real-world video shot in 360 degrees, and reduce Scene complexity in VR by including a pre-rendered backdrop video instead of real geometry.
When importing 360 or 180 degree videos into Unity, we import them as an Asset and then use a combination of a Video Player, Render Texture, and Skybox Material to apply the video to the surrounding Skybox.
The 360 or 180 video import and setup workflow revolves around pulling any supported video file (like an .mp4) containing either 360 or 180 equirectangular or Cubemap content into Unity (imported as an Asset), and playing it through a Video Player component. To display the video on the Skybox, the Render Texture’s dimensions must match that of the imported video.
2. How to import 360 Video into your project
1. You can start a project by importing your own 360 or 180 degree videos in either 2D (monoscopic) or 3D (stereoscopic) formats.
2. Drag your video into your Assets folder.
3. Select the Video Asset to view its import settings. Ensure Import Audio is toggled on.
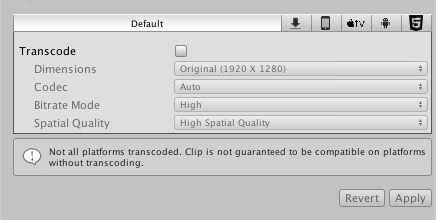
4. To modify any platform-specific options, toggle Transcode to enable modification of default options for each platform (Figure 01).

3. Applying video to the Skybox
1. Create a new Material and change its Shader to Skybox/Panoramic.
2. Create a new Render Texture, and add it as the new Spherical (HDR) Texture parameter on the Skybox Material.
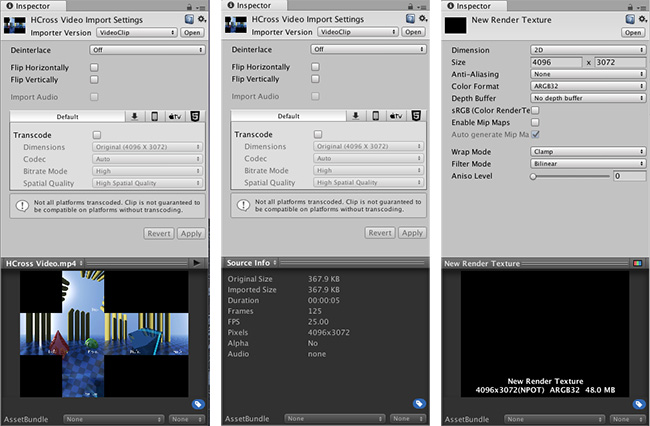
3. Set the Render Texture’s size to match your imported video exactly. To view the source information / dimensions of a video clip, navigate to the preview pane at the bottom of the Inspector window, click the name of the video clip in the top-left corner, and select Source Info (Figure 02).

4. Next, set your Render Texture’s Depth Buffer option to No Depth Buffer.
5. In the Hierarchy, add a new GameObject with a Video Player component.
6. Add the imported 360 video to the Video Player.
7. Change the Video Player’s Render Mode to Render Texture.
8. Add the new Render Texture as the Target Texture reference.
9. Open the Lighting Settings window (Window > Rendering > Lighting Settings).
10. Add the Skybox Material to the Skybox Reference, so we can play the video in the Skybox.
11. Enter Play Mode to try it out.
4. Conclusion
Great job! You have now imported a 360 Video and applied it to the Skybox. That’s all you need to build out a simple, non-interactive 360 Video Unity project. Continue on to learn about interactive playback menus, and including audio in your project.