
Importing assets with the PiXYZ Plugin
Tutorial
Beginner
+10XP
30m
(15)
Unity Technologies
In this tutorial, you will learn how to import assets with the PiXYZ Plugin, and how to work with the Import and Post-Processing Settings.
Languages available:
1. Importing Assets
This tutorial has been verified using Unity 2019 LTS and PiXYZ 2020.1.1.8
Once installed and activated, importing assets with PiXYZ Plugin is quick, easy, and flexible.
1. From the PiXYZ dropdown, select Import Model (Figure 01).
2. Navigate to your model, click to select, and click Open.
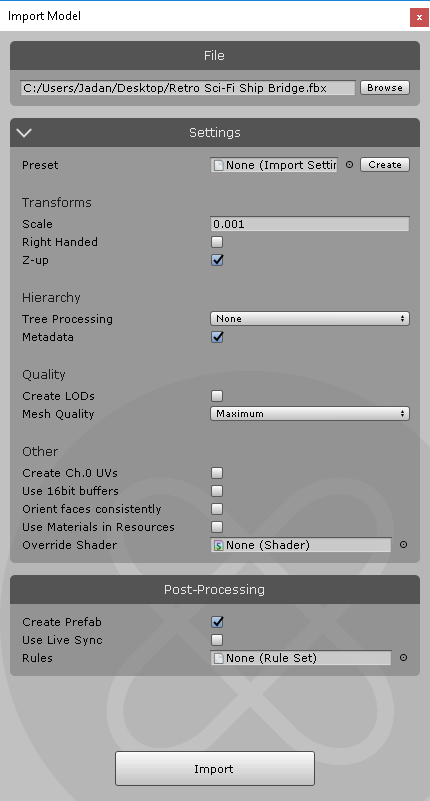
3. A window will appear showing the file you selected for import, import settings, and post-processing options (Figure 02).
4. After applying your chosen settings, explained below, click Import.
2. Import Settings
Dropping an Import Settings preset into the slot labeled Preset will change the settings accordingly. If you’d like to create a preset from the current settings, click Create in the upper right corner. The preset is created in the main Assets folder, and given a default name. To rename, click the preset to highlight it in the Project view. Right-click and select Rename. The rest of the Settings are:
Import
Import Metadata
This option will import the Metadata associated with the imported mesh.
Import Patch Boundaries
This option will import patch boundaries as lines.
Import Lines
This option will import lines such as laser markings.
Import Points
This will import points or free vertices. The points can be CAD position information or point cloud data.
Transforms
Scale
This is the universal scale factor applied to the imported model.
Left Handed
Enable this if the model was created in a Left-Handed environment.
Z-up
If checked, Z is used as the vertical axis for the imported model. Unchecked, Y is the vertical axis.
Merge Final Level
Merges objects on the last level of the hierarchy
Hierarchy
These options will simplify the hierarchy of your object. These include: Full, Cleanup Intermediary Nodes, Transfer All Under Root, Merge All and Merge by Material
Geometry
Use 16bit buffers
This limits the imported model to 65,536 vertices. Unchecked, the default 32-bit maximum of ~4.2 billion is used. This is useful when working on or targeting less powerful devices.
Re-orient Faces
If checked, PiXYZ will attempt to determine one universal correct orientation for all faces.
Singularize Symmetries
If true all GameObjects that are considered symmetries will have their transform baked in their mesh vertices
Repair Instances
If true PiXYZ will attempt to detect similar GameObjects and recreate instances of their meshes. This can be used to simplify a model that has similar parts that could be instanced to reduce drawcalls, GPU memory usage and file size.
Create LODs
If checked, PiXYZ will automatically create LOD Meshes from the imported model.
Mesh Quality
If checked, PiXYZ will reduce the imported model to the specified quality. This can be useful in preview situations, or when working on or targeting a less powerful machine.
Rendering
Create Ch.0 UVs
This will create UV information for the imported model. Do NOT check this if the imported model already has UV information, as it will be discarded.
Create UVs for Lightmapping
This will create a UV set for use with lightmaps
Use Materials in Resources
If checked, PiXYZ will use existing Materials for the imported model rather than those embedded in the model. The Materials’ names must match, and they must be in the root of a resource folder located somewhere in Assets.
Override Shader
If an Override Shader is specified, PiXYZ uses that in the Materials for the imported model. Otherwise, the standard Shader for the chosen Render Pipeline is used.
3. Post-Processing Settings
PiXYZ can create a Prefab from the imported model, and — using Live Sync — update the Prefab when changes are made to the imported model outside of Unity. Additionally, a RuleSet can be applied to the imported model. A RuleSet can be used to automatically stage or optimize your imported model. For more information about the Rule Engine and RuleSets, see the PiXYZ Plugin Manual.
4. Conclusion
The settings that work best for you and your project will vary based on many factors, from software used to target platform. Mastering them will greatly reduce the time and effort involved in importing assets with PiXYZ Plugin.