
Importing Revit content into Unity with Reflect
Tutorial
Beginner
+10XP
15 mins
(14)
Unity Technologies
A major benefit of using Reflect is the ability to collaborate with all members of your team on the same project through the use of the Reflect viewer. With the Reflect Prefab, this collaboration can occur directly in the Unity Editor as well. In this tutorial, you will learn how to take the content you create in Revit and import it into Unity using Reflect.
Languages available:
1. Importing Revit Content into Unity
This tutorial has been verified using Unity 2019 LTS and Unity Reflect Version 1.2.0.
A major benefit of using Reflect is the ability to collaborate with all members of your team on the same project through the use of the Reflect viewer. With the Reflect Prefab, this collaboration can occur directly in the Unity Editor as well. The Reflect Prefab creates the Unity Editor functionally the Reflect viewer itself: This means that the actual data is only being viewed, rather than hosted, in the Editor. This allows for rapid iteration, with changes in Revit being viewable in real-time through the Reflect viewer. For general use collaborative reviews, this is the perfect solution; however, for certain applications, such as visualizations, actual Mesh data needs to be brought from Revit into Unity to be built on top of. In this tutorial, you will import Revit assets into Unity for further project development. Before you begin, make sure you’ve already installed the Reflect plug-in for Revit.
1. Open Revit. If you have not yet used Reflect, when prompted, select Always Load to grant the Reflect plug-in permission to run in Revit.
2. Launch the project you wish to send to Unity and select a 3D view.
3. On the top tabs, you will see Unity to the far right. Click the Unity tab to get access to the Export and Sync features (Figure 01).
4. Click Start to launch the Reflect project window.
5. Inside of the Reflect project window, verify you are logged into your Unity account by clicking on the circular profile button on the upper right of the Reflect project window.
6. Select New Project and enter a name for the project, or select an existing project you wish to work with (Figure 02).
7. Once you’ve created a new project or selected a current one, select Sync. The project will now be ready to bring into Unity.
2. Adding the Reflect Prefab
Importing content from Revit will require the Reflect plug-in for Unity, which is available via the Package Manager.
Go to Window > Package Manager, and at the top of the window, click on the Advanced drop-down, and select Show preview packages (Figure 03).
1. Locate Unity Reflect in the list on the left and click the Install button on the lower right of the window. Reflect and several other required packages will be installed.
3. Import Reflect data into the Editor
1. Go to Window > Reflect>Reflect Window to open the Reflect project management window in the Unity Editor.
The Reflect window displays all the projects associated with the account. If you cannot see your project select “Refresh”
2. Select the project you wish to use and click Import.
Your Revit project will import into a Reflect folder automatically generated in the Assets folder. Nested inside will be a folder with the name of your Reflect project.
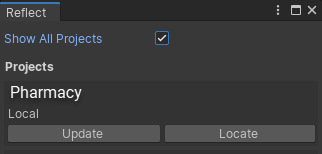
3. The best way to locate the Prefab is to go back to the import window. There will be two new buttons next to your project, Update and Locate. Clicking the Locate button will take you to the imported folder. The content is now ready for further production.
4. Updating imported Prefab
There may be some instances when further refinement will occur to the Revit model once production in Unity has begun. The Reflect plug-in for Unity can update the Mesh Prefab at any time to account for this.
1. First, make any changes that you want inside of Revit.
2. In Revit’s Unity tab, ensure that the Start button is still pressed. If it isn’t, click on it, and from the project list, select your current project and click the “Sync” button.
3. Return to Unity and click on Window > Reflect.
4. Click on the Update button listed with your associated project (Figure 05).
5. The Prefab will update to reflect the current changes made in Revit. This will continue to happen in real-time until the Stop button is pressed in Revit.
5. Conclusion
Now that you know how to update Reflect data inside of Unity, you can easily make changes in Revit and be able to update almost simultaneously in Unity without any hassles.