
Input Manager
Tutorial
Beginner
+10XP
5m
(298)
Unity Technologies
The Input Manager is a great way to set up various input devices. This may include keyboard input, mouse input, and game controller input. In this tutorial, you will learn about the Input Manager.
Languages available:
1. Using the Input Manager
This tutorial has been verified using Unity 2019.4.10f1 LTS
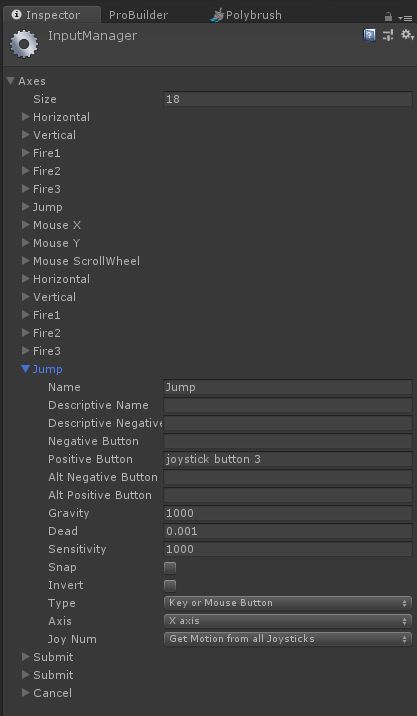
The Input Manager is a great way to set up various input devices. This may include keyboard input, mouse input, and game controller input. The Input Manager requires a name for the input mapping and a set of buttons or axes to associate them to (Figure 01). These names are strings (human-readable text variables in scripting) that are written into scripts to create what the inputs actually do to a GameObject in Unity. It is important to know that the string name in the Input Manager must match the string in the script exactly in capitalization and spelling. For more information about mapping Input, check out the Unity documentation.
- In the Menu Bar, click Edit > Project Settings > Input Manager
- In the Inspector, expand Axes
- Increase the Size parameter to make room for the new Input parameters
- Expand the new Input Axis
- Rename the Input Axis
- Enter the correct Positive button
- Set the Type to the necessary Input Type desired
- Change the Axis and Joy Num as necessary (Figure 01)
The following code shows how the “Jump” Input Axis is used.
using System.Collections;
using System.Collections.Generic;
using UnityEngine;

public class Jump : MonoBehaviour
{

    private bool isGrounded = false;

    // Update is called once per frame
    void Update ()
    {
        if (!isGrounded) //Only jump if the player is grounded
        {
            if (Input.GetButton("Jump")) //Jump is set up in the Input Manager
            {
                //Add jump code here
            }
        }
     }
}
2. Conclusion
You now know how to navigate to the Input Manager and use it to set up various input devices. In this tutorial, you learned how to create new inputs in the Input Manager as well as how to edit current ones. You also learned that each input has a “Name” and the names are strings in which you can use in your scripts to call that input and create events when the input is triggered.