
Intro to the Unity Physics Engine - 2019.3
Tutorial
Beginner
+10XP
30m
(406)
Unity Technologies
Physics enables objects to be controlled by (an approximation) of the forces which exist in the real world, such as gravity, velocity and acceleration. This tutorial will serve as an introduction to many of the key concepts
Languages available:
1. Intro to the Unity Physics Engine
This tutorial has been verified using Unity 2019.4.11f1 LTS - https://learn.unity.com/tutorial/intro-to-the-unity-physics-engine-2019-3
Physics enables objects to be controlled by (an approximation) of the forces which exist in the real world, such as gravity, velocity and acceleration. This tutorial will serve as an introduction to many of the key concepts
2. Colliders
Colliders enable Unity to register when GameObjects strike or intersect each other.
GameObjects must have a RigidBody component attached to them for collisions to occur.
Types of Colliders include: Box Collider, Capsule Collider, Mesh Collider, Sphere Collider, Terrain Collider, and Wheel Collider (Figure 01). Note that Mesh Colliders are computationally expensive. It is best to use a “cheaper” mesh for collisions if the displayed mesh is very detailed. With ProBuilder, simpler “proxy” meshes can be built to conform to the shape of more complex meshes.
Colliders are included in many of Unity’s 3D objects from the GameObject drop-down menu.
To enable the Unity Physics Engine for a separate or empty GameObject, select the Add Component button in the Inspector window, select Physics, and specify the type of Collider. Here, a Box Collider is selected (Figure 02).
3. Triggers
Triggers are enabled with the “Is Trigger” checkbox selected. This functions the same as a Collider, but disables Physics on the component, enabling objects to pass through it via a zone. Events can be called when objects enter or exit the Trigger (Figure 03).
One of the objects must have a Rigidbody component attached. As a best practice, objects that move within a Trigger should have this component.
4. Rigidbody
The Rigidbody Component (Figure 04), allows GameObjects to be affected by Physics properties, such as Gravity. It also includes properties for Mass, Velocity, and Drag (air resistance). Objects of larger mass are less affected by objects with lower mass and vice versa. Drag affects the dampening of velocity over time. Angular Drag affects angular velocity.
The Is Kinematic checkbox allows the Rigidbody to affect other objects via the Unity Physics Engine, but will not be affected themselves. For example, a Hand Avatar in a VR game can interact with objects via Physics, but we don’t want Physics to act on the hand.
The Is Kinematic checkbox also affects objects controlled by the Animation Engine. If the Is Kinematic checkbox is selected (on), the Animation Engine affects objects. If deselected (off), the Physics Engine retains control.
The Interpolate setting detects how collisions are checked. From the dropdown, select either Interpolate or Extrapolate.
- Interpolate: Smooth movements of objects are based on information from the previous frame in an animation’s timeline.
- Extrapolate: Smooth movements of objects are based on a guess of the next frame.
The Collision Detection dropdown menu sets the rate at which collisions are checked.
- Discrete: Default.
- Continuous: Fast objects that interact with static objects.
- Continuous Dynamic: Fast objects that interact with other fast objects.
- Continuous Speculative: Predictive collision checking.
The Constraints checkboxes for the X, Y, and Z axes, defines which axis objects should not move.
Additionally, we can redefine and change elements of the Unity Physics Engine values by selecting from the drop-down menu: Edit > Project Settings > Physics (Figure 05).
5. Scripting
The functions used for Colliders when interacting with other GameObjects include:
OnCollisionEnter (Collision)Called when a collision is registered. For example:
void OnCollisionEnter(Collision collision)
{
     if(collision.gameObject.CompareTag("Enemy")
     {
          //Hit the enemy
     }
}
OnCollisionStay (Collision)Called during a collision
OnCollisionExit (Collision)Called when a collision has stopped
In order to enable or disable gravity, you would use the useGravity function.
bool rigidBody.useGravityIn order to add a force in a particular direction, you would use the .AddForce() function.
*rigidBody.AddForce(Vector3)In order to add a rotational force around an axis, you would use the .AddTorque() function.
rigidBody.AddTorque(Vector3, Force Mode)Note, calling AddForce and AddTorque in FixedUpdate() will apply this force over time.
6. Force Modes
- Acceleration: Applies a force that increases at a constant rate.
- Force: Default, gradually applies a force accounting for its mass.
- Impulse: Applies an instant force instead of one that gradually builds up over time.
- VelocityChange: Applies instant forces in different directions. Disregards mass.
7. About Updates
- Update: Called once per frame.
- FixedUpdate: Called multiple times per frame. Most physics calculations will be called in FixedUpdate. The time between calculations is fixed, as the name implies.
8. Physics Materials
Controls how the frictions of surfaces interact with other surfaces. Custom Materials can be applied to Physics Colliders. You can specify the values for: Dynamic Friction, Static Friction, and Bounciness, as well as customize the parameters for: Friction Combine, and Bounce Combine. To create a custom Physics Material, select from the top menu drop-down: Assets > Create > Physic Material (Figure 06), and add it to your GameObject by selecting the newly created Physic Material in the Project window, and dragging it to the GameObject’s Material property in the Inspector.
9. Physics Joints
A Joint Component connects a Rigidbody to another Rigidbody or a fixed point in space. Joints
apply forces that move rigid bodies. Joint limits also can restrict certain movements. The types of Physics Joints include Character Joint, Configurable Joint, Fixed Joint, Hinge Joint, and Spring Joint (Figure 07).
Character Joint: Emulates a joint of a character, such as a hip or shoulder joint. This constrains Rrigidbody movement along all linear degrees of freedom, and enables all angular freedoms. Rigidbodies attached to a Character Joint orient around each axis and pivot from a shared origin.
Configurable Joint: Emulates any skeletal joint, such as the joints in a ragdoll. You can configure this joint to force and restrict Rigidbody movement in any degree of freedom.
Fixed Joint: Restricts the movement of a Rigidbody to follow the movement of the Rigidbody it is attached to. This is useful when you need Rigidbodies that easily break apart from each other, or you want to connect the movement of two Rigidbodies without parenting in a Transform hierarchy.
Hinge Joint: Attaches a Rigidbody to another Rigidbody or a point in space at a shared origin and allows the Rigidbodies to rotate around a specific axis from that origin. Useful for emulating doors and finger joints.
Spring Joint: Keeps Rigidbodies apart from each other but lets the distance between them stretch slightly. The spring acts like a piece of elastic that tries to pull the two anchor points together to the exact same position.
10. Raycasting
Casts a ray, or invisible connection between one Physics object and another.
Physics.Raycast (Vector3 Origin, Vector3 Direction)
Physics.Raycast (Vector3 Origin, Vector3 Direction, RaycastHit Info, float Distance, int Layermask)
OR
Physics.Raycast (Ray RayName, RaycastHit Info, float Distance, int Layermask)Parameters:
- origin: The starting point of the ray in world space.
- direction: The direction of the ray being cast in object space.
- maxDistance: The maximum distance the ray should check for collisions.
- layerMask: A layer mask that is used to selectively ignore Colliders when casting a ray.
- queryTriggerInteraction: Specifies whether this query should hit Triggers.
The colliding GameObject can be assigned a new or existing tag so a RaycastHit will be easier to identify (Figure 08).
In this example, a Raycast is casting a ray downward from the origin of whatever gameObject this script is attached to.
If the distance between the transform position and the floor (GameObject with the environment tag) is at deploymentHeight, call the function: DeployParachute().
It is a best practice when working with Raycasts to:
- Reduce the number of Raycasts in a scene.
- Not to call Raycasts inside of the FixedUpdate() or Update() functions.
- MeshColliders should be avoided.
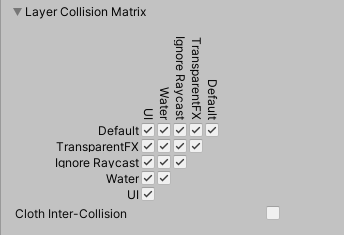
11. Layers and Collision Matrices
https://docs.unity3d.com/Manual/LayerBasedCollision.html
When the Default behavior is assigned to the GameObject’s Default Layer, it collides with everything. This can be inefficient. Instead, GameObjects can be assigned to a new Layer. The collision relationship between these Layers can be determined by the Collision Matrix.
To open the Physics Engine settings, select from the top menu drop-down:
Edit > Project Settings > Physics. At the bottom of the Project Settings window, is the Layer Collision Matrix (Figure 09).
12. Notes on Optimization
It is useful to explicitly define which objects collide with other objects, reducing the number of calculations and requiring less scripting.
Additionally, it is not advisable to apply certain Physics attributes onto Static Objects. For instance, you do not have to use transform on a static object. Doing so would expensively be worse for performance.
13. Conclusion
The Unity Physics Engine enables objects to approximate universal forces in nature such as gravity, velocity, acceleration, and friction. It allows for a wide range of objects with various physical properties to interact with other objects in a Scene dynamically.