
Introduction to AssetBundles - 2019.3
Tutorial
intermediate
+10XP
1h
(81)
Unity Technologies
An AssetBundle is content that is stored separately from a main game or application and loaded (or downloaded, in the case of mobile and online apps) at runtime. This helps minimize the impact on network and system resources by allowing customers to download and install only the parts they need. AssetBundles can also be used to update or add to content post-release. In this tutorial, we’ll explore AssetBundles and how they may best serve your project.
Languages available:
1. Introduction
If you are using Unity 2019.1 or below, click here.
An important note about Unity AssetBundles: The AssetBundle Manager is deprecated for Unity versions 2018.2 and higher.
The Unity Addressable Asset System provides an easier way to handle assets. This reduces asset management overhead by simplifying content pack creation and deployment.
An AssetBundle, nevertheless, is used for content that is stored separately from a main game or application and loaded (or downloaded, in the case of mobile and online apps) at runtime. This helps minimize the impact on network and system resources by allowing customers to download and install only the parts they need. For example, an automobile manufacturer with a VR app that allows customers to test drive a vehicle wouldn’t want to include every vehicle in an app: that would make it prohibitively large to download and install. An AssetBundle allows the customer to download only the vehicle he wants to test drive and at a quality level his platform can handle.
When working with existing AssetBundles in a project using the current Editor (2019.3), there are examples provided in this tutorial. If rather you are seeking to upgrade your existing project to take advantage of the Addressable Asset System, see the last section titled: “Upgrading to the Unity Addressables System,” later on in this tutorial.
2. Advantages of AssetBundles
AssetBundles can also be used to update or add to content post-release. This could include downloadable content, limited-time promotional events, or themed content such as holiday related models. AssetBundles also allow automatic updates and for content to be reused from project to project. For example, for connected apps, you might store your branding — such as logos or introductory videos — as an online AssetBundle. When your branding changes, you only need to update the relevant AssetBundle on your server. Apps that load those assets via a remote AssetBundle would automatically show the updated content rather than needing an update. Apps that download those graphics could be pre-programmed to check for changes in the online AssetBundle and update the locally stored bundle as needed.
3. Variants
An AssetBundle can be further divided into variants. A variant is an option or subclass of an AssetBundle that’s stored with it. If you have an AssetBundle named “Vehicles”, you might have one variant for cars and one for trucks. If you assign a bundled asset to a variant, you must assign all assets in that bundle to a variant. You cannot have an asset in bundlename.variant and another asset in bundlename (with no variant), where bundlename is the same for both.
To illustrate one use of variants to aid AssetBundle organization, let’s say we’re creating a tutorial level for a multi-console video game. The following table lists some of the graphics that might be used in the instructions to show the player which buttons to press. The Controller Layout is common to modern consoles, but the labeling on the action buttons varies by platform. In this example, the top action button performs the same action on both versions of the game, despite the labels being different. In our code, we’d load the Universal Variant for directional graphics, but load the variant containing the button or keyboard graphics for our specific system at runtime.
Contents of AssetBundle ControlImages
Or, let’s say we’re bundling images of keys to be used to train users on a cross-platform desktop application. ConsoleA and ConsoleB could become Windows and macOS, respectively, and TopActionButton might be something like CmdCtrl.
4. Creating an AssetBundle
Currently, the only way to build AssetBundles is via scripting. The following script adds this functionality to the Unity Editor. There are three parameters for BuildAssetBundles: the directory the AssetBundles should be created in, BuildAssetBundleOption (optional) for nonstandard build modes, and the build target of the AssetBundle.
1. Create a folder named Editor inside your Assets folder.
2. Inside Editor, create a new C# script named “CreateAssetBundles”.
3. Double-click CreateAssetBundles to open it in your script editor, and delete all contents.
4. Type the following:
using UnityEditor;
using UnityEngine;
using System.IO;

public class CreateAssetBundles
{
	[MenuItem("Assets/Build AssetBundles")]
	static void BuildAllAssetBundles()
	{
  	string assetBundleDirectory = "Assets/StreamingAssets";
  	if (!Directory.Exists(Application.streamingAssetsPath))
  	{
    	Directory.CreateDirectory(assetBundleDirectory);
  	}
  	BuildPipeline.BuildAssetBundles(assetBundleDirectory, BuildAssetBundleOptions.None, EditorUserBuildSettings.activeBuildTarget);
	}
}
5. CreateAssetBundles is complete. Save changes and close your script editor.
6. In the Unity Editor, you’ll find a new option appearing at the bottom of the top drop-down menu: Assets > Build AssetBundles (Figure 01).
Note that the Build process is not yet ready to perform, until we first set up the directory folders in your project, as specified in the script.
CreateAssetBundles Parameters
The specified AssetBundle directory must exist before the AssetBundle is built. The BuildAssetBundleOptions parameter is optional and defaults to None if nothing is specified. Some key options are:
Target Platform Options
Because the required format and handling of AssetBundles varies by platform, you must specify the target platform using one of the following options:
5. Creating a Simple AssetBundle
In order to test loading an AssetBundle, we’ll create an AssetBundle with a single GameObject. This workflow assumes you’ve completed the CreateAssetBundles script from earlier. Mirroring your AssetBundle organization in your project’s folder structure makes it easier to find and update your bundled assets as needed.
1. Drag a Sprite into your Assets folder.
2. In a new Scene, create a GameObject called “BundledSpriteObject”.
3. Attach a Sprite Renderer component and assign your Sprite from Step 1 (Figure 02).
4. Create a folder called “BundledAssets” inside the Assets folder
5. Create a folder called “StreamingAssets” inside the Assets folder, if your project doesn’t already have the StreamingAssets folder (also referenced in the previous CreateAssetBundles C# script example.)
6. Inside BundledAssets, create a folder called “testbundle”.
7. Drag BundledSpriteObject into testbundle and delete it from the Hierarchy.
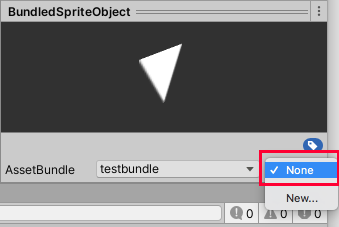
8. Select BundledSpriteObject in the Project view to open its Inspector. Pay special attention to the bottom section of the Inspector.
9. Select None next to AssetBundle to assign BundledSpriteObject to an AssetBundle (Figure 03).
10. Select New (Figure 04), type “testbundle”, and select Enter.
11. From the Assets drop-down, select Build AssetBundles.
12. To assign an asset to a Variant, follow steps 1-9, but select None in the lower-right corner rather than the bottom-center (Figure 05).
6. Loading a locally stored AssetBundle
Assuming no errors occurred, we are ready to load our AssetBundle from local storage. We are loading our bundle in Start() for ease of demonstration. In production, you’d load an AssetBundle only when necessary.
1. Set the Main Camera’s transform position to 0 in X and Y.
2. Create a new Empty GameObject, and rename it to “Loader”.
3. Create a new C# script called “BundledObjectLoader” and attach it to Loader.
4. Double-click BundledObjectLoader to open it in your script editor.
5. Delete the Update() method.
6. On line 4, type:
using System.IO;7. Beginning on line 8, type:
public string assetName = "BundledSpriteObject";
public string bundleName = "testbundle";
8. Inside the Start() method, beginning on line 14, type:
AssetBundle localAssetBundle = AssetBundle.LoadFromFile(Path.Combine(Application.streamingAssetsPath, bundleName));

if (localAssetBundle == null) {
	Debug.LogError(“Failed to load AssetBundle!”);
	return;
}

GameObject asset = localAssetBundle.LoadAsset<GameObject>(assetName);
Instantiate(asset);
localAssetBundle.Unload(false);
9. Save changes and return to the Unity Editor.
10. Press Play.
11. The object that you created earlier, (in this example of an arrow Sprite,) should load instantly. Note that the BundledSpriteObject loads as a Clone during runtime. You may or may not need to position your Camera closer to bring the object into view (Figure 06).
12. Exit Play Mode.
13. Remove the BundledObjectLoader component from Loader.
The command used to load the AssetBundle, AssetBundle.LoadFromFile, is synchronous. That means it doesn’t return until the command has completed its task (the AssetBundle is fully loaded). This is fine for a small bundle like our example of the arrow Sprite, but for something larger, as we might see in an automotive or architectural previsualization program or AAA video game, this would likely cause an unacceptable drop in frame-rate or responsiveness.
Loading Async
Another option is to use LoadFromFileAsync, which runs as a coroutine to allow a project to continue to run while the AssetBundle is loaded.
1. Create and attach a new C# script called “BundleLoaderAsync” to Loader.
2. Double-click BundleLoaderAsync to open in your script editor.
3. On line 4, type:
using System.IO;4. Delete the Update() method.
5. Change Start()’s return type from void to IEnumerator.
(On line 11, change ‘void’ to ‘IEnumerator’.)
(When you change a Start()’s return type to IEnumerator, it allows for running a coroutine. A coroutine is code that can be executed over multiple frames, and for allowing any lengthy initialization processes to complete.)
6. The following variables should be populated with the bundle and asset name respectively. Inside the class definition, type:
public string bundleName;
public string assetName;
7. In Start(), beginning on line 12, type:
AssetBundleCreateRequest asyncBundleRequest = AssetBundle.LoadFromFileAsync(Path.Combine(Application.streamingAssetsPath, bundleName));
yield return asyncBundleRequest;

AssetBundle localAssetBundle = asyncBundleRequest.assetBundle;

if (localAssetBundle == null) {
	Debug.LogError(“Failed to load AssetBundle!”);
	yield break;
}

AssetBundleRequest assetRequest = localAssetBundle.LoadAssetAsync<GameObject>(assetName);
yield return assetRequest;

GameObject prefab = assetRequest.asset as GameObject;
Instantiate(prefab);

localAssetBundle.Unload(false);
8. BundleLoaderAsync is complete. Save changes and return to the Unity Editor.
9. Press Play.
10. Again, as expected, the bundled object created earlier, (in this example of an arrow Sprite,) loads instantly as a clone during runtime.
11. Exit Play Mode and remove BundleLoaderAsync from Loader
Loading from Web
Downloading an AssetBundle from the web is very similar to loading it from local storage. For our purposes, the file is hosted on a local web server, inside a directory named “assetbundles”.
1. Create a C# script called “BundleWebLoader” and attach it to Loader.
2. Double-click BundleWebLoader to open in your script editor.
3. On line 4, type:
using System;4. Beginning on line 7, type:
public string bundleUrl = "http://localhost/assetbundles/testbundle";
public string assetName = "BundledSpriteObject";
5. On line 11, change the return type of Start() from void to IEnumerator.
6. Beginning on line 12, type:
using (WWW web = new WWW(bundleUrl))
{
	yield return web;
	AssetBundle remoteAssetBundle = web.assetBundle;
	if (remoteAssetBundle == null) {
		Debug.LogError(“Failed to download AssetBundle!”);
		yield break;
	}
	Instantiate(remoteAssetBundle.LoadAsset(assetName));
	remoteAssetBundle.Unload(false);
}
7. BundleWebLoader is complete. Save changes and return to the Unity Editor.
8. Press Play.
9. Barring any web connectivity issues, you should see the same result as in the previous two examples.
10. Exit Play Mode.
7. Upgrading to the Unity Addressable Asset System
In order to take advantage of the Unity Addressable Asset System, it may be a best practice to upgrade your project to incorporate the system, and update the file structures.
From the Window menu, select Package Manager, and install the Addressables package (Figure 07).
From the top drop-down menu, select: Window > Asset Management > Addressables (Figure 08).
Accept the conversion process by selecting Convert (Figure 09).
Complete the conversion process using the Analyze and Build tools provided in the Addressables window (Figure 10).
8. Conclusion
AssetBundles offer myriads of possibilities for developers, users, and players. You’re sure to come up with new ways to make them work for you and mastering them will allow you to offer a more efficient, versatile, and personal experience to your users.