Introduction to HDRP Lights
Tutorial
intermediate
+10XP
20 mins
163
Unity Technologies

Unity’s High Definition Render Pipeline (HDRP) Lighting allows you to enhance your project’s visual appeal with ease. It uses a hybrid of Deferred and Forward Rendering Paths along with Tile and Cluster Renderers that allow the lighting to scale better than if you’re just using Unity’s built-in Rendering. In this tutorial, you will learn about HDRP and using it to light scenes.
Languages available:
1. Introduction to High Definition Render Pipeline Lighting
This tutorial has been verified using Unity 2019 LTS
Unity’s High Definition Render Pipeline (HDRP) lighting allows you to enhance your project’s visual appeal with ease. It uses a hybrid of Deferred and Forward Rendering Paths along with Tile and Cluster Renderers that allow the lighting to scale better than if you’re just using Unity’s built-in Rendering. In this tutorial, we will go over the HDRP light types and briefly discuss the light components properties.

2. Lighting Improvements
HDRP comes with a new lighting architecture as it uses a hybrid of Deferred and Forward Rendering Paths along with Tile and Cluster Renderers. This combination means lighting scales better than if you’re using the built-in Unity Rendering. This new architecture is focused on performance while bringing a new level of quality and accuracy to your Scene.
HDRP comes with new light properties and a new light Editor that allows you to do things like fade the light, affect only diffuse or specular lighting, and use color temperature to set the lighting color. With HDRP, you can control the inner angles and shapes of Spot Lights. HDRP also supports colored cookies and allows the use of real-time area lights.
Note: HDRP removed the Built-in Unity ‘Gamma Mode’ and uses the precise ‘Linear Mode’.
3. HDRP Light Settings
With HDRP, the Light Component — which controls the shape, color, and intensity of the light and whether the light will cast shadows in your scene — comes with some more advanced settings.
To pull up the Light Component window:
1. Go to the GameObject dropdown and select Light > Point Light to add a new light to your Scene.
2. Ensure the new Point Light you created is selected.
3. Go to the Inspector Window and expand all the hidden fields (Figure 02).

As you can see, there are quite a few settings. We’ll break this down into bite-sized chunks, beginning with the Features Section (Figure 03).
4. General Section

Use this section to change the type of light being used, its mode, and Layer default.
- Type: The current type of light. The possible values are Spot, Directional, Point, Rectangle, and Tube.
- Mode: Specifies the light mode used to determine if and how the light will be baked. Possible values are Realtime, Mixed, and Baked.
5. Shape Section

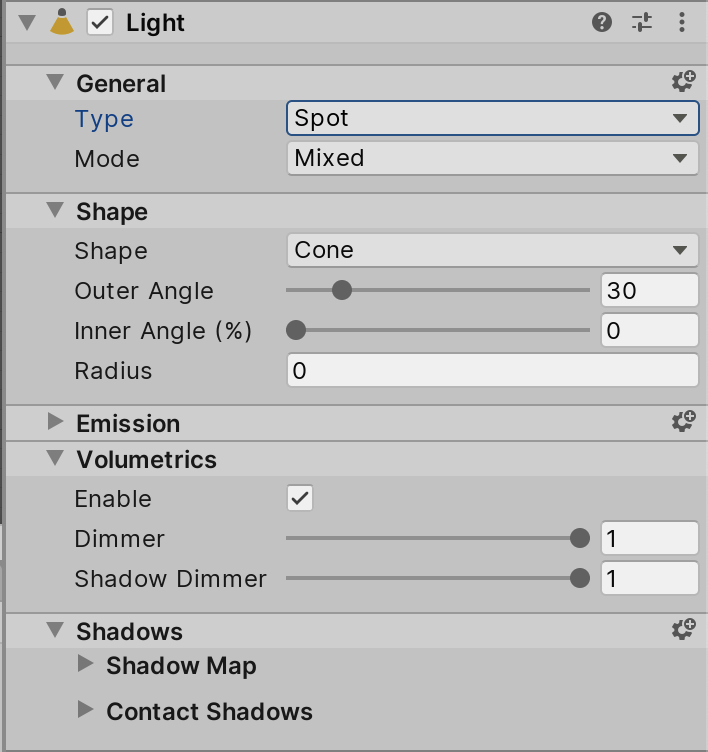
Use the Shape section to change the shape of your light (Figure 04).
- Shape: Use this dropdown to select the shape of your Light. You can choose from the following: Directional Lights, Point Lights, Rectangle, and Spot. When selecting a light, it’ll add/remove settings for each specific light type.
- Spot Lights include Shape, Outer Angle, Inner Angle (%), and Radius:
- Shape determines the shape of your Spot Light.
- Outer Angle determines the angle of the light in degrees.
- Inner Angle (%) determines where the attenuation between the inner cone and the outer cone starts. Higher values will cause the light at the edges of the Spot to fade out, while lower values will prevent the light from fading at the edges.
- Radius sets the radius of the light source. This effects the falloff of diffuse lighting, the spread of specular highlight, and the softness of raytraced shadows.
When the Spot Light Shape is set to Pyramid, the Inner Percent changes to Aspect Ratio, which adjusts the aspect ratio of the Pyramids light project, a value of 1 results in a square. If the Shape is set to Box, Inner Percent and Spot Angle are replaced with Size X and Size Y, which determines the size of the box or rectangular light being emitted.
- Directional Lights will not have Sun Highlight Disk, Sun Highlight Halo, and Max Smoothness.
- Sun Highlight Disk controls the size of the highlight of the sun disk which is the angle of the sun cone in degrees.
- Sun Highlight Halo controls the size of the halo around the highlight of the sun disk.
- Max Smoothness determines the aspect of the specular highlight in order to mimic an area light. This allows you to avoid very sharp specular highlights that don’t match the shape of the light source.
- Point Lights include the Max Smoothness property.
- Rectangular Lights will have Size X and Size Y properties.
- Tube Lights have Length which determines the length of the Line Light.
6. Volumetrics Section

Use this section to control if the light will use volumetrics and if so, adjust the density of it and how dim you want the shadows to be.
- Enable: When enabled, the light will use volumetrics.
- Dimmer: Controls the density of the scattered volumetric lighting.
- Shadow Dimmer: Dims the volumetric shadows that this light casts.
7. Shadows Section

Use the following settings to adjust the way shadows appear in your scene from the selected Light (Figure 06).
- Enable: Enables shadows on this light. Tube and Rectangular lights do not cast shadows, while Directional casts cascaded shadows which can be controlled in the scene settings.
- Update Mode: Specifies when HDRP updates the shadow map.
- Resolution: Use this to set the resolution of the shadows cast by this light. A higher resolution increases the fidelity of the shadows at the cost of GPU performance.
- Near Plane: Use this to set the distance from the light at which objects start casting shadows.
- Shadowmask Mode: Specifies the behavior of the Shadowmask when using mixed lighting. Distance Shadowmask uses HDRP real-time shadows to Shadow Distance and baked shadows after. Shadowmask is used for static shadow casters which are always baked.
8. Conclusion
The HDRP offers many new features and options that bring that AAA lighting to your projects. It’s important to understand how the light component is more robust than before to really bring that believable atmosphere to your scenes. HDRP also gives you much more control over light behavior within each Scene.