
Introduction to Preprocessing Commands
Tutorial
intermediate
+10XP
20m
(71)
Unity Technologies
In this tutorial, we’ll examine preprocessor commands, also known as preprocessor directives.
Languages available:
1. Preprocessor Commands
In this tutorial, we’ll examine preprocessor commands, also known as preprocessor directives. Unity uses preprocessor commands to include or exclude blocks of code, or set variables to different values, based on the platform on which the code is running. They can also be used to branch code using Scripting Define Symbols (either predefined in Player settings, or defined directly in code). They are called “preprocessor commands” because they are evaluated, and code branched, before the script is compiled and run. To see this in action, assuming your code editor has syntax coloring, try the following:
1. In Unity, create a new C# script called “CodeBranch”.
2. Double-click to open it in the script editor.
3. At the top of the script, type:
#define SOME_SYMBOL
#if SOME_SYMBOL
// Symbol is already defined.
#else
// Symbol is undefined.
#endif
4. Notice how “Symbol is already defined.” and “Symbol is undefined.” are two different colors.
5. Put a // before the first line, and the colors switch.
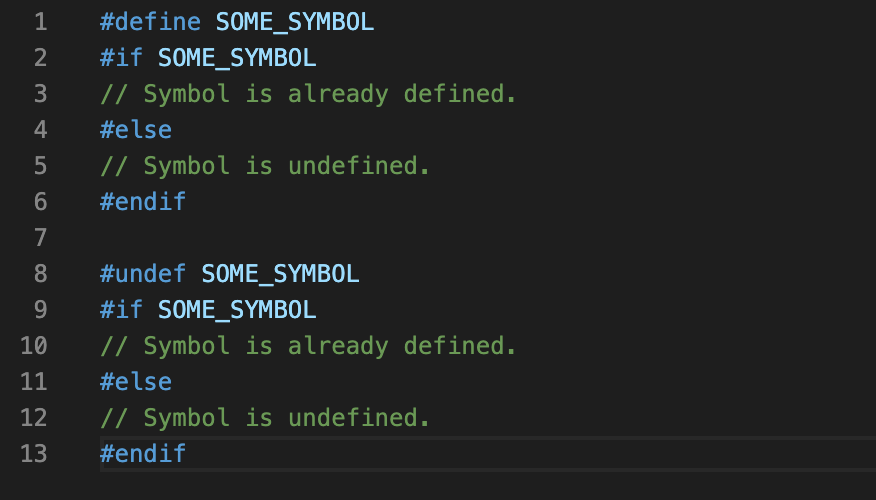
6. Copy and paste a duplicate of the block from step 3, changing #define SOME_SYMBOL to #undef SOME_SYMBOL, to get: (Figure 01).
7. Try commenting out #undef SOME_SYMBOL.
A bit later in this tutorial, we’ll do something similar that will be more obvious, as we’ll use one script to get three different results, depending on where we run our project.
2. Defining Variables using Preprocessor Commands
One instance where preprocessor commands are useful is when interfacing with a native plug-in. For most target platforms, you’d import the dynamically linked library file by name. On iOS, native plug-in code is imported directly as a source to be included with the Xcode project, so the plug-in name used is __Internal.
#if UNITY_IOS
    const string dll = "__Internal";
#else
    const string dll = "MyNativePlugin";
#endif

[DllImport(dll)]
private static extern void foo();3. Code Branching Dependent upon Define Symbols
Another case where preprocessor commands come into play is when branching code based on Define Symbols. Define Symbols are a simple way to create and use custom flags. Scripting Define Symbols are set in the Configuration section of Other Settings in Player Settings, but can also be defined (set) directly in code using the #define preprocessor command, or undefined (unset) using the #undef command. It’s important to note that any use of #define or #undef must happen before any other tokens (commands), including any using statements.
You might choose to define custom symbols if you want to combine conditions/platforms. For example, you might check if your game is being played on a console by putting the following at the top of your script:
#if UNITY_PS4 || UNITY_WII || UNITY_XBOXONE
#define USING_CONSOLE
#endif
Later in the script, you might check for USING_CONSOLE to use the branch of code that defines console controls versus keyboard controls. For example:
#if USING_CONSOLE
// load console controls
#else
// load mouse/keyboard controls
#endif4. Code Branching Dependent upon Platform
For our final example, we’ll create UI text that changes with the platform on which the code is run.
1. In the Unity Editor, from the GameObject drop-down, select UI > Text. Name it “PlatformText”.
2. Create an empty GameObject by selecting Create Empty from the GameObject drop-down. Name it “PlatformTextDisplayObject”.
3. Attach a new C# script to PlatformTextDisplayObject called “PlatformTextDisplay”.
4. Double-click the script in the Project view to open it in the Editor. Delete the Update() method, as we won’t be using it.
5. On line 4, type:
using UnityEngine.UI;6. Inside the class definition, type:
public Text text;7. Inside Start(), type:
 string platforminfo = "This project is running ";
#if UNITY_EDITOR
        platforminfo += "in the editor.";
#elif UNITY_WEBGL
        platforminfo += "on the web.";
#else
        platforminfo += "as a build.";
#endif

        text.text = platforminfo;
8. Save changes and return to the Unity Editor.
9. Drag the text you created in Step 1 into the slot labeled Text in PlatformTextDisplay’s inspector.
10. Enter Play Mode. You should see “This project is running in the editor” (Figure 02).
11. Exit Play Mode.
12. Build the project for WebGL (Figure 03), and any other platform (Figure 04). Run it in all platforms and notice how the text changes.
5. Conclusion
Though our exercises in this tutorial have been fairly abstract, we hope they have conveyed the utility of preprocessor commands.