
Introduction to Sprite Editor and Sheets
Tutorial
Beginner
+10XP
30m
(534)
Unity Technologies
The Sprite Editor is used to take images with multiple elements like a Sprite Atlas or Sheets and slice them into individual Sprites. This allows importing optimized Sprite Atlases and retrieving the individual elements as needed without the need to have a handful of separate Sprite assets. In this tutorial, you'll learn to create and edit Sprites and Sheets.
Languages available:
1. Introduction to Sprite Editor and Sheets
This tutorial has been verified using Unity 2019.4.11f1 LTS and 2D Sprite version 1.0.0
Unity’s Sprite Editor takes images with multiple elements, like a Sprite Atlas or Sheets, and slices them into individual Sprites. This allows you to import optimized Sprite Atlases and retrieve the individual elements without having to deal with a handful of separate Sprite Assets. The ability to use Sprite Sheets and Atlases reduces the number of physical Assets you’ll have to maintain in your project. So, instead of having 50 separate Sprite files, you have a single image with 50 Sprites added to it, yet you still maintain the use of each Sprite.
Sprites are 2D graphic objects within a 2D Unity project.
2. Installing the Sprite Editor
As of Unity 2019.2, the Sprite Editor is a separate package, available via the Package Manager.
1. To install the Sprite Editor, select Package Manager from the Window drop-down.
2. Click 2D Sprite in the left column, then click Install in the lower-right corner (Figure 01).
3. Creating Sprites
There are two ways to bring Sprites into your project:
1. Drag and drop your image into the Unity Project Assets folder, or
2. Go to Assets > Import New Asset to select the image you want.
Sprite Atlases are images containing a collection of non-sequential Sprites. Sprite Sheets are images containing sequential Sprites and are typically used for animation.
There are a couple of important things to be aware of when using the Sprite Editor. The Sprite Sheet should be sized by the power of 2 (512*512, 1024*512, 1024*1024, etc.) to avoid any issues with improperly sized sheets. Also, set Sprite Mode set to Multiple (Figure 01). If it’s set to Single, you won’t be able to use the Sprite Editor.
4. Import Settings
1. In the Project window, select the Sprite image you just imported into your project. This will bring up the Sprite Sheet Inspector.
2. Change some of the Import settings to see how each setting affects the image (Figure 02).
In the Sprite Sheet Inspector, there are several configurable settings:
- Texture Type: Leave this at Sprite (2D and UI).
- Sprite Mode: Multiple signifies the image has multiple Sprites. Single signifies the image contains a single Sprite.
- Pixels Per Unit: This setting determines how many pixels are in a Unity unit. Many retro games use 16x16 pixel Sprites for terrain blocks, meaning you’d set Pixels Per Unit to 16. For modern games, you’d want a higher setting so the art appears smoother.
- Mesh Type: This defines the type of Mesh generated for the Sprite. Tight results in a Mesh based on pixel alpha values. FullRect results in a Mesh equal to the user’s specified Sprite size.
- Extrude Edges: This determines the size of the transparent buffer created around the Sprite when using the Tight Mesh type.
- Generate Physics Shape: This automatically generates the shape for the Sprite’s Collider2D Mesh.
- Wrap Mode: This determines how the Sprite Sheet animation is interpreted.
- Filter Mode: This determines the Sprite’s filtering mode.
Sprite Sheets also have an Advanced configuration:
3. If it’s not already expanded, click the Advanced menu in the Import settings (Figure 03).
Note: If the Sprite Mode is set to Single, the Slice button will be inactive in the Sprite Editor.
5. Sprite Editor
1. Click Sprite Editor to open a new window (Figure 04).
Note: The Sprite Editor can also be opened via Windows > Sprite Editor. This window can be docked just like any other Unity window.
6. Creating Sprites in the Sprite Editor
1. In the Sprite Editor, click and drag a rectangular selection to create Sprites. You may adjust the selection by clicking to select the rectangle, and dragging the edges to adjust the size and border of the Sprite.
2. Try some of the following:
- Drag the selection to move it.
- Click and drag a corner or edge to resize it.
- Click and drag the pivot point Gizmo to adjust the Sprite’s pivot point.
There’s a small info window in the lower-right corner of the Sprite Editor window (Figure 05). It gives you the following options:
- Name: The name of the selected Sprite, which is inherited from the name of the image and the order in which it was sliced. The numbering starts at 0.
- Position: The position of the Sprite in the image in pixels. X and Y determine the starting point of the Sprite at the bottom left corner; W and H determine the width and height of the image from the starting point.
- Border: Creates a border inwards towards the center of the Sprite.
- Pivot: Allows you to select where the pivot is located. If you select Custom, you can give it a custom X and Y position.
7. Sprite Editor Tools
At the top of the Sprite Editor there are a number of tools (Figure 06):
From left to right:
- Sprite Editor: This drop-down toggles between four different tools. The Sprite Editor, Custom Outline, Custom Physics Shape, and Secondary Textures.
- Slice: Provides automatic slicing based on the Sprite’s nearest pixel (Figure 07). Slicing options include the type of slicing (Automatic, Grid By Cell Size, Grid By Cell Count), changing the pivot point, and the method for handling previous slices. Automatic is best used on a Sprite Atlas with mostly uneven or odd Sprite placement. Grid By Cell Size and Grid By Cell Count are both best used for Sprite Sheets where Sprite cells are the same size, laid out in a grid pattern.
- Trim: Automatically trims a selected slice to the smallest possible size based on the Sprite’s actual size.
- Revert: Reveres any changes.
- Apply: Applies any changes.
- RGB Alpha Toggle: Toggles the Sprite Editor display between the Sprite as it appears in-game, and its alpha channel. Click this and you’ll see your Sprite image turn black and white: Black represents the alpha and white shows the Sprite’s pixels (Figure 08).
- Zoom Scroll: Allows you to zoom in and out using the scroll bar.
There are three other tools to be aware of: Custom Outline, Custom Physics Shape, and Secondary Textures.
Select Edit Outline from the drop-down to bring up a new toolbar (Figure 09).
When this tool is selected, the Sprite Editor displays the outline and control points of the Sprite. You can use the control points to move and manipulate the outline. This is useful because the transparent areas in a Sprite can impact your project’s performance. This tool can also be used to fine-tune the bounds of a Sprite.
The Custom Outline tool can automatically generate a custom outline based on the opaque areas of the Sprite. You can then adjust the points manually or use the Snap button to snap it to the nearest pixel. Outline Tolerance controls how tightly the outline follows the Sprite’s Texture.
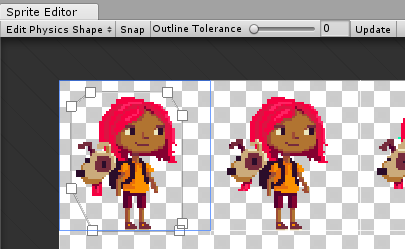
Next is the Custom Physics Shape tool (Figure 10).
This tool allows you to edit a Sprite’s Physics Shape, which defines the initial shape of the Sprite’s Collider 2D Mesh. This tool allows you to further refine the Physics Shape through the Collider’s component settings, which are the same as the Edit Outline Tool (Figure 09).
You can adjust the points manually or use the Snap button to snap it to the nearest pixel. Outline Tolerance controls how tightly the generated outline follows the Sprite Texture.
Next is the Secondary Textures Tool (Figure 11). A Sprite can contain extra Textures to be used by its Shader for effects such as normal mapping.
8. Conclusion
The Sprite Editor allows you to create Sprites from Sheets and Sprite Atlases, making it easier to adjust the Sprites and customize how they are accessed and used within your project.