
Introduction to the PiXYZ Plugin Toolbox
Tutorial
Beginner
+10XP
30m
(14)
Unity Technologies
The Toolbox is a collection of optimization and staging tools for the PiXYZ Plugin. The Toolbox comes with out of the box features giving the ability to optimize or stage your scene in a semi automatic way. In this tutorial you will learn about the PiXYZ Plugin Toolbox.
Languages available:
1. Introduction
This tutorial has been verified using Unity 2019 LTS and PiXYZ 2020.1.1.8
The Toolbox is a collection of optimization and staging tools that gives you the ability to perform multiple operations on selected GameObjects. The Toolbox allows you to make GameObject modifications after it’s been imported into the Unity Editor. And with the Create New Custom Action menu, you can create your own actions using C# scripting. The actions within the Toolbox are not restricted to PiXYZ-imported models and can be used on anything within the Scene.
2. Accessing the Toolbox
Within the Unity Editor, you can access the PiXYZ Toolbox in three ways:
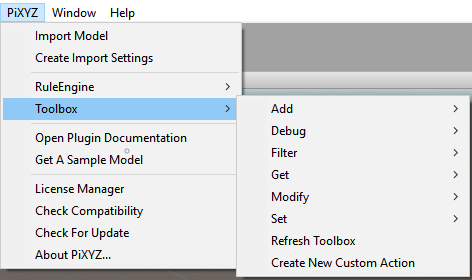
- In the PiXYZ menu, select Toolbox.
- You can also right-click in the Hierarchy or directly in the Scene view.
- You can also right-click on the GameObject in the Scene view.
3. Toolbox Functionality
The Toolbox offers a number of ways to modify and optimize selected GameObjects.
Note: It’s important to remember that Toolbox actions are permanent and cannot be undone. Also, the plugin won’t operate on selections larger than 1,000 GameObjects. If your selection is larger than 1,000 GameObjects, you need to use the Rule Engine instead of the Toolbox.
- Create Collider - Adds Colliders to GameObjects (if no collider is present).
- Decimate - Reduces the number of polygons on the Meshes.
- Merge - Merges GameObjects together. 'All Together' will merge all input objects into a single object. 'With Children' will merge each with all of its own children (recursively). By merging, you will lose additional components such as Metadatas.
- Explode - Explodes each GameObject in multiple GameObjects depending on its submesh count.
- Create UVs - This will create a new primary UV set. The size and the channel can be set in the menu. Caution: Pixyz will override the existing UV set.
- Create Uvs for Lightmaps- This option will create UVs on the UV2 channel for use with lightmapping. The resolution and padding can be set in the menu.
- Create Normals- Create new normals on the mesh.
- Flip Normals - Reverses the normals on the mesh.
- Replace By…- Replace selected Game Objects with another Game Object. You can replace objects by a Bounding Box or by another Game Object.
- Remove Hidden- This feature deletes Game Objects, Submeshes or Polygons not viewed from a sphere around the selection.
- Repair Mesh- This will repair an asset automatically by running several algorithms. This includes vertex welding, face orientation, and edge collapse.
- Retopologize- Creates a remeshed version of the given mesh, following input topology. It is very useful for collisions or LODs or reducing meshes for use in devices with lower graphics capabilities.
- Move Pivot- Moves the origin (pivot) to another point.
4. Extending the Toolbox
If Toolbox doesn’t offer what you need, you can implement your own Toolbox actions. These actions can be used in the Rule Engine. To make your own custom actions,
click PiXYZ > Toolbox > Create New Custom Action (Figure 08).
This will create a script in your project named “NewCustomActions.cs.” It will always be in the Assets > Plugins > PiXYZ > Editor folder.
When you’re finished with your new script, click PiXYZ > Toolbox > Refresh to refresh the Toolbox menu. (The Toolbox does not refresh automatically.) If this doesn’t show your new script, you can edit the file manually to include it.
5. Conclusion
The PiXYZ Toolbox helps with optimization and modifying GameObjects with ease. It’s flexible and extendable, as well, which makes it a great tool not only for working with imported PiXYZ assets, but any of your GameObjects within Unity.