
Introduction to the Post-Processing Stack
Tutorial
Beginner
+10XP
10m
(104)
Unity Technologies
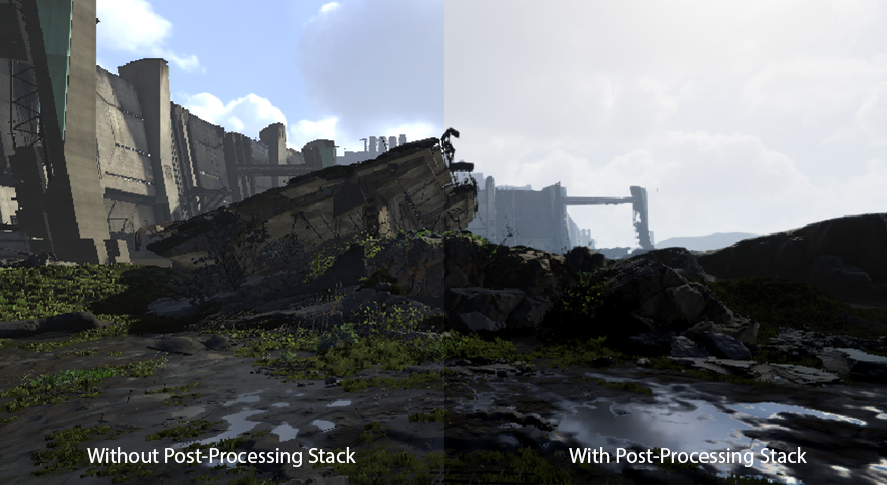
It’s useful to know the Post-Processing Stack, as it can really deliver amazing effects for your project. It’s applies effects after the main processing pipeline and enhances the overall look of a Scene. In this tutorial, you will learn about the Post-Pocessing Stack.
Languages available:
1. Introduction to the Post-Processing Stack
This tutorial has been verified using Unity 2019 LTS and Post-Processing 2.3.0
It’s useful to know the Post-Processing Stack, as it can really deliver amazing effects for your project. It applies effects after the main processing pipeline and enhances the overall look of a Scene (Figure 01).
Unity’s Post-Processing Stack is a comprehensive system of post-processing effects compiled into a single post-processing pipeline. Here are some of its advantages:
- Effects will always be configured in the correct order
- It renders multiple effects in a single pass rather than requiring a separate pass for each effect.
- All of the effects are grouped together in the UI for a better user experience.
Post-Processing Stack also includes a collection of monitors and debug views to help you set up effects correctly and debug any problems that may appear in the output.
2. Setting up the Post-Processing Stack
Let’s set up the Post-Processing Stack:
1. Go to Window > Package Manager (Figure 02).
2. Make sure in the top left dropdown you have All Packages selected.
3. Find the Post Processing on the left side and click install on the bottom right corner.
Once you’ve installed the Post-Processing Stack, you’ll want to set it up for optimal results. With this in mind, it’s recommended that you work in Linear Color Space with HDR enabled. Using the Deferred Rendering Path is also recommended, as it’s necessary for some effects, such as Screen Space Reflection.
Now, let’s set up the Post-Processing Stack in our Scene:
1. Add the Post-Processing Layer to the camera by clicking the Add Component button.
2. In the search field, type Post-Process Layer (Figure 03). Or, you can drag the script onto the camera or use the Component dropdown and select Rendering > Post Processing Layer.
Now that you have added the Post-Processing Layer to your Camera, it’s time to create a new profile.
3. Right-click in your Project window and select the Create dropdown. Then select Post-Processing Profile.
4. Select the new Profile you created. In the Inspector, you should see a button named Add Effect... (Figure 04).
5. Click the Add effect... button in order to add on whichever effects you would like.
Note: Post-Processing Profiles are Project Assets that can be shared easily between your Scenes and Cameras. They can even be shared between different Projects or on the Asset Store.
6. On the Post Processing Layer Component on the camera you will need to change the Layer from none to Everything for this demo in order to see any effects you added.
7. Now we need to add a post processing volume into the scene.
8. Create a new empty GameObject in the hierarchy.
9. Now go to the inspector of the GameObject you just created and click Add Component
10. Add in the Post Processing Volume.
11. Now click the Radial button or drag and drop your Post Processing Profile into the Post-Processing Volume Script we just added to our empty GameObject (Figure 08).
12. Now with that added, you can simply select the Profile you created in the Project and toggle the Post-Processing effects you wish to use.
3. Conclusion
Each effect has additional settings that allow you to fine-tune them. Here’s a quick overview of all the effects available within the Post-Processing Stack.
- Ambient Occlusion: This effect darkens creases and holes to provide ambient occlusion during run time, and helps create a believable scene.
- Screen Space Reflections: This is often used to simulate subtle reflections like wet floor surfaces or metal surfaces that would have some minor reflections.
- Depth of Field: This effect simulates a camera lens where the focus is on a certain point and everything outside of that point is blurred.
- Motion Blur: This effect blurs parts of the screen that are moving past the screen, such as reducing focus on the environment while you're focusing on the character running or a car driving by the scenery.
- Bloom: This effect reproduces the flare or feathering that occurs when a real-world camera focuses on a bright light.
- Color Grading: This effect alters and enhances color in the final image. It’s useful to establish moods or fix any incorrect coloring.
- Chromatic Aberration: This reproduces the effect of a camera lens failing to converge all colors to the same point, creating fringes of color along the boundaries that separate dark and bright parts of the image.
- Grain: This effect adds a film grain to the screen, simulating the presence of small particles in the metallic silver of film stock. It’s useful for time-period projects or to simulate old photographs.
- Vignette: This effect darkens and desaturates the edges of the camera, putting a bigger focus on the center of the image. It’s useful when you want to draw focus to the center of the screen.
- Lens Distortion: distorts the final rendered picture to simulate the shape of a real-world camera lens.
- Auto Exposure: effect dynamically adjusts the exposure of an image according to the range of brightness levels the image contains.
The Post-Processing Stack is a complex and powerful system that will help add those final touches to your project and help bring a visual punch to a Scene.