
Introduction to Unity Collaborate
Tutorial
Beginner
+5XP
50 mins
(415)
Unity Technologies
In this tutorial, we will demonstrate using version control with Unity Collaborate.
Languages available:
1. Overview
Unity Collaborate is a built-in version control system that takes advantage of the Unity Teams service. With Unity Collaborate, participants and team members can create and develop projects together with more efficiency and coordinated effort.
2. Get set up with Unity Collaborate
In order to get set up with Unity Collaborate, you will first need to get your project enabled. Let’s begin by ensuring that you are signed in with your Unity ID in the Unity Hub, and have your project open.
1. From the top menu dropdown, select: Window > Collaborate to open up the Collaborate window.
2. Select the Set Project ID button in the Collaborate window, to open up the Project Settings window. Alternatively, you can access the Project Settings by selecting from the top menu dropdown: Edit > Project Settings.
3. With the Project Settings window open, ensure that the Collaborate option is selected in the left column, under Services. Select the Select organization field to select your organization name associated with your Unity ID from the dropdown menu.
4. To establish an additional organization name associated with your Unity ID, open up the Unity ID page in a web browser, select Organizations from the left hand column, and then select the + Add new button.
5. Enter an Organization Name, select an Industry from the Select Industry dropdown menu, and then select the Create button.
6. Switch back to Unity, ensure that your intended Organization name is selected from the Organizations dropdown menu, and then select the Create project ID button to establish a unique project ID designator to your project.
7. A message will appear indicating that the Project was linked successfully. You may close the Project Settings window.
3. Publish a project
1. Select the Start Collab button in the Collaborate window.
2. Make sure that the checkbox is selected for All files, and then select the Publish button in the Collaborate window to upload your project to the Unity Cloud Storage.
The project upload time will display in a progress bar, and will vary depending on the size of your project. Note that for a personal license, storage space is limited to 1 GB in size. If your team size is greater than 3 members, or need to add more storage space, you will need to upgrade to Unity Teams Advanced, or purchase a Cloud Storage Pack.
4. Explore Unity Services
1. To explore Unity Services, access the Unity Dashboard in a web browser, and select the Explore button in the Collaborate panel.
2. A list of your enabled projects will appear in a popup window. Select the project you have just uploaded to inspect its Collaborate settings.
The project window will open, confirming that you have Unity Teams Access. Designated as a Unity Team owner, you are now able to add team members, administer and edit the project settings, and monitor your project’s usage.
3. After adding a team member to your project, they will be able to access the shared project as a Unity Team user. Direct your team collaborator to sign in to the Unity Hub, and they will see the shared project in the Projects tab. Have them select the download button to the right of the shared project, and select a local folder location. The project will then download from the cloud and save locally to their machine.
After downloading, the shared project will open up in the team member’s Unity Editor. Both team members are now set up and ready to collaborate.
5. Track and save changes to the shared project
To demonstrate how a shared project’s workflow may efficiently track and update changes, we will display the Unity Editor windows of both team collaborators as they work together on the same shared project.
In the first team member’s Unity Editor window, some Assets have been added to the Project folder, including 3D models of rocks and boulders. These GameObjects have been added to the Scene, and the Scene has been saved.
1. To publish all of the new Asset additions as well as the Scene changes, select the checkbox next to All in the Collaborate window, and then type a contextually meaningful note in the comment description field. Write a clear description to document any relevant information to your team, and then select the Publish button.
In the second team member’s Unity Editor window, the recent changes are indicated in the Collaborate window displaying their documented comments. The changes are not yet updated in the Scene. When viewing the History tab of the Collaborate window, the team member can see the documented changes.
2. To update the changes, select the Sync button to synchronize the project.
3. The team member can then select the Reload button to reload the Scene in their Unity Editor.
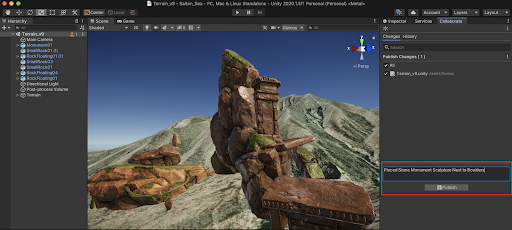
The team member is now able to see the updated changes occur in the Scene. They may continue to develop and collaborate. For example, here the team member has added a stone monument GameObject to the Scene, next to their teammate’s previously added boulders.
4. The team member can then save the Scene, write a comment, and select the Publish button to publish the changes.
5. Now within your Unity Editor, the recent changes are listed in the Collaborate window’s History tab. Select the Sync button to synchronize the project.
6. Select the Reload button to reload the Scene changes.
The updated changes are now reloaded into the Scene.
There may be a case where you might need to go back and restore the project to an earlier version. During development, supposing errors have occurred, or a decision has been made to go back to a previously saved version. You can do so in the Collaborate window.
7. In the Collaborate Window, select the change(s) button corresponding to the change you wish to restore from in the History tab. Here we will restore back to the Scene before any boulders or monument GameObjects have been added.
8. Select the Go back to button to restore to the previously shared project version.
9. Again, select the Reload button to reload to the previously saved Scene.
The previously saved project version is now restored.
6. Next steps
Now that you have successfully set up the Unity Collaborate version control system, you and your teammates will have the freedom to work both collaboratively and autonomously with your Unity projects. You will have the flexibility and control over managing complex projects, as well as having the additional tools to collaborate with your team.